Annotating Images
You can add nine types of annotations to documents saved in the .tif, .jpg, or .bmp format. These annotations are available via the Annotation toolbar or the Annotation menu. Be aware that when you select an annotation tool by clicking an Annotation toolbar button or choosing an Annotation menu command, your selection remains in effect until you deactivate it. For example, if you select the Attach-A-Note tool, each time you click your image, you get a new Attach-A-Note annotation. To deactivate an annotation tool, choose Select Annotations from the Annotation menu or click the Annotation Selection button (the arrow) on the Annotation toolbar. You can also deactivate an annotation tool by clicking the Drag button or the Select Image button (both on the Imaging toolbar), or by choosing their Edit-menu equivalents.

After you create an annotation, you can change its appearance by right-clicking it and choosing Properties from the shortcut menu. The options vary with the kind of annotation involved. With lines, for example, you can change thickness and color. With text, you can change font and color, and so on.
The annotation tools, and the Annotation toolbar buttons you use to select them, are described in Table 37-2.
Table 37-2. Imaging Annotation Tools
| Toolbar Icon | Description |
|---|---|
| The Freehand Line tool draws squiggly lines. Click where you want the line to begin, drag at will, and release the mouse button where you want the line to end. | |
| The Highlighter tool creates a filled rectangle that is, by default, yellow and transparent, providing a way to call attention to a particular block of text. Click where you want a corner of the rectangle to appear, drag to the opposite corner, and release the mouse button. You can highlight graphics as well as text, but the Highlighter tool affects the color of the underlying graphics. | |
| The Straight Line tool adds straight lines. Click at one end point, drag to the other, and release the mouse button. | |
| The Hollow Rectangle tool lets you create a box around an area of interest. Click where you want a corner to appear, drag to the opposite corner, and release the mouse button. | |
| The Filled Rectangle tool works like the Hollow Rectangle tool, except that the resulting box is filled with an opaque background color. (You can use the Properties command to make the background transparent—but if that's what you want, you might as well use the Highlighter tool instead.) | |
| The Text tool allows you to add any amount of text to your document. Click and type. | |
| The Attach-A-Note tool creates a solid rectangle on which you can type. Click and drag to make the rectangle, and then type. | |
| The Text From File tool allows you to import the textual contents of a specified file. Click the image, and then specify the file you want to import. | |
| The Rubber Stamp tool adds a preset text block or image, including (optionally) the current date or time. Supplied stamps include Approved, DRAFT, Received, and Rejected. You can create your own as well; see the following section. Click where you want the stamp to appear, and then choose the stamp you want to use from the Rubber Stamp Properties menu. |
TIP
If you don't like the annotation you just created, select it by clicking a portion of it, and press the Delete key.
Creating and Changing Rubber Stamps
Choosing Rubber Stamps from the Annotation menu generates the Rubber Stamp Properties dialog box, shown in Figure 37-7. Here you can select one of the supplied stamps or click the Create Text or Create Image button to make your own rubber stamp. To create a text stamp, click Create Text. In the ensuing dialog box, you can specify the name and content of the stamp. Click the Date or Time button to add the current date or time to the content of your stamp. (Imaging adds the codes %x and %X to generate the current date and time, respectively.) To create a graphic stamp, click the Create Image button. In the dialog box that appears next, specify the name of your stamp and the graphics file that you want to use as an image. If you don't know the name and path of your graphics file, click the Browse button to find it.
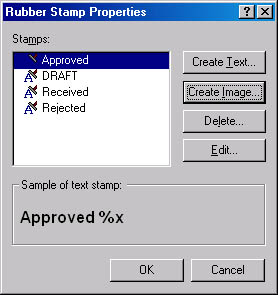
Figure 37-7. Open the Annotation menu and choose Rubber Stamps to display this dialog box.
Back in the Rubber Stamp Properties dialog box, select the stamp you want from the list, and then click OK. Imaging then applies the selected stamp wherever you click the image.
If you click the Rubber Stamp button on the Annotation toolbar rather than using the Annotation menu, Imaging bypasses the Rubber Stamp Properties dialog box. Instead, you get a pop-up menu of predefined stamps. (You can't create new stamps using this method.) Choose a rubber stamp from the menu, and then click the image to apply the stamp.
NOTE
Rubber stamps that include the date and time use the short date style and the time style from the Regional Options dialog box. Visit Control Panel if you want to change these styles.
Working with Annotations
Annotations live initially in a separate layer of your document. Here they can be manipulated at will. You can copy and paste them, modify their properties, or delete them. To perform any of these actions with an annotation, first choose Select Annotations from the Annotation menu, or click the Annotation Selection tool on the Annotation toolbar or the Imaging toolbar. Then click the annotation you want to manipulate. (To select more than one annotation, hold down the Ctrl key as you click each one, or drag your mouse across the set of annotations you want to select.) To change an annotation's properties, right-click and choose Properties from the shortcut menu. To cut, copy, or clear (delete), choose from the shortcut menu or the Edit menu.
Once you have annotated your document to your satisfaction, you can use the Annotation menu's Make Annotations Permanent command to merge the annotation layer with the rest of your document. After you do that, you will not be able to manipulate the annotations.
EAN: 2147483647
Pages: 317
- Assessing Business-IT Alignment Maturity
- A View on Knowledge Management: Utilizing a Balanced Scorecard Methodology for Analyzing Knowledge Metrics
- Measuring ROI in E-Commerce Applications: Analysis to Action
- Technical Issues Related to IT Governance Tactics: Product Metrics, Measurements and Process Control
- Governance in IT Outsourcing Partnerships