Using Whiteboard
Whiteboard, shown in Figure 21-11, is a drawing program that functions superficially like Microsoft Paint, except that it's designed for sharing drawings, diagrams, screen shots, and other images with members of a NetMeeting conference. Anything you create in the Whiteboard window is visible to all other parties in the conversation, and any participant can modify the Whiteboard contents at any time. To run Whiteboard, click the Whiteboard button at the bottom of the NetMeeting window, press Ctrl+W, or choose Whiteboard from the Tools menu.
TIP
The Whiteboard (1.0 - 2.x) command on the NetMeeting Tools menu allows you to share a whiteboard with people using NetMeeting versions 1 through 2.11.
Like Paint, Whiteboard includes editing and line-width tools displayed to the left of the drawing window, and a color palette displayed below. You can enlarge the available drawing space by hiding the toolbar. (Choose Tool Bar from the View menu.) With the toolbar removed, you can use commands on the Tools menu to switch between editing tools and use the Tools menu's Line Width command to change line width. Here's an overview of the available tools.
SEE ALSO
For information about Paint, see Chapter 34, "Drawing With Paint."

Use the Selector tool when you want to move, cut, copy, or recolor part of a drawing. Click the Selector tool, and then click anywhere on the object you want to manipulate. To select more than one object, drag a rectangle over the group of objects you want to manipulate.
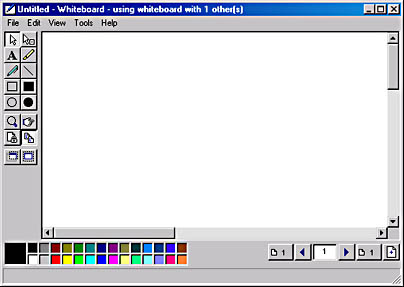
Figure 21-11. Whiteboard is a drawing program that lets you share images with other users in a NetMeeting conversation.
![]()
The Eraser tool works exactly like the Selector tool except that it deletes what you select. Click an object once, and the object is gone. Fortunately, although Whiteboard has no Undo command, its Edit menu does have an Undelete command. Repair thereto if you zap the wrong object. After you have deleted something, the Undelete command stays active until you use it, even if you subsequently add new objects to your drawing. However, only the last deletion can be restored.
TIP
As an alternative to using the Eraser tool, you can select an object and press the Delete key.
![]()
The Text tool lets you add letters and words. Click the tool, and then click once wherever you want the text to go. Whiteboard displays a small rectangle for your text and expands the rectangle as you type. Words do not wrap. To begin a new line, press Enter. Whiteboard uses 8-point MS Sans Serif Regular in black as its default font. To change, choose Font from the Options menu or click a color in the color palette. Note that font and color changes always affect everything in the text rectangle. To emphasize part of your text, use the Highlighter tool.

The Highlighter tool works just like the Pen tool, except that, if you choose an appropriate color, it creates transparent lines. Thus, for example, you can use yellow highlighting to emphasize particular words in a text object without obliterating the highlighted text. Note, however, that highlighting works best with light colors. You might want to experiment with highlighting colors before you use them in a presentation with your colleagues—particularly because Whiteboard lacks an Undo command.
![]()
The Pen tool lets you add freehand elements to your drawing. Click the tool, click the line width and color you desire, click a starting point in the drawing window, and hold down the mouse button while you move the mouse.
![]()
The Line tool creates straight lines in the current width and color. Note that Whiteboard's Line tool, unlike Paint's, doesn't constrain lines to particular angles when you hold down the Shift key. If you want perfect diagonals, horizontals, or verticals, you can do your work in Paint and then paste it into Whiteboard.

The Unfilled Rectangle tool creates a rectangle in the current line width and color. Note that Whiteboard lacks Paint's ability to constrain rectangles into squares. If a perfect square is what you need, it's best to create it in Paint and paste it into Whiteboard.

The Filled Rectangle tool creates a solid rectangle in the current color. Note that Whiteboard has no counterpart to Paint's Fill With Color tool. If you want a rectangle filled with one color and outlined with another, use Paint and paste into Whiteboard.

The Unfilled Ellipse tool creates an ellipse in the current line width and color. If you need a perfect circle, use Paint and paste.
![]()
The Filled Ellipse tool creates a solid ellipse in the current color.
![]()
Clicking the Zoom tool enlarges your drawing. Clicking again returns it to normal size. If you're not displaying the toolbar, you can choose Zoom from the View menu.

Clicking the Remote Pointer tool displays a hand with outstretched index finger. You can move the hand to draw attention to a particular part of your drawing. Click the tool a second time to make the hand disappear. Each NetMeeting participant has his or her own remote pointer that others can see but not move.

Click the Lock Contents tool to prevent others from making changes to the contents of the whiteboard. When the whiteboard is locked, click the Unlock Contents tool so other users can make changes to the whiteboard.

You can use the Synchronize tool to view a whiteboard page privately. (Ordinarily, when someone switches to a different page, everyone's whiteboard changes so that everyone in the meeting is, well, on the same page.) Click Unsynchronize and move to a different page, and only your whiteboard changes. When you click Synchronize, everyone's whiteboard switches to the page you're viewing.
![]()
The Select Area tool lets you paste a selected portion of any window into your drawing, making it easy to show the state of some program or document to your conference-mates. When you click the tool, Whiteboard displays a message telling you to select an area on the screen. Then it gets out of the way and lets you drag the area you want to paste. The area you select is pasted into the upper left corner of the whiteboard. Drag it to place it where you want it.

The Select Window tool works just like the Select Area tool except that it lets you paste an entire window into your drawing. When you click the tool, Whiteboard displays a message saying that the next window you click will be pasted into your drawing. Then it gets out of the way and lets you click the window you want to paste. Note that what you get is the client area of the window you click. If you click in a Microsoft Word window, for example, you get the visible part of whatever Word document you're working in, along with Word's ruler (if displayed) and toolbar. You don't get the Word menu bar or title bar. Note also that if the window you click is displaying two or more document windows, you get only the active document window. After you paste your window, the window becomes a selected object. You can drag to reposition it.
Other Whiteboard Features
Whiteboard is object-oriented rather than pixel-oriented (as Paint is). When you create one object on top of another, they remain distinct objects. You can change the z (stacking) order of objects that lie atop one another by choosing Send To Back or Bring To Front from the Edit menu.

Whiteboard lets you create multipage documents. To insert a new page after the current page, click the Insert New Page button at the lower right corner of the Whiteboard window or choose Insert Page from the Edit menu. To move between pages, click the controls next to the Insert New Page button—or press Ctrl+Page Up or Ctrl+Page Down.
To save or print the current Whiteboard document, choose commands from the File menu. When you print, the Print dialog box lets you specify whether you want all pages or a selected page range.
EAN: 2147483647
Pages: 317