Getting Around the World Wide Web
Internet Explorer offers several ways to navigate the World Wide Web. You can
- Click a link to go to a page
- Enter an Internet address to go to a specific page
- Use the Forward and Back commands to revisit previously viewed pages
- Go farther back in your Web-browsing history using the History bar
- Return to a favorite page by selecting it from the Favorites menu
- Use a search provider to find a page of interest
Using Links to Get to Other Pages
The World Wide Web works much like the HTML-based Windows Help system. In Help, you can click any word that is underlined or highlighted to get more information. The Web works the same way; on the Web these underlined items are called links.
Shortcut Keys for Web PagesYou can use the following shortcut keys as you work with Web pages in Internet Explorer:
Shortcut Key Action Tab Selects the next link Shift+Tab Selects the previous link Enter Activates the selected link Shift+F10 Displays the shortcut menu for the current link Ctrl+Tab Cycles between frames (independent areas within a Web page)
Alt+Left arrow
or BackspaceReturns to the previous page Alt+Right arrow Moves to the next page Esc Stops display of the current page F5 Refreshes display of the current page Alt+Home Displays your home page Ctrl+E Opens and closes the Search bar Ctrl+I Opens and closes the Favorites bar Ctrl+H Opens and closes the History bar Ctrl+O Opens a document or Web page Ctrl+N Opens a new window Ctrl+S Saves the current page as a file Ctrl+F Finds text in the current page Ctrl+P Prints the current page F11 Switches between Full Screen and regular views
Each page on the Web can have an unlimited number of links to other pages. You can identify a link by moving the mouse pointer over a text or graphic item on a page. If the pointer icon changes to a hand when you pass over the item, then the item is a link. Notice also that the status bar displays information about the link. (See Figure 18-1.)
To use a link, all you have to do is click it. When you do this, Internet Explorer takes you to the Web page to which the link points.
Once you click a link and go to its linked page, Internet Explorer remembers that you used that link. To let you know that you've already used a link, Internet Explorer changes the color of the text for that link.
SEE ALSO
For information about setting the colors for links, see "Selecting Colors."
Going to a Specific Web Page
If you know the address (that is, the URL) of the Web page you want, Internet Explorer's Address bar provides an easy way to get there. The Address bar always displays the address of the current Web page. However, you can also type the address of the Web page you want and press Enter, and Internet Explorer will take you there. To enter an address:
- Press Alt+D or click the Address bar's text box to highlight the text currently in the box.
- Type the address for the page you want to go to. The address should look something like this:
- Press Enter or click the Go button located at the right side of the Address bar.
http://www.microsoft.com/
Internet Explorer finds the page that you want. (It might take a few seconds for the Web page to respond to Internet Explorer's request for information.)
Address Bar Shortcut KeysYou can use the following shortcut keys as you work in the Address bar:
Shortcut Key Action Alt+D Selects all text in the Address bar F4 Displays a list of previously entered addresses Ctrl+Left arrow Moves the insertion point left to previous period or slash Ctrl+Right arrow Moves the insertion point right to next period or slash Ctrl+Enter Inserts www. at beginning and .com at end of Address bar text
TIP
Alternatives to the Address BarIf the Address bar isn't visible, you can open the File menu and choose Open. The Open dialog box that appears contains a text box where you can type the address. You have other alternatives as well: you can enter an address into the Address bar of any Windows Explorer window, into the Address toolbar that you can place on the desktop, or into the Run dialog box that appears when you choose Run from the Start menu.
TIP
Reentering Addresses You've Typed BeforeEach of the address-entry boxes contains a list of its previous entries. You can click the downward-pointing arrow at the right end of the Address box to display the list. (Note, however, that each address-entry box—the Address bar and Open dialog box in Internet Explorer, the Address toolbar on the desktop, and the Run dialog box—maintains its own history of entries.)
![]()
Using AutoComplete and Other Keystroke Savers
When you start typing an address, Internet Explorer attempts to complete it by displaying a list with any similar addresses that you've previously entered. If the address you want is in the list, press the Down arrow key repeatedly until the address is highlighted, and then press Enter. (Alternatively, you can click the list item you want.) As you continue to type, Internet Explorer's AutoComplete feature narrows the list to only those entries that match what you've typed so far.
![]()
NOTE
AutoComplete also helps with Web-based forms. On a page that asks for your name and address, for example, as you begin typing into each text box, AutoComplete displays a list of similar entries you've made before.
SEE ALSO
For more information about AutoComplete, see "Setting AutoComplete Options."
Internet Explorer can eliminate keystrokes in other ways too:
- For most Internet addresses, Internet Explorer can identify the correct protocol automatically. Therefore, you can shorten your typing for these addresses by omitting the protocol—the part of the address up to and including the two slashes, such as http:// or ftp://. For example, to enter the sample address in step 2 of section "Going to a Specific Web Page", you could type just www.microsoft.com.
- Pressing Ctrl+Enter adds www. to the beginning and .com to the end of the text you type into the Address bar. So the easiest way to get to http://www.microsoft.com/ is to type only microsoft and press Ctrl+Enter.
The Anatomy of an AddressInternet addresses can be cryptic. But there is logic to their structure, and understanding the logic can help you to make reasonable guesses about a company's address or about what you'll find at a particular address.
The first part of an address is the protocol (such as http or ftp), which is followed by a colon and two slashes. The part of the address between the two slashes after the protocol name and the next slash is the domain name. Domain names are typically made of two or three words separated by periods. If you read a domain name from right to left, each word more specifically identifies the site. You begin at the right with the top-level domain, a designation such as .com (for a commercial site), .edu (educational institution), .gov (government), or .org (organization). The next word, the second-level domain name, typically identifies the name of the organization, such as microsoft. The leftmost part tells you a little about the organization's site. For example, a domain name that begins with www indicates that the address is for a World Wide Web site (but not all World Wide Web sites start with www).
By remembering this right-to-left order of importance, you'll be able to remember, for example, that The Microsoft Network's investment advice can be found at moneycentral.msn.com, not msn.moneycentral.com.
Using Back and Forward
Internet Explorer keeps a list of the pages you've already viewed. The Back and Forward commands—or their toolbar equivalents, shown in Table 18-1—provide a simple way to move through that list so that you can easily return to places you have already seen. Try out the commands with this simple example:
- On your home page, click any link to move to a new Web page.
- When the new page appears, click the Back button on the Standard Buttons toolbar or choose the Back command from the Go To submenu on the View menu to move back to your home page.
- Click the Forward button or use the Forward command on the Go To menu. You'll move forward to the page you visited in step 1.
Notice that the Forward toolbar button is now active.
TIP
Retrace Your StepsYou can easily move two or three pages at a time by clicking the small arrow at the right edge of the Back or Forward button. Doing so displays a list of the last several pages in the back/forward list. Choose a page from this list to jump directly to that page. (You can also right-click the Back or Forward button to open its list.)
You can also return to a recently visited site by choosing it from the Go To submenu of the View menu.
Revisiting the Past with History
The Back button provides a simple way to retrace your steps, but it only remembers where you've been during the current session. To return to a site you visited in a previous session or to a site that's many steps back from your current location, you'll want to use Internet Explorer's History feature.
To review your browsing history, display the History bar by clicking the History button (shown in Table 18-1). A pane on the left side of the Internet Explorer window shows a list of pages you've visited, sorted by date and then by site. Figure 18-3, below, shows an example of the History bar in its default view, By Date.
Returning to Previously Viewed Sites
The top of the History bar hierarchy lists the beginning date of the past few weeks and each day in the current week. When you click a date or day, the History bar shows the sites, or domains, that you visited during that week or day, sorted alphabetically. (Internet Explorer drops the www. that precedes most names before sorting and displaying the list.) Clicking a site name displays a list of all the pages you visited at that site. To revisit a page that's listed on the History bar, click its title.
TIP
To determine precisely when you last visited a page that's listed on the History bar, right-click the page title and choose Properties. Because some pages have similar (or identical) titles, you can sometimes use the time to determine which page you want to revisit.
Figure 18-3. The History bar makes it easy to return to pages you've already visited.
![]()
Sorting the History List
The History bar's default view organizes the historical list by the date you visited each site. Clicking the View button at the top of the History bar displays a menu with four options:
- By Date. Displays a hierarchy of dates, sites, and pages (the default view).
- By Site. Displays a two-level hierarchy: sites and pages.
- By Most Visited. Displays the 20 pages you have visited most often.
- By Order Visited Today. Displays, in reverse order, all the pages you visited today.
![]()
Searching the History List
Often the page titles alone aren't enough to help you find a specific page you want to revisit—particularly on a site that uses the same title for all its pages. Fortunately, there's an alternative to relying on page titles and your memory for finding pages in your history.
To search your history list:
- Display the History bar.
- Click the Search button at the top of the History bar.
- Type a word or phrase that appears on the page you want to find.
- Click Search Now.
Internet Explorer searches the content of all the pages in your history list and displays matching results in the History bar. Click a result to display that page.
Deleting Items from History
If you need to cover your tracks, you can remove any item from history. You can delete an individual page, a site (and all the pages it contains), or a date (and all the sites and pages it contains). Simply right-click the item you want to delete, and choose Delete.
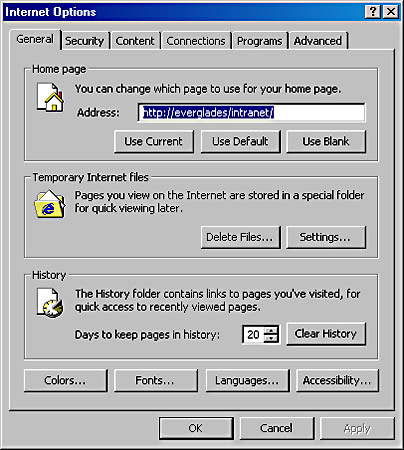
You can obliterate your entire browsing history with a visit to the Internet Options dialog box. (Choose Internet Options from the Tools menu to display it.) On the General tab, shown in Figure 18-4 on the next page, click the Clear History button to do the deed.
NOTE
The History folder contains only pointers to the pages you've visited; the contents of those pages (that is, the pages' text, graphics, and media files) are stored in the Temporary Internet Files folder. Therefore, if you're intent on hiding your past, you need to delete the files in that folder. The Delete Files button on the General tab does just that.
Internet Explorer automatically deletes items from the history list after a period of time that you can specify. On the General tab in the Internet Options dialog box, use the Days To Keep Pages In History box to set the number of days' history you want to keep. The default is 20 days.
Keeping Track of Your Favorite Pages
As you surf the Web and discover pages that you like, you'll probably want a way to get back to those pages easily. Internet Explorer provides a series of Favorites commands and the Favorites bar for exactly this purpose. You can have as many favorite pages as you like.
Using Favorites commands, you can create a list of your favorite pages and organize them into folders. Then, to go to a favorite page, you simply select the page you want from the Favorites menu. The Favorites menu also appears in Windows Explorer and (optionally) on your Start menu, so you can return to a favorite site easily, even if Internet Explorer isn't currently running. (You can also add file folders and document files to the Favorites menu. Choosing a file folder from the menu opens it in Windows Explorer; choosing a document file opens the file in its parent program.)
TIP
Show Just Your Recent FavoritesIf your Favorites menu becomes too long, you can enable an option to make it show only the favorites you've visited recently. (You can see the rest of your favorites by clicking the arrow at the bottom of each menu.) To enable this option, open the Tools menu, choose Internet Options, and click the Advanced tab. Select Enable Personalized Favorites Menu (under Browsing).
The Favorites bar places links to your favorite pages in a pane on the left side of the Internet Explorer window for even easier access. To display the Favorites bar, click the Favorites button, shown in Table 18-1. Figure 18-5 shows a Favorites bar.
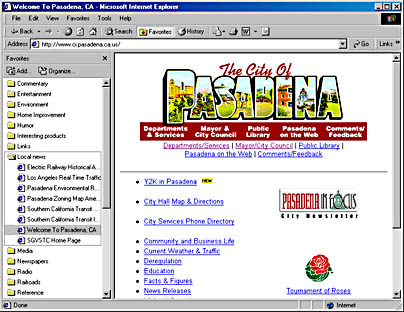
Figure 18-5. The Favorites bar provides a convenient way to access sites that you've marked as important to you.
Adding an Item to Favorites
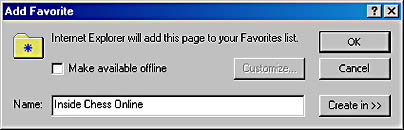
The Add To Favorites command allows you to create a favorite-page listing for the page you're currently viewing. To add the Web page you are currently viewing to your Favorites list:
- Open the Add Favorite dialog box in any of these ways:
- Open the Favorites menu and choose Add To Favorites.
- Right-click the page (but not on a link) and choose Add To Favorites from the shortcut menu.
- Click the Add button at the top of the Favorites bar.
- If you want to make the page available when you're not connected to the Internet, select Make Available Offline. And if you want Internet Explorer to periodically synchronize the page (that is, download any updates), click Customize to launch the Offline Favorite Wizard.
SEE ALSO
For more information about offline pages and synchronizing, see "Working Offline."
- In the Name text box, make any changes you want to the name of the page.
- If you want to place your new favorite in a folder within Favorites
- Click the Create In button. The dialog box expands to display a folder hierarchy.
- Select an existing folder; or click the New Folder button, type a name for your new folder, and then click OK.
- Click the OK button. This creates a favorite-page listing for the current page.
Organizing favorites in folders lets you group your favorite pages logically. After you create a new folder, the Favorites menu includes a cascading item with a folder icon that has the name of the folder you created.
TIP
Press Ctrl+D to instantly add the current page to the top level of the Favorites menu, bypassing the Add Favorite dialog box.
TIP
Adding Favorites with Drag and DropIf the Favorites bar is displayed, you can use drag and drop to add a page to your favorites. Drag the icon for the current page from the Address bar to the Favorites bar. A horizontal line indicates where the page will be added. (If you want to add the favorite to a folder, hover the mouse pointer over the folder momentarily and the folder opens.)
You can also drag a link from Internet Explorer's document area to the Favorites bar.
Using the Organize Favorites Command
The Organize Favorites command allows you to view, organize, and modify your favorite places. Any of these steps opens the Organize Favorites dialog box:
- Open the Favorites menu and choose Organize Favorites.
- Click the Organize button at the top of the Favorites bar.
- Press Ctrl+B.
To open a folder, simply click it. When you click a folder or favorite place, information about the selected item appears in the lower left corner of the dialog box, as shown in Figure 18-6.
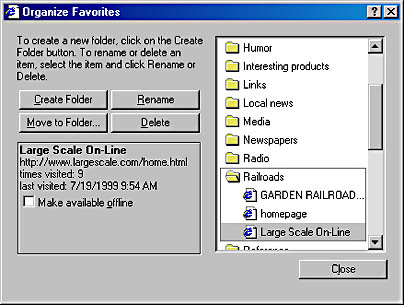
Figure 18-6. The Organize Favorites dialog box provides a convenient way to move, rename, or delete items in your Favorites folder.
The buttons in the Organize Favorites dialog box provide an obvious and quick way to create new folders, rename or delete items, and organize items as you see fit. You might prefer these easier, but less intuitive, tricks:
- Drag favorites or folders to move them to another folder or change their order.
- Press Alt+Up arrow or Alt+Down arrow to move the selected favorite or folder up or down within the list.
- Right-click favorites or folders to see the usual shortcut menus.
TIP
Organizing Favorites Using the Favorites BarThe Favorites bar provides an easy way to move, rename, or delete favorites. To move a favorite, simply drag it from one location on the Favorites bar to another. To rename or delete a favorite, right-click it and choose Rename or Delete.
Using Search to Find New Sites
The Internet is a vast repository of information, but sometimes it's difficult to find the information you need. The Search feature in Internet Explorer provides easy access to search providers that comb the Internet for the words or topics that interest you. You can invoke the Search feature in two ways: by typing into the Address bar or by using the Search bar.
Searching from the Address Bar
To search from the Address bar, type go, find, or ?, followed by the words you want to search on. Then press Enter or click the Go button at the right side of the Address bar.
When you search by typing your query into the Address bar, by default Internet Explorer displays the page that most nearly matches your request, and it also opens the Search bar, where it displays a list of other matching pages.
TIP
To change the search provider that Internet Explorer uses for Address bar searches or to change how it displays results, click the Customize button at the top of the Search bar. In the Customize Search Settings dialog box, click Autosearch Settings. Then select a search provider and an action.
Using the Search Bar
To use the Search bar:
- Click the Search button, shown in Table 18-1. (If the Search bar already displays results—for example, because of a query you entered into the Address bar—click the New button at the top of the Search bar to clear the decks for a new search.)
- Select the option for the type of Internet search you want to conduct:
- Find A Web Page. Searches for Web pages that contain the words or phrases you type.
- Find A Person's Address and Find A Business. Search directory listings. For more information, see "Finding People on the Internet."
- Previous Searches. Repeats one of your 10 most recent searches.
- Find A Map. Searches for a map of a particular address or location.
- Look Up A Word. Searches for a dictionary, encyclopedia, or thesaurus entry.
- Find A Picture. Searches for an image.
- Find In Newsgroups. Searches for newsgroup postings that contain the words or phrases you type.
- Enter the requested information, and then click Search.
- Click one of the result links, and the page appears in Internet Explorer's document area.
(If not all options are shown, click the More link.)
In a moment, the results of your query appear in the Search bar.
TIP
For more details about a particular search result, hover the mouse pointer over the result link, and a ScreenTip appears with information about that page. Most often, this information includes the page title, the first few sentences, and the address for the page. This helps you narrow down your search without having to download another page.
If you found the page you're interested in, you can close the Search bar. But if you want to visit another page that appears in the results list, simply click the one you want to see. You can click links on the page you display or use other methods for navigating the Web, and your most recent search results remain available on the Search bar; if at any time you want to try another result, you can click its link on the Search bar.
TIP
If you're not satisfied with the results of the first search provider, click the Next button at the top of the Search bar to display the results from a different search provider.
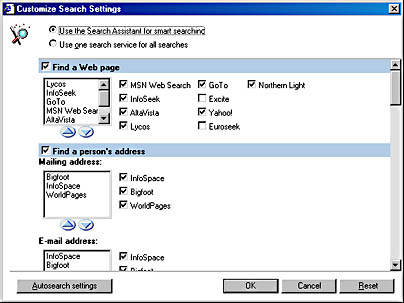
Changing Search Options
Internet Explorer provides access to most of the popular Internet search providers. Because each provider offers different features and maintains its own Web pages, you might get different results by trying the same search with different providers.
To specify the provider for each type of search:
- Click the Customize button at the top of the Search bar.
- Select the check box for each type of search you want to include on the Search bar.
- For each type of search, select the check boxes for the search providers you want to use.
- To set the order in which search providers are used (this determines which provider's results appear first, as well as the order of the remaining providers displayed by opening the list on the Next button of the Search bar), select a provider in the list. Then click the arrows located under the list to move the selected provider up or down within the list.
The Customize Search Settings dialog box appears.
NOTE
If you want to use only one search provider for all types of searches, in the Customize Search Settings dialog box, select Use One Search Service For All Searches, and then select the provider you want. Internet Explorer version 5 then updates the Search bar to show the user interface for the provider you choose, mimicking the behavior of the Search bar in Internet Explorer version 4.
Finding Related Topics
Internet Explorer offers one more tool in its Web-search arsenal: the Show Related Links command. To display a list of links that are similar to the currently displayed page, open the Tools menu and choose Show Related Links. The Search bar appears (if it's not already displayed), populated with a list of related sites. (See Figure 18-7.)
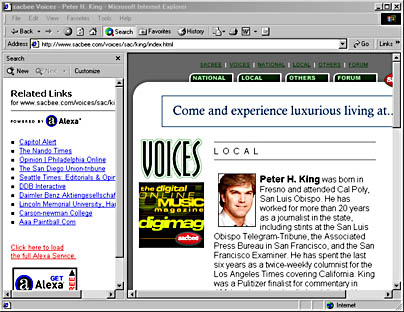
Figure 18-7. The Show Related Links command displays links to sites that are similar to the currently displayed page.
Tips for Successful SearchesSearching for information on the Internet can be a tricky task. Here are some simple tips to help you find what you're looking for much easier and faster.
Be specific. Whenever you type a query, use as many detailed words as possible. If you're searching for recipes for chocolate chip cookies, searching for "cookies" returns many results that aren't useful. Instead, search for "chocolate chip cookie recipes." The more words you use, the more likely you'll find good results.
Use quotation marks. Enclose phrases in quotation marks so that the search provider considers only the entire phrase—and not its component words.
Try different search providers. Each search provider has its own algorithms and techniques for finding the best pages to match your query—and none of them indexes the entire Web. The results you get from one provider might be completely different from another. So if you're having trouble with your favorite search provider, try a different one.
Look for a tips or advanced link in the Search bar. Some search providers include such links with the search results. Follow these links to see specific ways (such as special characters or key words) to refine your search. Special characters and other tricks you can use are different for each search provider.
EAN: 2147483647
Pages: 317