Flylib.com

Books Software


Archiving Messages


Archiving Messages

graphics/microsoft10.gif

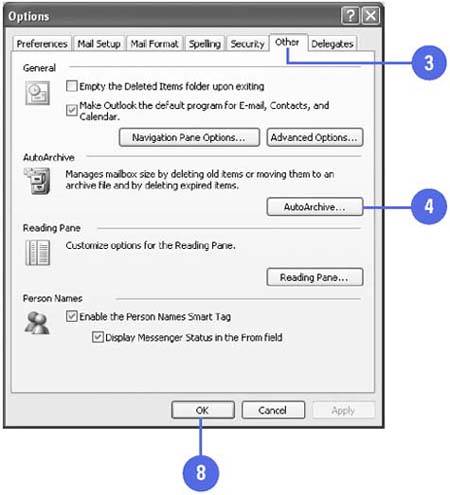
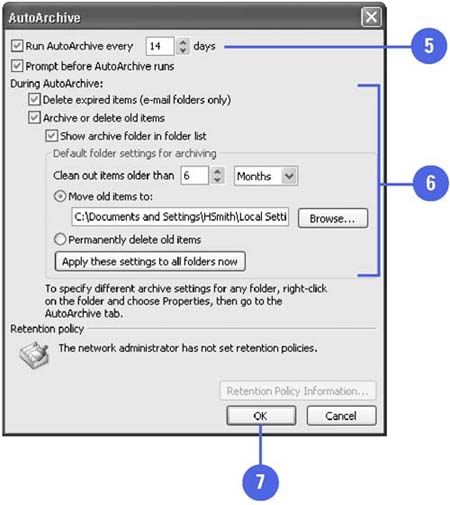
Archiving compresses messages into files that are stored on your hard drive. You can archive messages manually or automatically using AutoArchive. This Outlook tool automates the task of archiving your messages (as well as files and folders) based on a period of time you set. For example, you could archive all the messages you sent in the last six months. Archived items are saved in the personal store (.pst) file format. This format compresses the message so it takes up less space. It also stores the file on your computer and not on the e-mail server.

Set Inbox Archive Options

graphics/one_icon.jpg

In Mail view, click Inbox.

graphics/two_icon.jpg

Click the Tools menu, and then click Options.

graphics/three_icon.jpg

Click the Other tab.

graphics/four_icon.jpg

Click AutoArchive.

graphics/five_icon.jpg

Select the Run AutoArchive Every x Days check box, specify the number of days, and then select the Prompt Before AutoArchive Runs check box.

graphics/six_icon.jpg

Specify the options you want for during the AutoArchive.

graphics/seven_icon.jpg

Click OK.

graphics/eight_icon.jpg

Click OK.

graphics/03inf26.jpg

graphics/03inf27.jpg

Did You Know?

You can retrieve an archived file . Click the File menu, and then click Import And Export to start the Import And Export Wizard. Select the Import From Another Program Or File option, click Next, click Personal Folder File (.pst), click Next, click Browse, navigate to the folder where the archive is stored, double-click the archive, click Next, and then click Finish.

You can set AutoArchive for individual folders . Right-click the folder, click Properties, click the AutoArchive tab, specify the settings, and then click OK.


Saving Messages

graphics/microsoft11.gif

You can keep your messages as they are stored in Outlook folders, or you can choose to store your messages by saving them as text or HTML files in folders other than the Outlook ones. When you save a message as text, you can use the text in other files, such as a Word document. Messages saved as HTML files can be displayed in a Web browser. You can also archive messages that you've already read or sent, but want to retain for future reference.

Save a Message

graphics/one_icon.jpg

Display your Inbox.

graphics/two_icon.jpg

Click the message you want to store.

graphics/three_icon.jpg

Click the File menu, and then click Save As.

graphics/four_icon.jpg

Click the Save In list arrow, and then navigate to the folder in which you want to save your message.

graphics/five_icon.jpg

If you want, enter a new file name .

graphics/six_icon.jpg

Click the Save As Type list arrow, and then click Text Only or make sure HTML is displayed.

graphics/seven_icon.jpg

Click Save.

graphics/03inf28.jpg

Did You Know?

You can share messages with others who use a different language . In the Save As dialog box, click the Save As Type list arrow, and then click Outlook Message Format -Unicode. When you send the message in this file format, it can be translated into another language.

You can save a message as a template . In the Save As dialog box, click the Save As Type list arrow, and then click Outlook Template. You can use the message saved as a template in Word.


Setting Message Security

To send secure mail, you must attach a digital ID and encrypt the messages. Outlook allows you to secure the e-mail you send so only the intended recipients can read your messages and they have proof that the messages are from you and have not be changed in any way. Encrypting a message ensures that only the intended recipient can read the message. You can digitally sign any message without encrypting it so your recipient has proof that the message is from you. However, you cannot encrypt a message without digitally signing it. The digital signature is the key to an encrypted message. Outlook also provides the options for setting security for information that comes from different sources, or zones, on the Internet.

Set Message Security

graphics/one_icon.jpg

Click the Tools menu, and then click Options.

graphics/two_icon.jpg

Click the Security tab.

graphics/three_icon.jpg

Specify the encryption settings you want to use by default.

graphics/four_icon.jpg

Click OK.

graphics/03inf29.jpg

Did You Know?

You don't have to set up digital IDs . You probably won't need or want to change your digital security settings. When you acquire a digital ID, these settings are installed for you.

Set Security for Internet Sources

graphics/one_icon.jpg

Click the Tools menu, and then click Options.

graphics/two_icon.jpg

Click the Security tab.

graphics/three_icon.jpg

Click Zone Settings, and then click OK.

graphics/four_icon.jpg

Click Default Settings.

graphics/five_icon.jpg

Select the Web content zone you want to set security for.

graphics/six_icon.jpg

Drag the slider to set the security level.

graphics/seven_icon.jpg

Click OK, and then click OK again.

graphics/03inf30.jpg

See Also

See " Using Digital Signatures " on page 72 for information on digital signatures.

Frequently Asked Questions

Do I Need to Obtain a Digital ID?

If you intend to use a digital ID, then you must obtain one. If you are using Microsoft Exchange Server, then you can obtain a digital ID from the administrator of the server. If you are not part of an Exchange Server network, you can also obtain a digital ID over the Internet from a company that provides certification services, such as VeriSign, Inc.; British Telecommunications; and Thawte Certification.