|  If you use the find feature to search for the same types of messages on a regular basis, you can save time by creating a filter. You can use a filter to view only the items that meet the conditions you have defined. For example, you can filter your messages so only those that they been flagged as high priority appear or those that you have categorized as business items. Filter Your Messages Based on Content -
 | In Mail view, display the folder you want to customize. | -
 | Click the View menu, point to Arrange By, point to Current View, and then click Customize Current View. | -
 | Click Filter. | -
 | Click the Messages tab. | -
 | To filter your messages, enter the keyword or phrase, and then select a field option from the In list arrow. | -
 | To filter your messages using preset conditions, click the Search For The Word(s) list arrow, and then select the filter you want. | -
 | To filter your messages by sender or recipient, use the From and Sent To buttons . | -
 | Click OK. | -
 | Click OK. |  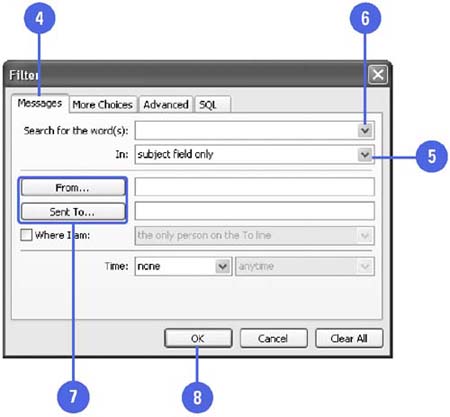 Did You Know? You can filter messages sent or received during a specified time . In the Filter dialog box, click the first Time list arrow, click Received, Sent, or any other option, click the second Time list arrow, and then click a time, such as Yesterday. When you're done, click OK. | Filter Your Messages Based on Category -
| | In Mail view, display the folder you want to customize. | -
| | Click the View menu, point to Arrange By, point to Current View, and then click Customize Current View. | -
| | Click Filter. | -
| | Click the More Choices tab. | -
| | Click Categories. | -
| | To select the categories and specify conditions you want to use for filtering your messages, click the appropriate check boxes in the Available Categories list box, and then enter the conditions you want. | -
| | Click OK to close the Categories dialog box. | -
| | Click OK to close the Filter dialog box. | -
| | Click OK. | 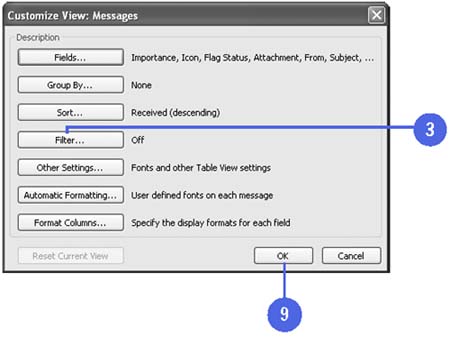 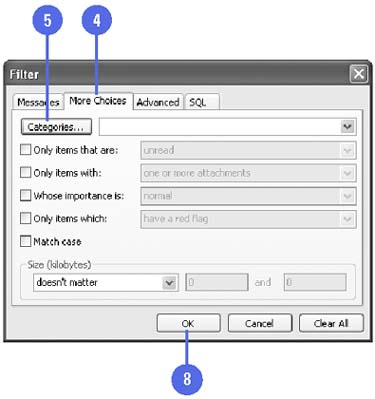 Did You Know? You can assign a category to a message that you create . In the message window, click Options, click Categories, select the category check box(es) you want to apply, click OK, and then click OK. You can assign a category to a message that you receive . Right-click the message header, click Categories, select the category check box(es) you want to apply, and then click OK. |  |