| You can specify the activities for the contacts that you want to track. You can track meeting requests and cancellations , and keep a record of notes about those meetings. Other items you can track include e- mails sent to and received by contacts, task requests, and task responses, as well as other documents such as letters , Excel files, or Access databases. You can record virtually anything related to a particular contact in a Journal for that contact. Outlook can track your activities automatically, or you can track a specific activity as you are about to perform it. Record Journal Entries Automatically -
 | Click the Tools menu, and then click Options. | -
 | Click Journal Options. | -
 | Select the check boxes for the items you want to record in the Journal automatically. | -
 | Select the check boxes of the contacts for whom you want to record the selected items. | -
 | Select the check boxes of the programs that you want recorded. | -
 | Click OK. | -
 | Click OK. | 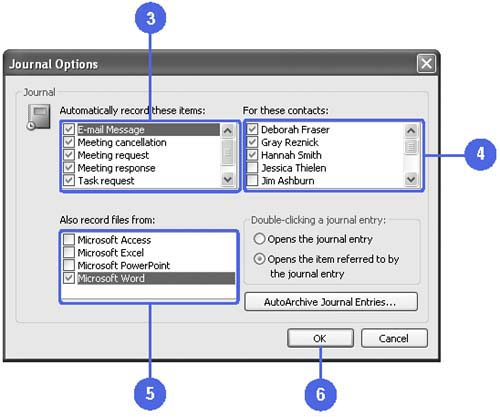 Did You Know? You can archive Journal entries . In the Journal Options dialog box, click the AutoArchive Journal Entries button, and then specify the settings on the AutoArchive tab. You can turn off the automatic recording of journal entries . To turn off the automatic recording of your journal entries, open the Journal Options dialog box, and then clear the check boxes for the items and contacts for which you no longer want to track. | Record a Journal Entry Manually -
| | Open the Journal. | -
| | Click the New button on the toolbar. | TIMESAVER Press Ctrl+N in Journal view to create a new journal entry. -
| | Enter text in the Subject box that describes the journal entry. | -
| | Click the Entry Type list arrow, and then select the type of activity you want to record. | -
| | Specify the date, time, and duration of the activity. | -
| | Type a description of the activity. | -
| | If necessary, click Contacts to assign an entry to a contact. | -
 | If necessary, click Categories to select a category. | -
 | Click the Save And Close button. | 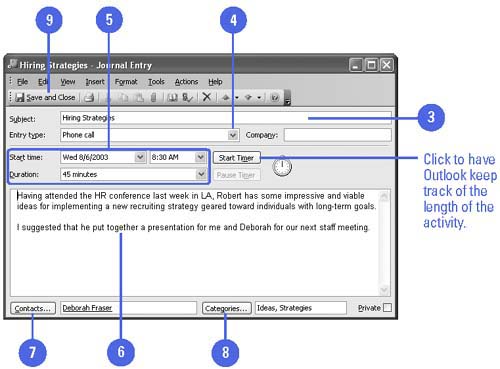 Did You Know? You can time how long an activity takes . Open the Journal, click New, enter a subject, select the type of entry, and then click the Start Timer to begin timing how long the activity takes (shown in the Duration list box). Take notes as you continue the activity. Click Pause Timer if necessary, and then click Start Timer to resume. Click Pause Timer when you have completed the activity. You can display the Journal icon on the Navigation pane . Click the Configure Buttons button, point to Add Or Remove Buttons, and then click Journal. |  |