IDE Overview
When you first start Visual Studio, it initially displays a Startup Page by default. To change what Visual Studio does when it starts, select the Tools menu’s Options command. Select the Show all settings check box so you can see all of the options. Use the Environment folder’s Startup page to tell Visual Studio how to start.
There are several reasons why Visual Studio on your system may not look exactly like the screens shown in this book. First, Visual Studio looks different on different operating systems. The figures in this book were taken on a computer running a pre-release version of Windows Vista, so they display the distinctive Vista style. This computer was using the new Aero Glass style, so the forms use large, translucent borders and other Aero-style decorations. You may see a different appearance, even if you are using Vista and you have selected another style, or if Vista thinks your hardware won’t support Aero nicely. Additionally, some commands may not behave exactly the same way on different operating systems.
| Tip | In addition to its new Aero appearance, new features in Vista also include a new User Account Control (UAC) security model. When you first log on, all accounts get a normal level of user privileges. Later, when you try to run certain applications that require increased permissions, a UAC privilege elevation dialog box appears where you can enter an administrator password. The examples in this book were tested using a normal user account, so you should not see that dialog while running them, but you may see it if you use other development tools. Chapter 14 provides more details about UAC. |
Second, Visual Studio will look different depending on which version you have installed. The free Visual Basic 2005 Express Edition product has fewer tools than other editions such as the high-end Visual Studio 2005 Team Suite. The figures in this book were captured while using Visual Studio 2005 Team Suite, so, if you have another version, you may not see all of the tools shown here.
Finally, you may be using different configuration settings that the ones used while writing this book. When you install Visual Studio, it asks you what kind of development settings you want to use. The most obvious choice for a Visual Basic developer is Visual Basic Development Settings. This choice customizes Visual Studio to work more easily with Visual Basic, and is a good choice if you will focus on Visual Basic development.
Another reasonable choice is General Development Settings. This option makes Visual Studio behave more like Visual Studio 2003 does. It’s a good choice if you are used to Visual Studio 2003, or if you expect to use other Visual Studio languages such as C# fairly regularly.
This book assumes that you have configured Visual Studio for Visual Basic development. If you have chosen a different configuration, some of the figures in this book may look different from what you see on your screen. Some of the menu items available may be slightly different, or may appear in a different order. Usually, the items are available somewhere, but you may have to search a bit to find them.
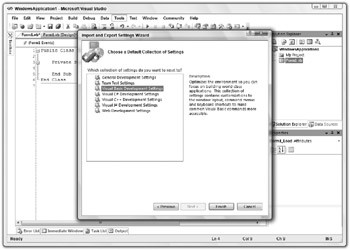
If you later decide that you want to switch configurations, open the Tools menu and select Import and Export Settings to display the Import and Export Settings Wizard. Select the Reset all settings option button and click Next. In the second page, tell the wizard whether to save your current settings and click Next. On the wizard’s final page (shown in Figure 1-1), select the type of configuration you want and click Finish. When the wizard is done saving the new settings, click Close.

Figure 1-1: Use the Tools menu’s Import and Export Settings command to change the Visual Studio configuration.
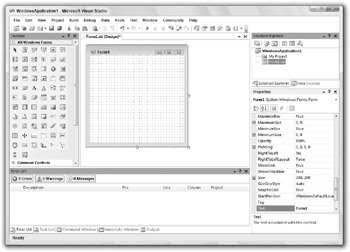
After you open Visual Studio, you can use the File menu’s New Project command to start a new project. Figure 1-2 shows the IDE immediately after starting a new Windows Application project. The IDE is extremely configurable, so it may not look much like Figure 1-2 after you have rearranged things to your own liking.

Figure 1-2: Initially the IDE looks more or less like this.
If you don’t have a reason to modify the IDE’s basic arrangement, you should probably leave it alone. Then when you read a magazine article that tells you to use the Project menu’s Add Reference command, the command will be where it should be. Using the standard IDE layout also reduces confusion when you need to consult with another developer. It’s a lot easier to share tips about using the Format menu if you haven’t removed that menu from the IDE.
The key pieces of the IDE are labeled with numbers in Figure 1-2. The following list briefly describes each of these pieces:
-
(1) Menus - The menus contain standard Visual Studio commands. These generally manipulate the current solution and the modules it contains, although you can customize the menus as needed. Visual Studio changes the menus and their contents depending on the object you currently have selected. In Figure 1-2, a Form Designer (marked with the number 4) is open so the IDE is displaying the menus for editing forms.
-
(2) Toolbars - Toolbars contain tools that you can use to perform frequently needed actions. The same commands may be available in menus, but they are easier and faster to use in toolbars. The IDE defines several standard toolbars such as Formatting, Debug, and Image Editor. You can also build your own custom toolbars to hold your favorite tools. Visual Studio changes the toolbars displayed to match the object you currently have selected.
-
(3) Toolbox - The Toolbox contains tools appropriate for the item that you currently have selected and for the project type that you are working on. In Figure 1-2, a Form Designer is selected in a Windows Forms application so the Toolbox contains tools appropriate for a Form Designer. These include Windows Forms controls and components, plus tools in the other Toolbox tabs: Crystal Reports, Data, and Components (plus the General tab is scrolled off the bottom of the Toolbox). You can add other customized tabs to the Toolbox to hold your favorite controls and components. Other project types may display other tools. For example, a Web project would display web controls and components instead of Windows Forms components.
-
(4) Form Designer - A Form Designer enables you to modify the graphical design of a form. Select a control tool from the Toolbox, and click and drag to place an instance of the control on the form. Use the Properties window (marked with the number 6) to change the new control’s properties. In Figure 1-2, no control is selected, so the Properties window shows the form’s properties.
-
(5) Solution Explorer - The Solution Explorer lets you manage the files associated with the current solution. For example, in Figure 1-2, you could select Form1.vb in the Project Explorer and then click the View Code button (the third icon from the right at the top of the Solution Explorer) to open the form’s code editor. You can also right-click an object in the Solution Explorer to get a list of appropriate commands for that object.
-
(6) Properties - The Properties window lets you change an object’s properties at design time. When you select an object in a Form Designer or in the Solution Explorer, the Properties window displays that object’s properties. To change a property’s value, simply click the property and enter the new value.
-
(7) Error List - The Error List window shows errors and warnings in the current project. For example, if a variable is used and not declared, this list will say so.
If you look at the bottom of Figure 1-2, you’ll notice that the Error List window has a series of tabs. The Task List tab displays items flagged for further action such as To Do items. The Command Window lets you execute Visual Studio commands such as those invoked by menu items. The Immediate Window lets you type and execute Visual Basic commands, possibly while a program is running, but paused.
The Output tab shows output printed by the application. Usually an application interacts with the user through its forms and dialog boxes, but it can display information here to help you debug the code. The Output window also shows informational messages generated by the IDE. For example, when you compile an application, the IDE sends messages here to tell you what it is doing and whether it succeeded.
The following sections describe the major items of the IDE in more detail.
EAN: N/A
Pages: 417