Flylib.com

Books Software


Getting to Your Favorite Folders


Getting to Your Favorite Folders

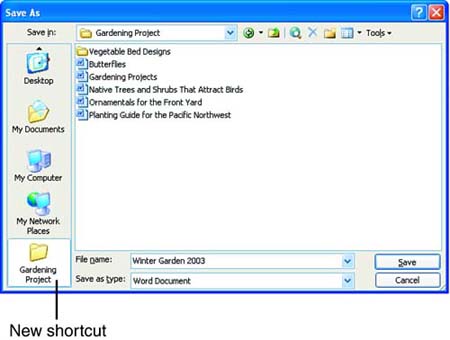
If a folder that you use frequently is buried deep in the structure on your hard disk or is on another network computer, it can be time-consuming to navigate to it in the Open and Save As dialog boxes. Fortunately, you can avoid this hassle by creating a shortcut to the folder in your Places list. The shortcut simply points to the folder; clicking it opens the folder just as if you clicked the item itself.

Follow these steps to create a shortcut to a folder in your Places list:

  1. Display the Open or Save As dialog box. Using the Look In or Save In box if necessary, navigate until the folder that you want to create a shortcut for appears in the main area of the dialog box, and then select it.

  2. At the top of the dialog box choose Tools, Add to "My Places" . The shortcut is added to the bottom of the Places list. (You may need to click the down arrow at the bottom of the Places list to scroll it into view.)

  3. Click your shortcut in the Places list. The contents of the folder appear in the dialog box (see Figure 3.11).

    Figure 3.11. Click your shortcuts in the Places list to access your favorite folders.

    graphics/03fig11.jpg

  4. If you don't want to have to scroll your Places list, right-click any of the shortcuts in the list and choose Small Icons in the context menu.

  5. To rearrange the shortcuts in the list, right-click the one you want to move and choose Move Up or Move Down in the context menu.

  6. To rename a shortcut, right-click it and choose Rename in the context menu. In the Rename Place dialog box that appears, type the new name and click OK . (You can't rename the default shortcuts in the Places list.)

  7. To delete a shortcut, right-click it and choose Remove . Deleting a shortcut does not remove the file or folder to which the shortcut pointed. (You can't delete the default shortcuts in the Places list.)


Creating Folders

Just as you might add a new hanging folder to a physical filing cabinet to hold a new group of related files, so you can create new folders on your hard drive (or a network drive) to store groups of related Word documents. For example, you might want to create a folder for your personal correspondence, or one for your child's homework assignments. You can create folders in either the Save As or the Open dialog box, although you're most likely to create them in the Save As dialog box when you're in the midst of saving a file.

Microsoft Office automatically creates the My Documents folder on your hard drive as a convenient place for you to store data files including Word documents, Excel spreadsheets, PowerPoint presentations, and so on. You can create a set of subfolders within My Documents for the various types of documents you create. You aren't required to use the My Documents folder, but it's a good idea to designate one folder for your datawhether it be the My Documents folder or different oneand then store all of your files in subfolders of that folder. (If you want to use a different folder to store all of your data files, see the next section.) If you are on a network, ask your network administrator where you should save your Word documents.

To create a folder, follow these steps:

  1. In either the Save As or the Open dialog box, navigate to the folder that you want to be the parent of the new folder so that it appears in the Save In or Look In box.

  2. Click the Create New Folder button.

  3. The New Folder dialog box appears (see Figure 3.12). Type the name you want to use, and click OK . (The rules for naming folders are the same as for naming filessee "Saving a Document for the First Time" earlier in this hour .)

    Figure 3.12. Word displays the New Folder dialog box to let you name your new folder.

    graphics/03fig12.jpg

If you are in the middle of saving a file when you create your new folder, it will become the location in the Save In box, so you can simply continue the save process. If you created the new folder in the Open dialog box, click the Cancel button to close it.