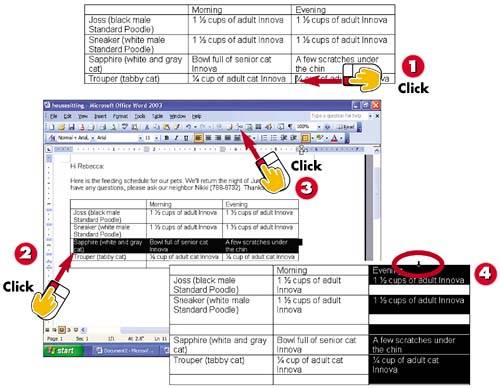
To add a row at the end of the table, click anywhere in the lower-right cell in the table, and press the Tab key.
To add a row in the middle of the table, first select the row below the location of the new one by clicking to its left.
Click the Insert Rows button on the Standard toolbar to insert the row. (The Insert Table button turns into Insert Rows when a row is selected.)
To insert a column, first select the column to the right of where the new one will go by clicking at the top of the column when the mouse pointer changes to a black arrow.
INTRODUCTION
As you enter text in a table, you will almost certainly need to change its structure. This task describes the most common adjustments you'll need to make. As you experiment with these techniques, keep in mind that Word does not prevent you from making a table too wide to fit on the page. If you're adding columns and increasing column widths, check Print Preview periodically to make sure that the table isn't running off the page.
TIP
Table Off the Page?
If you have widened your table too much, open the Table menu, choose AutoFit , and select AutoFit to Window .
Click the Insert Columns button on the Standard toolbar. (The Insert Table button turns into Insert Columns when a column is selected.)
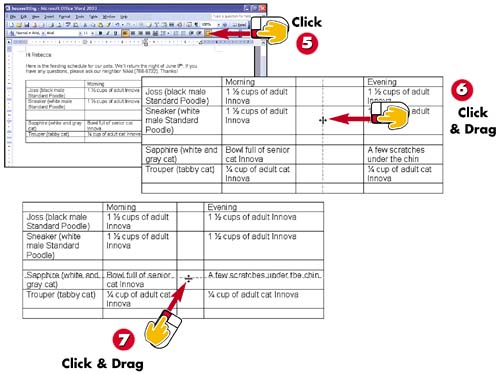
To adjust a column's width, point to its right border and drag it to the desired location.
To resize a row, point to its bottom border and drag it to the desired location.
TIP
Why Are All the Table Menu Commands Dim?
Most of the commands in the Table menu are active only when the insertion point is in a table. If you notice that the commands are dim, it's a sign that you accidentally clicked outside the table. Simply click inside the table and then display the Table menu again.
TIP
Deleting a Row or Column
To delete a row or column, select it first (see steps 2 and 4), and then open the Table menu, choose Delete , and choose Rows or Columns .