Creating Real GUI Forms
PreparationTo make our system usable for the next step, which is making the real GUI forms that you will show to your users, we need some data. Use what I've just shown you and make a couple more simple forms to enter some questions, answers, a student or two, and all the other tables. Note Remember: Table data must be entered in the correct sequence, or you will start seeing errors in the lower left-hand corner. We must not forget that we built referential integrity into our tables! To build a usable system, follow the same sequence that we used in creating the AUTHORS table, and you'll be all set. However, you do not yet have any programs behind the scenes to check your work, so you'll have to keep good records of what you've entered, and from time to time go to SQL*Plus and run a SELECT * from <table- name > command to make sure you're linking the right tables:
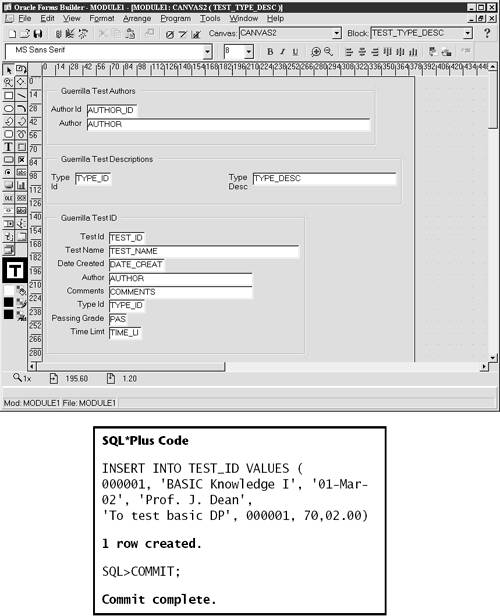
Note Refer to Chapter 9 for details of how to load tables. Then write down what you will be loading, or follow the steps outlined here. Let's take a quick walk through building the tables. First we have to load data into the TEST_TYPE_DESC table. Here's an example of using plain SQL*Plus and a quick and dirty form (which is called GUERRILLA TEST DESCRIPTIONS): Or, if you still have the first canvas open , you can get fancy and add the GUERRILLA TEST DESCRIPTIONS form to that canvas: Tip Here's a hint for the brave of heart: In Object Navigator, highlight DATA-BLOCK , click on TOOLS Data Block Wizard , and off you go. Note If you're working on two new open forms and you haven't saved either of them with its own name, you will get an Oracle "FRM-30087" error when you try to run and compile the forms. Save and close one of them to end the conflict. Note Extra credit to anyone who caught the misspelling in the last screen shot. I suggest that you practice both entering and running queries in Forms to become proficient with the icons and menu items. Now build a Test_ID entry. Again, use SQL*Plus and Forms: Components of Forms 6 iNow let's get acquainted with Form 6 i 's components. If you're still at the runtime form, close it, and you should automatically be brought to the Object Navigator screen. It looks like a tree without leaves , or a verbal skeleton of some strange language. Object NavigatorJust like the data dictionary, Object Navigator is your friend. Get familiar with it. It is the main sandbox for your development, and it is the tree-looking screen. The Object Navigator shown here is actually what you'll be building in a little while: There are three more major sandboxes in Forms 6 i you need to know about: the property palette, the canvas, and the PL/SQL editor. Property PaletteIf you right-click on most of the items in Object Navigator window, you'll get a pull-down menu, and one of the items will be Property Palette . The property palette is where you give your objects names , as well as pick colors, sizes, and so forth. It's like a blueprint with a lot of details that govern your objects. CanvasThe canvas is where you will "paint" your GUI forms. It has plenty of editing, artistic, and other tools to help you create attractive, functioning forms. PL/SQL EditorAs you will see shortly, you can build in plenty of code to handle all the editing, movement from form to form, warnings, and so forth that a good GUI system must have. Forms 6 i , fortunately, has quite a few built-in tools to help you and make your life easier. Got the general idea of how it works? Go ahead and try the same thing with some of the other tables, just to become really familiar with the basic steps and concepts. Be careful, though, to delete any new records that you add to the tables and don't want to keep around or have someone else see. For example, if you make up some strange names, or use names of coworkers, you may want to get rid of them as soon as you're done with your testing. Steps in Creating GUI FormsHere's where we start to work on our real GUI system. I hope the preceding brief discussion has gotten you excited. Let's keep that enthusiasm and get started! Here are the steps we'll take:
Warning As we go along, I'm also going to sneak in building a couple of views. There is quite a bit of detail in the following pages, and the only way to get through it and build your forms is just to get through it. I want to show you the final screens now so that you'll have a good picture of where we're going. With forms development, it's easy to get lost among the trees and canvases, so keep in mind that here's what you're going to make: 1. Splash 2. Main 3. Select test 4. Take Test You may be thinking you can go ahead and get comfortable because all you have to do is create these four simple screens. Nothing to it, right? Well, as you'll see, a lot of work is involved in making what looks like simplicity itself. Just stay with it, go step by step, and you'll soon have your own version of these screens. Hopefully your sense of color and design will be better than mine! OK, let's get started. Here's what we're going to build: first a splash screen (the one with the green "GUERRILLA ORACLE" splashed across it), then an opening screen, then the screen where you log in and select which test to take, and last, the actual test screen. Splash ScreenStart Forms 6 i , select Build a new form manually , and click OK: On the next screen change the name to "CWE1P_MAIN": We want the form to fill the screen, so select Triggers , right-click and select SmartTriggers , then PRE-FORM , and type in the following: "SET_WINDOW_ PROPERTY (FORMS_MIDI_WINDOW, WINDOW_STATE,MAXIMIZE);": Now, click on the Compile button, and then when the compile is complete, click on the CLOSE button to close the form. CanvasNow let's create the canvas. Click on Canvases and then on the green plus sign or just double-click on Canvases , and change the name to "CWE1P_CANVAS": Now change the property palette: Right-click on the name, CWE1P_CANVAS, select Property Palette and then Physical , and change the Width to 580 and the Height to 375: The last step in creating this main module is to configure the window node. Click on Windows , and a new entry will automatically be created. Change it to "CWE1P_WINDOW": Do the same thing againright-click on the name and select Property Palette and change the properties as follows :
Save the form as CWE1P_MAIN.fmb in your CWE1P_PROJECT folder: ButtonsRemember that our form has to have two buttons ENTER and EXIT along with our Guerrilla logo, and here's how we create those buttons. Go back to the main Object Navigator screen, select Data Blocks , and click on the green plus sign. Then choose Build a new data block manually and change the name to "CWE1P_BLOCK": Now that we have our data block, let's add the buttons. Go back to CWE1P_CANVAS, double-click to open it, and then select the button icon and drop two buttons on the canvas: Ready for the property palette? First right-click on the first button and change Name to "ENTER_BUTTON", Label to "ENTER", Width to 63, and Height to 16. For the second button, change Name to "EXIT_BUTTON" and Label to "EXIT": The result will look like this: ImagesLet's get our image. First make sure you are in Layout Editor. Next select File Import Image... : (The sample image is on the the book's CD for you. Once the image is on the canvas, you can resize it and move it around.) Tip This won't be the last time I say this: Save your work! You've done a little too much at this point to have to redo everything if you have a system failure, so save! Now you can right-click on the image and then on the canvas and show your expertise with the property palette. Here's an example of what the canvas looks like after we resize the graphic, add some text, and change the canvas background color: ToolsLet's talk about some of the features on the left-hand side of the canvas. These items are your tool palette (accessed by the selection of View Tool Palette ), and they are what you use to add buttons, color, shapes , and so forth: Note One thing I want you to doat least for nowis select all the toolbars under the View menu when you're in Layout Editor working on a canvas. This way you'll have all the tools possible, along with the ruler and ruler guides. OK, now what?, you ask. Well, I'm going to start sneaking in some more information. We have to let the users jump from one form to another, right? So how do we do this? We use what is called a global variable , and this variable will point to the home folder for the entire project. We create this global variable in the CWE1P_MAIN form by going back to the Object Navigator screen and selecting PRE-FORM under Triggers , just as we did a couple of minutes ago: Then add the PL/SQL text: :GLOBAL.project_path := 'D:\GUERRILLA_ORACLE\CWE1P_PROJECT'; Compile and then close the form. (Any compile errors will be the result of missing single quotes or other missing syntax that is necessary.) |


EAN: 2147483647
Pages: 84