Managing Catalogs
|
The Indexing Service stores all the information you’re indexing in catalogs. Catalogs contain the extracted contents from the main body of documents as well as metadata that describes the document and its properties. During the catalog creation process you specify which Web site you want to associate the catalog with. Once you create a catalog for a Web site, users can search it using a Web- based query form.
The Indexing Service automatically maintains catalogs, and they’re updated through the scan and merge processes. You can control catalogs manually as well by starting, stopping, or pausing the update monitor for the catalog. You can also force the Indexing Service to merge separate indexes into the master to improve the Indexing Service’s overall performance and responsiveness.
Viewing Catalog Properties and Directories Being Indexed
Each catalog configured on the server has a separate set of properties that you can manage. These properties control the tracking of network shares, the generation of document abstracts, and the indexing configuration. You can configure catalogs to have unique property settings or to inherit global properties from the Indexing Service.
Catalogs can be associated with a Web site, an NNTP site, and one or more external directories. External directories can include local and remote resources. When you associate a catalog with a Web or NNTP site, you use the IIS snap-in to specify which resources are indexed as discussed in the section of this chapter entitled “Setting Web Resources to Index.” When you associate a catalog with a network share, you can elect to index the directory when you add it to the catalog.
To view the current property settings for a catalog as well as the directories that are currently being indexed, follow these steps:
-
Start Computer Management. Expand the Services And Applications node by clicking the plus sign (+) next to it, and then expand the Indexing Service node.
-
You should see a list of catalogs configured on the server. Expand a catalog node by clicking the plus sign (+) next to it. Select the Directories node in the left pane to display a list of external directories associated with a catalog in the right pane.
-
If you want to view the properties of a catalog, right-click the catalog you want to work with and then select Properties. This displays a Properties dialog box that you can use to view or set properties.
Adding Physical Directories to a Catalog
You can add external directories to a catalog that can be indexed along with the content of a Web or NNTP site. These external directories can be on the local file system or on a remote file system. If you don’t select Add Network Share Alias Automatically, you must configure aliases manually for each network share you want to index.
To add an external directory to a catalog, follow these steps:
-
Start the Computer Management console. Expand the Services And Applications node by clicking the plus sign (+) next to it, and then expand the Indexing Service node.
-
You should see a list of catalogs configured on the server. Right-click the catalog you want to work with, choose New, and then select Directory. This displays the Add Directory dialog box shown in Figure 12-5.

Figure 12-5: You can add physical directories to a catalog and map them to aliases using the Add Directory dialog box. -
In the Path field, type the complete file path to the directory you want to index. If you don’t know the directory path, click Browse to search for the directory.
-
If you’re configuring indexing for a network share, type the network share alias that you want to use for this directory in the Alias (UNC) field. This alias should be in Universal Naming Convention (UNC) format and is returned in the search results sent to clients. For example, you could set the alias \\myserver\data to map to the actual network share path \\Galileo\reports\fy2001.
Tip When you work with remote systems, you must allow the Indexing Service to map administrative shares. If it’s unable to map administrative shares, the Indexing Service won’t be able to index content.
-
If you’re configuring indexing for a network share, you can also set the User Name and Password that the Indexing Service can use to authenticate on the remote system.
-
Select Yes to specify whether the directory should be included in the catalog index. Select No to exclude the directory from the index.
-
Click OK.
Forcing Full and Incremental Directory Rescans
The Indexing Service watches for change notification requests from the operating system to determine if files have been added to or changed within directories set for indexing. When a request is received, the Indexing Service schedules the related directory for an incremental scan. At times the Indexing Service might lose change notifications. This can happen during periods of high I/O or CPU processing; the Indexing Service might not be able to keep up with the change notifications. It can also happen when the Indexing Service is unable to receive change notifications for directories on remote systems.
Typically, you can identify a problem with scanning by searching for documents that have been updated recently or added to an indexed directory. If the search results don’t contain references to these documents, you might need to force a full or incremental rescan. You can do this only at the external directory level.
To force a directory rescan of an external directory, follow these steps:
-
Start Computer Management. Expand the Services And Applications node by clicking the plus sign (+) next to it, and then expand the Indexing Service node.
-
You should see a list of catalogs configured on the server. Double-click the catalog you want to work with and then select the related Directories node.
-
In the right pane, you should see a list of external directories configured for the catalog. Right-click the directory you want to work with, choose All Tasks, and then select Rescan (Full) or Rescan (Incremental) as appropriate.
-
When prompted, confirm the action by clicking Yes. Keep in mind that rescans of directories with a large number of documents can be resource- intensive. This means you’ll use additional CPU, memory, and file I/O resources during the rescan.
Starting, Stopping, and Pausing Individual Catalogs
When you need to perform a large number of updates to directories monitored by a catalog, it’s a good idea to pause or stop the catalog temporarily. Pausing or stopping the catalog tells the Indexing Service that it shouldn’t handle change notification requests for this catalog. The difference between pausing and stopping a catalog is important. When you stop a catalog, the Indexing Service stops both indexing and querying activities, which means that the related directories are no longer indexed and users can’t search the catalog. When you pause a catalog, Indexing Service stops indexing but still allows result sets from queries that are currently being processed to be returned. However, users can’t make new queries or attempt to get additional results within a query set.
To start, stop, or pause a catalog, complete the following steps:
-
Start the Computer Management console. Expand the Services And Applications node by clicking the plus sign (+) next to it, and then expand the Indexing Service node.
-
Right-click the catalog you want to work with, choose All Tasks, and then select Start, Pause, or Stop as appropriate.
Note The Indexing Service automatically performs an incremental scan when you stop and then restart a catalog. This ensures that updated or new documents are indexed as appropriate.
Merging Catalogs
As the Indexing Service updates the catalog, it creates temporary indexes, called shadow indexes, which extend the master index. These shadow indexes reflect the changes within catalog directories. Over time, the number of shadow indexes can grow substantially, and this is reflected in the number of saved indexes associated with a catalog. Because shadow indexes contain additional pointers and information, they use more space than a fully merged master index. As the number of shadow indexes grows, the responsiveness of queries against the catalog can slow.
You can improve the Indexing Service’s responsiveness and reduce storage space usage by merging the temporary indexes with the master index. To perform this task, complete the following steps:
-
Start Computer Management. Expand the Services And Applications node by clicking the plus sign (+) next to it, and then expand the Indexing Service node.
-
Right-click the catalog you want to work with, choose All Tasks, and then select Merge.
-
When prompted to confirm the action, click Yes. As with rescanning, the merge process can be resource-intensive, and you might temporarily reduce the Indexing Service’s responsiveness. The net gain, however, is that once merging is completed, the Indexing Service should be more responsive to user queries.
Specifying Web or NNTP Sites to Include in Catalogs
Each catalog can be associated with one Web site and one NNTP site. After you associate a site with a catalog, you can use the IIS snap-in to specify the resources that should be indexed as discussed in the section of this chapter entitled “Setting Web Resources to Index.” You specify the site to include in a catalog by completing these steps:
-
Start the Computer Management console. Expand the Services And Applications node by clicking the plus sign (+) next to it, and then expand the Indexing Service node.
-
Right-click the catalog you want to work with and then select Properties. Select the Tracking tab.
-
As shown in Figure 12-6 on the following page, you can now take one of the following actions:
-
Use the WWW Server drop-down list in the Tracking tab to specify the Web site that you want to associate with a catalog.
-
Use the NNTP Server drop-down list in the Tracking tab to specify an NNTP site that you want to associate with a catalog.
Note The NNTP Server drop-down list won’t be available if the NNTP Service isn’t installed on the system.
-
-
Click OK.
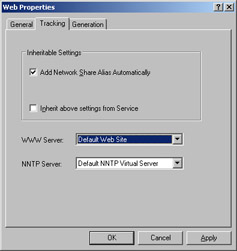
Figure 12-6: Specify the site to index in the Tracking tab.
Testing Catalogs with Queries
After you configure a catalog for indexing, you should query the catalog to ensure that you get the expected results. The Indexing Service has a built-in query form to perform this task. To access this form and enter a query, follow these steps:
-
Start the Computer Management console. Expand the Services And Applications node by clicking the plus sign (+) next to it, and then expand the Indexing Service node.
-
You should see a list of catalogs configured on the server. Double-click the catalog you want to work with and then select Query The Catalog in the left pane.
-
As shown in Figure 12-7, type the query you want to use in the field labeled Enter Your Free Text Query Below, and then click Search. If indexing is configured correctly, the Indexing Service should display search results. Then click a document title or path entry to ensure that documents can be accessed from the results page. If you experience problems with either of these procedures, you should check the indexing configuration.
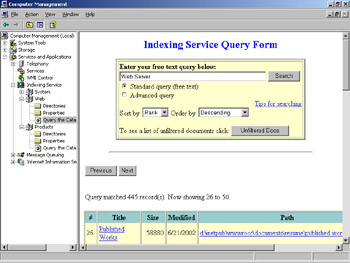
Figure 12-7: After you configure indexing, check the configuration using the predefined query form.
Finding and Resolving Catalog Problems
The Indexing Service can’t index documents that are corrupt, that are missing data, or that are locked for writing. If a document is repeatedly found in a nonindexable state, the indexing engine marks the document so that it’s filtered out of the catalog. Although documents can be filtered out of the catalog for other reasons, periodically searching for unfiltered documents is a good way to uncover potential problems with the catalog.
To find unfiltered documents, follow these steps:
-
Start the Computer Management console. Expand the Services And Applications node by clicking the plus sign (+) next to it, and then expand the Indexing Service node.
-
You should see a list of catalogs configured on the server. Double-click the catalog you want to work with, and then select Query The Catalog in the left pane.
-
Without entering any parameters in the query text field, click Unfiltered Documents.
-
Examine the documents that are listed as unfiltered to determine their potential status as corrupt, missing data, or locked.
If you suspect the catalog is itself corrupt, one way to resolve this is to empty the catalog and then recreate it. To do this, follow these steps:
-
Start the Computer Management console. Expand the Services And Applications node by clicking the plus sign (+) next to it, and then expand the Indexing Service node.
-
Right-click the catalog you want to work with, choose All Tasks, and then select Empty Catalog.
-
Force a full rescan of the catalog to rebuild it.
Limiting or Preventing File and Directory Indexing
You can use security permissions on files and directories to limit indexing. When a catalog is on an NTFS volume, Windows security permissions for documents are maintained. In this case, if the user doesn’t have permission to access a document, the document won’t be listed when the user queries the catalog. If you index a shared folder from another system, however, documents in the shared folder are listed in result sets regardless of access permissions, and it’s only when the user tries to access the document that access permissions are enforced.
If you want to prevent files or directories from being indexed, the technique you use depends on whether the documents are stored on a FAT or NTFS volume. If the documents are on a FAT volume and you don’t want them to be indexed, follow these steps:
-
You must add the directory containing the files to exclude from the directory. Follow the procedure detailed in the section of this chapter entitled “Adding Physical Directories to a Catalog.”
-
Start the Computer Management console. Expand the Services And Applications node by clicking the plus sign (+) next to it, and then expand the Indexing Service node.
-
You should see a list of catalogs configured on the server. Double-click the catalog you want to work with and then select the Directories node.
-
Right-click the directory you want to configure and select Properties.
-
Clear Include In Catalog and then click OK.
If the documents are on an NTFS volume and you don’t want them to be indexed, follow these steps:
-
Start Windows Explorer and then browse to the file or folder you want to exclude from the catalog.
-
Right-click the file or folder and then select Properties.
-
In the General tab, click Advanced.
-
Clear the For Fast Searching, Allow Indexing Service To Index This Folder check box, and then click OK.
|