Web Site Naming and Identification
|
This section discusses Web site naming and identification techniques. Each Web site deployed in the organization has unique characteristics. Different types of Web sites can have different characteristics. Intranet Web sites typically use computer names that resolve locally and have private Internet Protocol (IP) addresses. Internet Web sites typically use fully qualified domain names (FQDNs) and public IP addresses. Intranet and Internet Web sites can also use host header names, allowing single IP address and port assignments to serve multiple Web sites.
Understanding IP Addresses and Name Resolution
Whether you’re configuring an intranet or Internet site, your Web server must be assigned a unique IP address that identifies the computer on the network. An IP address is a numeric identifier for the computer. IP addressing schemes vary depending on how your network is configured, but they’re normally assigned from a range of addresses for a particular network segment (also known as a subnet). For example, if you’re working with a computer on the network segment 192.168.10.0, the address range you have available for computers is usually from 192.168.10.1 to 192.168.10.254.
Although numeric addresses are easy for machines to remember, they aren’t easy for human beings to remember. Because of this, computers are assigned text names that are easy for users to remember. Text names have two basic forms:
-
Standard computer names, which are used on private networks
-
Internet names, which are used on public networks
Private networks are networks that are either indirectly connected to the Internet or completely disconnected from the Internet. Private networks use IP addresses that are reserved for private use and aren’t accessible to the public Internet. Private network addresses fall into the following ranges:
-
10.0.0.0–10.255.255.255
-
172.16.0.0–172.31.255.255
-
192.168.0.0–192.168.255.255
Private networks that use Internet technologies are called intranets. Information is delivered on intranets by mapping a computer’s IP address to its text name, which is the NetBIOS name assigned to the computer. Although Microsoft Windows components use the NetBIOS naming convention for name resolution, Transmission Control Protocol/Internet Protocol (TCP/IP) components use the Domain Name System (DNS). Under Windows, the DNS host name defaults to the same name as the NetBIOS computer name. For example, if you install a server with a computer name of CorpServer, this name is assigned as the NetBIOS computer name and the default DNS host name.
In contrast, public networks are networks that are connected directly to the Internet. Public networks use IP addresses that are purchased or leased for public use. Typically, you’ll obtain IP address assignments for your public servers from the provider of your organization’s Internet services. Internet service providers (ISPs) obtain blocks of IP addresses from the American Registry for Internet Numbers. Other types of organizations can purchase blocks of IP addresses as well.
On the Internet, DNS is used to resolve text names to IP addresses. A hypothetical DNS name is www.microsoft.com. Here, www identifies a server name and microsoft.com identifies a domain name. As with public IP addresses, domain names must be leased or purchased. You purchase domain names from name registrars, such as Internet Network Information Center (InterNIC). When a client computer requests a connection to a site using a domain name, the request is transmitted to a DNS server. The DNS server returns the IP address that corresponds to the requested host name, and then the client request is routed to the appropriate site.
Don’t confuse the public DNS naming system used on the Internet with the private naming system used on intranets. DNS names are configured on DNS servers and resolved to IP addresses before contacting a server. This fact makes it possible for a server to have multiple IP addresses, each with a different DNS name. For example, a server with an internal computer name of Gandolf could be configured with IP addresses of 207.46.230.210, 207.46.230.211, and 207.46.230.212. If these IP addresses are configured as www.microsoft.com, services.microsoft.com, and products.microsoft.com, respectively, in the DNS server, the server can respond to requests for each of these domain names.
Understanding Web Site Identifiers
Each Web site deployed in your organization has a unique identity it uses to receive and to respond to requests. The identity includes the following:
-
A computer or DNS name
-
An IP address
-
A port number
-
An optional host header name
The way these identifiers are combined to identify a Web site depends on whether the host server is on a private or public network. On a private network, a computer called CorpIntranet could have an IP address of 10.0.0.52. If so, the Web site on the server could be accessed in the following ways:
-
Using the Universal Naming Convention (UNC) path name: \\CorpIntranet or \\10.0.0.52
-
Using a Uniform Resource Locator (URL): http://CorpIntranet/ or http:// 10.0.0.52/
-
Using a URL and port number: http://CorpIntranet:80/ or http://10.0.0.52:80/
On a public network, a computer called Dingo could be registered to use the DNS name www.microsoft.com and the IP address of 207.46.230.210. If so, the Web site on the server could be accessed in either of the following ways:
-
Using a URL: http://www.microsoft.com/ or http://207.46.230.210/
-
Using a URL and port number: http://www.microsoft.com:80/ or http:// 207.46.230.210:80/
Hosting Multiple Sites on a Single Server
Using different combinations of IP addresses, port numbers, and host header names, one can host multiple sites on a single computer. Hosting multiple sites on a single server has definite advantages. For example, rather than installing three different Web servers, one could host www.microsoft.com, support.microsoft.com, and service.microsoft.com on the same Web server.
One of the most efficient ways to host multiple sites on the same server is to assign multiple IP addresses to the server. Figure 3-1 shows an example of this configuration.
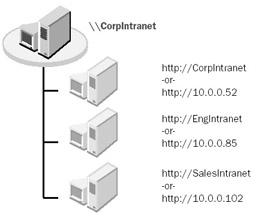
Figure 3-1: You can use multiple IP addresses to host multiple Web sites on a single server.
To use this technique, you must follow these steps:
-
Configure the TCP/IP settings on the server so that there is one IP address for each site that you want to host.
-
Configure DNS so that the host names and corresponding IP addresses can be resolved.
-
Configure each Web site so that it uses a specific IP address.
With this technique, users can access the sites individually by typing the unique domain name or IP address in a browser. Following the example shown in Figure 3-1, you can access the Sales intranet by typing http://SalesIntranet/ or http://10.0.0.102/.
Another technique you can use to host multiple sites on a single server is to assign each site a unique port number while keeping the same IP address, as shown in Figure 3-2. Users will then be able to do the following:
-
Access the main site by typing the DNS server name or IP address in a browser, such as http://Intranet/ or http://10.0.0.52/
-
Access other virtual servers by typing the domain name and port assignment or IP address and port assignment, such as http://Intranet:88/ or http://10.0.0.52:88/
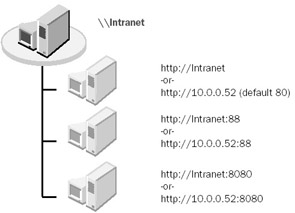
Figure 3-2: Another technique is to use multiple port numbers to host multiple Web sites on a single server.
The final method you can use to host multiple sites on a single server is to use host header names. Host headers allow you to host multiple sites on the same IP address and port number. The key to host headers is a DNS name assignment that’s configured in DNS and assigned to the site in its configuration.
An example of host header assignment is shown in Figure 3-3. Here, a single server hosts the sites CorpIntranet, EngIntranet, and SalesIntranet. The three sites use the same IP address and port number assignment but have different DNS names.
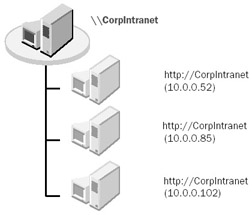
Figure 3-3: You can use host headers to support multiple Web sites on a single server, with a single IP address.
To use host headers, you must do the following:
-
Configure DNS so that the host header names and corresponding IP addresses can be resolved.
-
Configure the primary Web site so that it responds to requests on the IP address and port number you’ve assigned.
-
Configure additional Web sites so that they use the same IP address and port number and also assign a host header name.
Host headers have specific drawbacks. Earlier versions of browsers that don’t support Hypertext Transfer Protocol (HTTP) 1.1 are unable to pass host header names back to IIS. Although Microsoft Internet Explorer 3, Netscape Navigator 2, and later versions of these browsers support the use of host header names, earlier versions of these browsers don’t. Visitors using earlier browsers will reach the default Web site for the IP address.
Another drawback to host headers is that you can’t use host headers with Secure Sockets Layer (SSL). With SSL, HTTP requests are encrypted, and the host header name within the encrypted request can’t be used to determine the correct site to which the request must be routed.
Checking the Computer Name and IP Address of Servers
Before you configure Web sites, you should check the server’s computer name and IP address. You can view the computer name by completing the following steps:
-
Start the System utility in Control Panel.
-
Select the Computer Name tab. The tab displays the FQDN of the server and the domain or workgroup membership. The FQDN is the DNS name of the computer.
-
The DNS name is the name that you normally use to access the IIS resources on the server. For example, if the DNS name of the computer is www.microsoft.com and you’ve configured a Web site on port 80, the URL you use to access the computer from the Internet is http://www.microsoft.com/.
You can view the IP address and other TCP/IP settings for the computer by completing the following steps:
-
Access Network Connections by clicking Start and selecting Control Panel and Network Connections. Or double-click Network Connections in the Control Panel dialog box.
-
Right-click Local Area Connection and then select Properties. This opens the Local Area Connection Properties dialog box.
-
Open the Internet Protocol (TCP/IP) Properties dialog box by double- clicking Internet Protocol (TCP/IP). Or you could select Internet Protocol (TCP/IP) and then click Properties.
-
The IP Address and other TCP/IP settings for the computer are displayed, as shown in Figure 3-4.

Figure 3-4: Use the Internet Protocol (TCP/IP) Properties dialog box to view and configure TCP/IP settings.Real World IIS servers should use static IP addresses. If the computer is obtaining an IP address automatically, you’ll need to reconfigure the TCP/IP settings. See Chapter 16, “Managing TCP/IP Networking,” in Microsoft Windows Server 2003 Administrator’s Pocket Consultant (Microsoft Press, 2003), for details.
|
- ERP Systems Impact on Organizations
- Challenging the Unpredictable: Changeable Order Management Systems
- ERP System Acquisition: A Process Model and Results From an Austrian Survey
- Healthcare Information: From Administrative to Practice Databases
- Development of Interactive Web Sites to Enhance Police/Community Relations