Working with Group Policies Once you've selected a policy for editing or created a new policy, you use the Group Policy console to work with group policies. Techniques for working with this console are examined in this section. Getting to Know the Group Policy Console As Figure 4-3 shows, the Group Policy console has two main nodes: -
Computer Configuration Allows you to set policies that should be applied to computers, regardless of who logs on -
User Configuration Allows you to set policies that should be applied to users, regardless of which computer they log on to Figure 4-3. The configuration of the Group Policy console depends on the type of policy you're creating and the add-ons installed. 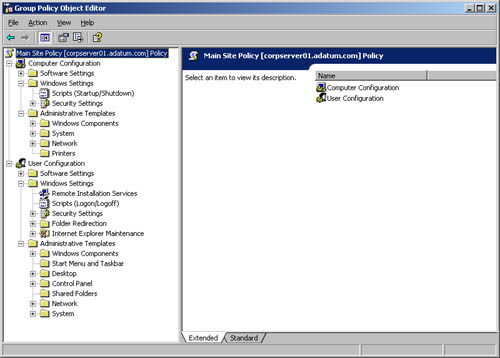 The exact configuration of Computer Configuration and User Configuration depends on the add-ons installed and which type of policy you're creating. Still, you'll usually find that both Computer Configuration and User Configuration have subnodes for -
Software Settings Sets policies for software settings and software installation. When you install software, subnodes might be added to Software Settings. -
Windows Settings Sets policies for folder redirection, scripts, and security. -
Administrative Templates Sets policies for the operating system, Windows components , and programs. Administrative templates are configured through template files. You can add or remove template files whenever you need to. Note A complete discussion of all the available options is beyond the scope of this book. The sections that follow focus on using folder redirection and administrative templates. Scripts are discussed in the section of this chapter entitled "User and Computer Script Management." Security is covered in Part II of this book, "Microsoft Windows Server 2003 Directory Service Administration."
Centrally Managing Special Folders You can centrally manage special folders used by Windows Server 2003 through folder redirection. You do this by redirecting special folders to a central network location instead of using multiple default locations on each computer. The special folders you can centrally manage are -
Application Data -
Desktop -
Start Menu -
My Documents -
My Pictures You have two options for redirection. You can redirect a special folder to the same network location for all users or you can designate locations based on user membership in security groups. In either case, you should make sure that the network location you plan to use is available as a network share. See Chapter 14 , "Data Sharing, Security, and Auditing," for details on sharing data on the network. Redirecting a Special Folder to a Single Location You redirect a special folder to a single location by completing the following steps: -
Access the Group Policy console for the site, domain, or organizational unit you want to work with as specified in the section of this chapter entitled "Creating and Editing Site, Domain, and Organizational Unit Policies." -
In the User Configuration node, you'll find Windows Settings. Expand this entry by double-clicking it, and then select Folder Redirection. -
Right-click the special folder you want to work with, such as Application Data, and then select Properties on the shortcut menu. This opens a properties dialog box similar to the one shown in Figure 4-4. Figure 4-4. Set options for redirection using the Application Data Properties dialog box. 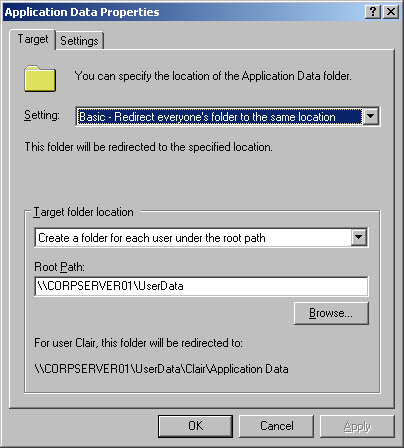 -
Since you're redirecting the folder to a single location, use the Setting selection list in the Target tab to choose Basic-Redirect Everyone's Folder To The Same Location. -
Under Target Folder Location, you have several options. The exact options available depend on the folder you're working with and include: -
Redirect To The User's Home Directory If you use this option, the folder is redirected to a subdirectory within the user's home directory. You set the location of the user's home directory with the %HomeDrive% and %HomePath% environment variables . -
Create A Folder For Each User Under The Root Path If you use this option, a folder is created for each user at the location you enter in the Root Path field. The folder name is the user account name as specified by %UserName%. Thus, if you entered the root path value \\Zeta\UserDocuments, the folder for WilliamS would be located at \\Zeta\UserDocuments\WilliamS. -
Redirect To The Following Location If you use this option, the folder is redirected to the exact location you enter in the Root Path field. Here, you typically want to use an environment variable to customize the folder location for each user. For example, you could use the root path value \\Zeta\UserData\%UserName%\docs. -
Redirect To The Local Userprofile Location If you use this option, the folder is redirected to a subdirectory within the user profile directory. You set the location of the user profile with the %UserProfile% variable. -
Click the Settings tab, and then configure additional options using the following fields: -
Grant The User Exclusive Rights To Gives users full rights to access their data in the special folder -
Move The Contents Of To The New Location Moves the data in the special folders from the individual systems on the network to the central folder(s) -
Click OK to complete the process. Redirecting a Special Folder Based on Group Membership You redirect a special folder based on group membership by completing the following steps: -
Access the Group Policy console for the site, domain, or organizational unit you want to work with. -
In the User Configuration node, you'll find Windows Settings. Expand this entry by double-clicking it, and then select Folder Redirection. -
Right-click the special folder you want to work with, such as Application Data, and then select Properties on the shortcut menu. -
In the Target tab, use the Setting selection list to choose Advanced “Specify Locations For Various User Groups. As shown in Figure 4-5, a Security Group Membership panel is added to the properties dialog box. Figure 4-5. Configure advanced redirection using the Security Group Membership panel. 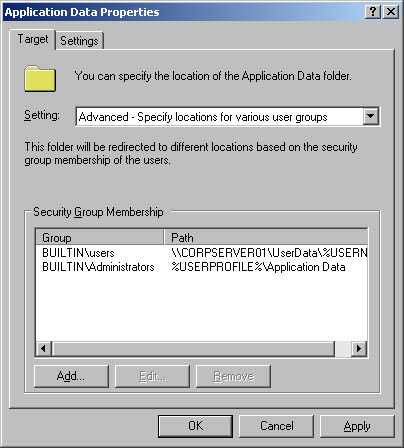 -
Click Add to display the Specify Group And Location dialog box. Or select an existing group entry and click Edit to modify its settings. -
In the Security Group Membership field, type the name of the security group for which you want to configure redirection. Or click Browse to find a security group to add. -
As with basic redirection, the options available depend on the folder you're working with and include: -
Redirect To The User's Home Directory If you use this option, the folder is redirected to a subdirectory within the user's home directory. You set the location of the user's home directory with the %HomeDrive% and %HomePath% environment variables. -
Create A Folder For Each User Under The Root Path If you use this option, a folder is created for each user at the location you enter in the Root Path field. The folder name is the user account name as specified by %UserName%. Thus, if you entered the root path value \\Zeta\UserDocuments, the folder for WilliamS would be located at \\Zeta\UserDocuments\WilliamS. -
Redirect To The Following Location If you use this option, the folder is redirected to the exact location you enter in the Root Path field. Here, you typically want to use an environment variable to customize the folder location for each user. For example, you could use the root path value \\Zeta\UserData\%UserName%\docs. -
Redirect To The Local Userprofile Location If you use this option, the folder is redirected to a subdirectory within the user profile directory. You set the location of the user profile with the %UserProfile% variable. -
Click OK. Then repeat Steps 5 “7 for other groups that you want to configure. -
When you're done creating group entries, click the Settings tab and then configure additional options using the following fields: -
Grant The User Exclusive Rights To Gives users full rights to access their data in the special folder -
Move The Contents Of To The New Location Moves the data in the special folders from the individual systems on the network to the central folder(s) -
Click OK to complete the process. Removing Redirection Sometimes you might want to remove redirection from a particular special folder. You remove redirection by completing the following steps: -
Access the Folder Redirection subnode in the Group Policy console. -
Right-click the special folder you want to work with, and then select Properties on the shortcut menu. -
Select the Settings tab, and then make sure that an appropriate Policy Removal option is selected. Two options are available: -
Leave The Folder In The New Location When Policy Is Removed When you select this option, the folder and its contents remain at the redirected location and current users are still permitted to access the folder and its contents at this location. -
Redirect The Folder Back To The Local Userprofile Location When Policy Is Removed When you select this option, the folder and its contents are copied back to the original location. The contents aren't deleted from the previous location, however. -
If you changed the Policy Removal option, click Apply. Then select the Target tab. Otherwise, just select the Target tab. -
To remove all redirection definitions for the special folder, use the Setting selection list to choose Not Configured. -
To remove redirection for a particular security group, select the security group in the Security Group Membership panel and then click Remove. -
Click OK. Using Administrative Templates to Set Policies Administrative templates provide easy access to registry-based policy settings that you might want to configure. Viewing Administrative Templates and Policies As Figure 4-6 shows, a default set of administrative templates is configured for users and computers in the Group Policy console. You can add or remove administrative templates as well. Any changes you make to policies available through the administrative templates are saved in the registry. Computer configurations are saved in HKEY_LOCAL_MACHINE (HKLM), and user configurations are saved in HKEY_CURRENT_USER (HKCU). Figure 4-6. You set policies through administrative templates. 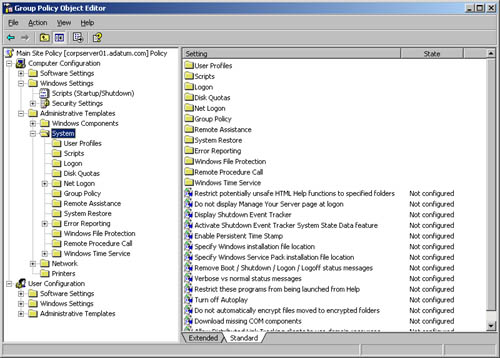 You can view the currently configured templates in the Group Policy console's Administrative Templates node. This node contains policies that can be configured for local systems, organizational units, domains, and sites. Different sets of templates are found under Computer Configuration and User Configuration. You can manually add additional templates containing new policies in the Group Policy console and when you install new Windows components. You set the user interface for the Administrative Templates node in .adm files. These files are formatted as ASCII text, and you can edit them using a standard text editor. When you set policies through the Administrative Templates node, the policy settings are saved in Registry.pol files. Separate Registry.pol files are used for HKEY_LOCAL_MACHINE (HKLM) and HKEY_CURRENT_USER (HKCU). The best way to get to know what administrative template policies are available is to browse the Administrative Templates nodes in the Group Policy console. As you browse the templates, you'll find that policies are in one of three states: -
Not Configured The policy isn't used and no settings for it are saved in the registry. -
Enabled The policy is actively being enforced and its settings are saved in the registry. -
Disabled The policy is turned off and isn't enforced unless overridden. This setting is saved in the registry. Enabling, Disabling, and Configuring Policies You can enable, disable, and configure policies by completing the following steps: -
Access the Group Policy console for the site, domain, or organizational unit you want to work with. -
Access the Administrative Templates folder in the Computer Configuration or User Configuration node, whichever is appropriate for the type of policy you want to set. -
In the left pane, click the subfolder containing the policies you want to work with. The related policies are then displayed in the right pane. -
Double-click or right-click a policy and choose Properties to display its related properties dialog box. -
Click the Explain tab to see a description of the policy. The description is available only if one is defined in the related .adm file. -
To set the policy's state, click the Setting tab and then use the option buttons provided to change the policy's state: -
Not Configured The policy isn't configured. -
Enabled The policy is enabled. -
Disabled The policy is disabled. Note Computer policies have precedence in Windows Server 2003. So if there's a conflict between a computer policy setting and a user policy setting, the computer policy is the one that's enforced.
-
If you enabled the policy, set any additional parameters specified on the Setting tab, and then click Apply. -
Use the Previous Policy and Next Policy buttons to manage other policies in the current folder. Then configure them in the same way. -
Click OK when you're finished managing policies. Adding or Removing Templates You can add or remove template folders in the Group Policy console. To do this, complete the following steps: -
Access the Group Policy console for the site, domain, or organizational unit you want to work with. -
Right-click the Administrative Templates folder in the Computer Configuration or User Configuration node, whichever is appropriate for the type of template you want to add or remove. This displays the Add/Remove Templates dialog box shown in Figure 4-7. Figure 4-7. You can use the Add/Remove Templates dialog box to add more templates or remove existing ones. 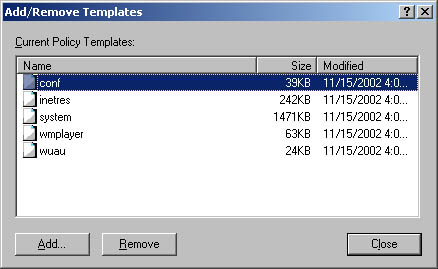 -
To add new templates, click Add. Then, in the Policy Templates dialog box, click the template you want to add and click Open . -
To remove an existing template, select the template to remove, and then click Remove. -
When you're finished adding and removing templates, click Close. |