| Services provide key functions to workstations and servers. To manage system services, you'll use the Services entry in the Computer Management console. You can start Computer Management and access the Services entry by completing the following steps: -
Choose Start, then choose Programs or All Programs as appropriate, then Administrative Tools, and finally Computer Management. Or select Computer Management in the Administrative Tools folder. -
Right-click the Computer Management entry in the console tree and select Connect To Another Computer on the shortcut menu. You can now choose the system whose services you want to manage. -
Expand the Services And Applications node by clicking the plus sign (+) next to it, and then choose Services. Note Windows Server 2003 provides several other ways to access services. For example, you can also use the Services entry in the Component Services utility.
Figure 3-5 shows the Services view in the Computer Management console. The key fields of this dialog box are used as follows : -
Name The name of the service. Only services installed on the system are listed here. Double-click an entry to configure its startup options. If a service you need isn't listed, you can install it by using the Network Connection Properties dialog box or the Windows Optional Networking Components Wizard. See Chapter 16 , "Managing TCP/IP Networking," for details. -
Description A short description of the service and its purpose. -
Status Whether the status of the service is started, paused , or stopped. ( Stopped is indicated by a blank entry.) -
Startup Type The startup setting for the service. Automatic services are started at bootup . Users or other services start manual services. Disabled services are turned off and can't be started while they remain disabled. -
Log On As The account the service logs on as. The default in most cases is the local system account. Figure 3-5. Use the Services view to manage services on workstations and servers. 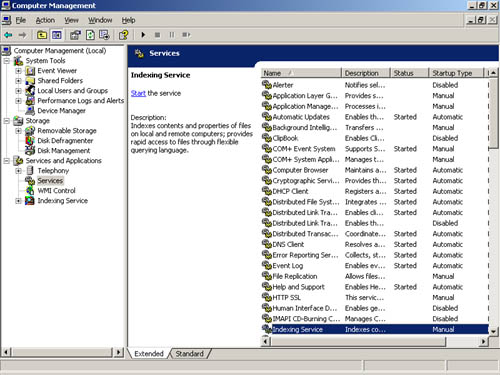 Services has two views: extended and standard. To change the view, click the tabs at the bottom of the Services area. In extended view, quick links are provided for managing services. Click Start to start a stopped service. Click Restart to stop and then start a service ” essentially resetting that service. If you select a service in extended view, a service description is shown, which details the service's purpose. Note Both the operating system and a user can disable Services. Generally, Windows Server 2003 disables services if there's a possible conflict with another service.
Starting, Stopping, and Pausing Services As an administrator, you'll often have to start, stop, or pause Windows Server 2003 services. To start, stop, or pause a service, complete the following steps: -
Start the Computer Management console. -
Right-click the Computer Management entry in the console tree and select Connect To Another Computer on the shortcut menu. You can now choose the system whose services you want to manage. -
Expand the Services And Applications node by clicking the plus sign (+) next to it, and then choose Services. -
Right-click the service you want to manipulate, and then select Start, Stop, or Pause as appropriate. You can also choose Restart to have Windows stop and then start the service after a brief pause. Additionally, if you pause a service, you can use the Resume option to resume normal operation. Note When services that are set to start automatically fail, the status is listed as blank and you'll usually receive notification in a pop-up dialog box. Service failures can also be logged to the system's event logs. In Windows Server 2003, you can configure actions to handle service failure automatically. For example, you could have Windows Server 2003 attempt to restart the service for you. For details, see the section of this chapter entitled "Configuring Service Recovery."
Configuring Service Startup You can set Windows Server 2003 services to start manually or automatically. You can also turn them off permanently by disabling them. You configure service startup by completing the following steps: -
In the Computer Management console, connect to the computer whose services you want to manage. -
Expand the Services And Applications node by clicking the plus sign (+) next to it, and then choose Services. -
Right-click the service you want to configure, and then choose Properties. -
In the General tab, use the Startup Type drop-down list box to choose a startup option, as shown in Figure 3-6. Select Automatic to start services at bootup. Select Manual to allow the services to be started manually. Select Disabled to turn off the service. -
Click OK. Figure 3-6. Use the General tab's Startup Type drop-down list box to configure service startup options. 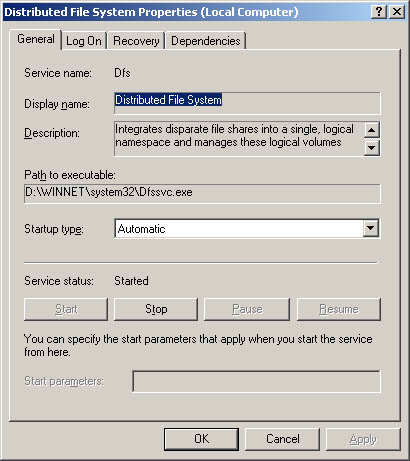 Real World When a server has multiple hardware profiles, you can enable or disable services for a particular profile. Before you disable services permanently, you might want to create a separate hardware profile for testing the server with these services disabled. In this way you can use the original profile to quickly resume operations using the original service status. The profile doesn't save other service configuration options, however. To enable or disable a service by profile, use the Logon tab of the Service Properties dialog box. Select the profile that you want to work with under Hardware Profile, and then click Enable or Disable as appropriate. | Configuring Service Logon You can configure Windows Server 2003 services to log on as a system account or as a specific user. To do either of these, complete the following steps: -
In the Computer Management console, connect to the computer whose services you want to manage. -
Expand the Services And Applications node by clicking the plus sign (+) next to it, and then choose Services. -
Right-click the service you want to configure, and then choose Properties. -
Select the Log On tab, as shown in Figure 3-7. -
Select Local System Account if the service should log on using the system account (which is the default for most services). If the service provides a user interface that can be manipulated, select Allow Service To Interact With Desktop to allow users to control the service's interface. -
Select This Account if the service should log on using a specific user account. Be sure to type an account name and password in the fields provided. Use the Browse button to search for a user account, if necessary. -
Click OK. Figure 3-7. Use the Log On tab to configure the service logon account. 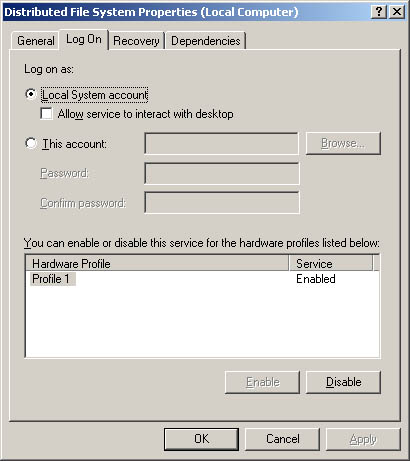 Security Alert As an administrator, you should keep track of any accounts that are used with services. These accounts can be the source of huge security problems if they're not configured properly. Service accounts should have the strictest security settings and as few permissions as possible while allowing the service to perform necessary functions. Typically, accounts used with services don't need many of the permissions you would assign to a normal user account. For example, most service accounts don't need the right to log on locally. Every administrator should know what service accounts are used (so they can better track use of these accounts), and the accounts should be treated as if they were administrator accounts. This means: secure passwords, careful monitoring of account usage, careful application of account permissions and privileges, and so on.
Configuring Service Recovery You can configure Windows Server 2003 services to take specific actions when a service fails. For example, you could attempt to restart the service or run an application. To configure recovery options for a service, complete the following steps: -
In the Computer Management console, connect to the computer whose services you want to manage. -
Expand the Services And Applications node by clicking the plus sign (+) next to it, and then choose Services. -
Right-click the service you want to configure, and then choose Properties. -
Select the Recovery tab, as shown in Figure 3-8. Figure 3-8. Use the Recovery tab to specify actions that should be taken in case of service failure. 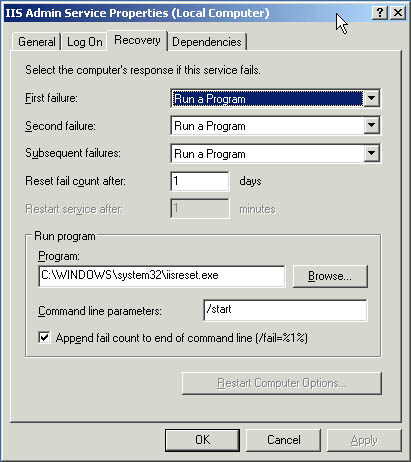 Note Windows Server 2003 automatically configures recovery for some critical system services during installation. In Figure 3-8, you see that the IIS Admin service is set to run a program called Iisreset.exe if the service fails. This program is an application that corrects service problems and safely manages dependent IIS services while working to restart the service. Iisreset.exe requires the command line parameter/start as well.
-
You can now configure recovery options for the first, second, and subsequent recovery attempts. The available options are -
Take No Action The operating system won't attempt recovery for this failure but might still attempt recovery of previous or subsequent failures. -
Restart the Service Stops and then starts the service after a brief pause. -
Run a Program Allows you to run a program or a script in case of failure. The script can be a batch program or a Windows script. If you select this option, set the full file path to the program you want to run and then set any necessary command line parameters to pass in to the program when it starts. -
Restart the Computer Shuts down and then restarts the computer. Before you choose this option, double-check Startup and Recovery options as well as Hardware Profile options as discussed in the sections entitled "Configuring System Startup and Recovery" and "Configuring the Way Hardware Profiles Are Used," respectively, in Chapter 2 , "Managing Servers Running Microsoft Windows Server 2003." You want the system to select defaults quickly and automatically. Best Practices When you configure recovery options for critical services, you might want to try to restart the service on the first and second attempts and then reboot the server on the third attempt.
-
Configure other options based on your previously selected recovery options. If you elected to run a program as a recovery option, you'll need to set options in the Run Program panel. If you elected to restart the service, you'll need to specify the restart delay. After stopping the service, Windows Server 2003 waits for the specified delay before trying to start the service. In most cases a delay of 1 “2 minutes should be sufficient. -
Click OK. Disabling Unnecessary Services As an administrator, it's your job to ensure server and network security, and unnecessary services are a potential source of security problems. For example, in many organizations that I've reviewed for security problems, I've found servers running Worldwide Web Publishing Service, Simple Mail Transfer Protocol (SMTP), and File Transfer Protocol (FTP) Publishing Service when these services weren't needed. Unfortunately, these services can make it possible for anonymous users to access servers and can also open the server to attack if not properly configured. If you find services that aren't needed, you have several options. In the case of IIS Admin services, Domain Name System (DNS), and other services that are installed as separate Windows components, you could use the Add/Remove Programs utility in the Control Panel to remove the unnecessary component and its related services. Or you could simply disable the services that aren't being used. Typically, you'll want to start by disabling services rather than uninstalling components. This way, if you disable a service and another administrator or a user says they can't perform task X anymore, you can restore the related service, if necessary. To disable a service, follow these steps: -
In Computer Management, right-click the service you want to disable, and then choose Properties. -
In the General tab, select Disabled as the option for the Startup Type drop-down list box. Disabling a service doesn't stop a running service. It only prevents it from being started the next time the computer is booted , meaning the security risk still exists. To address this, click Stop in the Properties dialog box on the General tab, and then click OK.  |