| The Computer Management console is designed to handle core system administration tasks on local and remote systems. You'll spend a lot of time working with this tool, and you should get to know every nook and cranny. Access the Computer Management console with either of the following techniques: -
Choose Start, then Programs or All Programs as appropriate, then Administrative Tools, and finally Computer Management. -
Select Computer Management from the Administrative Tools folder. As Figure 2-1 shows, the main window has a two-pane view that's similar to Windows Explorer. You use the console tree in the left pane for navigation and tool selection. Tools are divided into three broad categories: -
System Tools Provides access to general-purpose tools for managing systems and viewing system information -
Storage Displays information on removable and logical drives and provides access to drive management tools -
Services And Applications Lets you view and manage the properties of services and applications installed on the server Figure 2-1. Use the Computer Management console to manage network computers and resources. 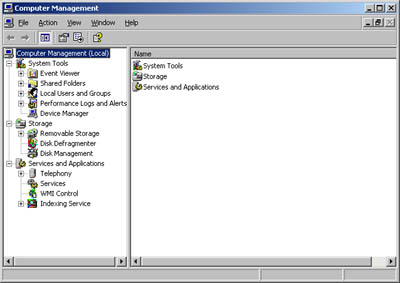 The tools available through the console tree provide the core functionality for the Computer Management console. When Computer Management is selected in the console tree, you can easily access three important tasks: The following sections examine these tasks, and then we'll take a detailed look at working with tools in the Computer Management console. Connecting to Other Computers The Computer Management console is designed to be used with local and remote systems. You can select a computer to manage by completing the following steps: -
Right-click the Computer Management entry in the console tree and then select Connect To Another Computer on the shortcut menu. This opens the Select Computer dialog box. -
Choose Another Computer and then type the fully qualified name of the computer you want to work with, such as engsvr01.technology.microsoft.com, where engsvr01 is the computer name and technology.microsoft.com is the domain name. Or click Browse to search for the computer you want to work with. -
Click OK. Sending Console Messages You can use the Computer Management console to send messages to users logged on to local or remote systems. These messages appear in a dialog box that the user must click to close. You send messages to remote users by completing the following steps: -
In the Computer Management console, right-click the Computer Management entry in the console tree. Then, on the shortcut menu, select All Tasks and then choose Send Console Message. This opens the dialog box shown in Figure 2-2. Figure 2-2. Use the Send Console Message dialog box to send console messages to other systems. 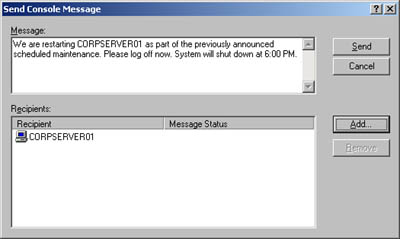 -
Type the text of the message in the Message area. In the Recipients area, you should see the name of the computer you're currently connected to. -
If you want to send a message to users of this system, click Send. Otherwise, use the Add button to add recipients or the Remove button to delete a selected recipient. Then, when you're ready to send the message, click Send. Note Only users logged on to the selected system will receive the message. Other users won't. Additionally, Windows NT, Windows 2000, Windows XP, and Windows Server 2003 systems must be running the Messenger service to send and receive console messages. Windows 95 and Windows 98 systems running the WinPopup utility can also send and receive console messages.
Exporting Information Lists The ability to export information lists is one of my favorite features of the Computer Management console, and if you maintain system information records or regularly work with Windows scripting it'll probably be one of yours, too. The Export List feature allows you to save textual information displayed in the right pane to a tab-delimited or comma-delimited text file. You could, for example, use this feature to save detailed information on all the services running on the system by completing the following steps: -
In the Computer Management console, click the plus sign (+) next to the System Tools node. This expands the node to display its tools. -
Right-click Event Viewer, and then from the shortcut menu select Export List. This opens the Export List dialog box. -
Use the Save In selection list to choose the save location and then enter a name for the export file. -
Use the Save As Type selection list to set the formatting of the export file. You can separate columns of information with tabs or commas and save as ASCII text or Unicode text. In most cases you'll want to use ASCII text. -
Click Save to complete the export process. You can use a similar procedure to export lists of other information displayed in the Computer Management console. Using Computer Management System Tools The Computer Management system tools are designed to manage systems and view system information. The available system tools are -
Event Viewer View the event logs on the selected computer. Event logs are covered in "Event Logging and Viewing" in Chapter 3 , "Monitoring Processes, Services, and Events." -
Shared Folders Manage the properties of shared folders, user sessions, and open files. Managing user sessions, open files, and network shares is covered in Chapter 13 , "Managing Files and Folders." -
Local Users And Groups Manage local users and local user groups on the currently selected computer. Working with users and groups is covered in Part II, "Microsoft Windows Server 2003 Directory Service Administration," along with other types of accounts that you can manage in the Active Directory directory service. Note Local users and local user groups aren't a part of Active Directory and are managed instead through the Local Users And Groups view. Domain controllers don't have entries in the Local Users And Groups view.
-
Performance Logs And Alerts Monitor system performance and create logs based on performance parameters. You can also use this tool to notify or alert users of performance conditions. For more information on alerts and monitoring systems, see Chapter 3 . -
Device Manager Use as a central location for checking the status of any device installed on a computer and for updating the associated device drivers. You can also use it to troubleshoot device problems. Managing devices is covered later in the chapter. Using Computer Management Storage Tools The Computer Management storage tools display drive information and provide access to drive management tools. The available storage tools are -
Removable Storage Manages removable media devices and tape libraries. Tracks work queues and operator requests related to removable media devices. -
Disk Defragmenter Corrects drive fragmentation problems by locating and combining fragmented files. -
Disk Management Manages hard disks, disk partitions, volume sets, and redundant array of independent disks (RAID) arrays. Replaces the Disk Administrator utility in Windows NT 4.0. Working with files, drives, and storage devices is the subject of Part III, "Microsoft Windows Server 2003 Data Administration." Working with Services and Applications You use the Computer Management services and applications tools to manage services and applications installed on the server. Any application or service-related task that can be performed in a separate tool can be performed through the Services And Applications node as well. For example, if the currently selected system has Dynamic Host Configuration Protocol (DHCP) installed, you can manage DHCP through the Server Applications And Services node. You could also use the DHCP tool in the Administrative Tools folder. You can perform the same tasks either way. This technology is possible because the DHCP tool is a Microsoft Management Console (MMC) snap-in. When you access the DHCP tool in the Administrative Tools folder, the snap-in is displayed in a separate console. When you access the DHCP tool through the Server Applications And Services node, the snap-in is displayed within the Computer Management console. Working with services and applications is discussed in Chapter 3 and elsewhere in this book.  |