| You can configure any Windows Server 2003 system as a DNS server. Four types of DNS servers are available: -
Active Directory “integrated primary server A DNS server that's fully integrated with Active Directory. All DNS data is stored directly in Active Directory. -
Primary server The main DNS server for a domain that uses partial integration with Active Directory. This server stores a master copy of DNS records and the domain's configuration files. These files are stored as text with the .dns extension. -
Secondary server A DNS server that provides backup services for the domain. This server stores a copy of DNS records obtained from a primary server and relies on zone transfers for updates. Secondary servers obtain their DNS information from a primary server when they're started, and they maintain this information until the information is refreshed or expired . -
Forwarding-only server A server that caches DNS information after lookups and always passes requests to other servers. These servers maintain DNS information until it's refreshed or expired or until the server is restarted. Unlike secondary servers, forwarding-only servers don't request full copies of a zone's database files. This means that when you start a forwarding-only server, its database contains no information. Before you configure a DNS server, you must install the DNS Server service. Afterward, you can configure the server to provide integrated, primary, secondary, or forwarding-only DNS services. Installing the DNS Server Service All domain controllers can act as DNS servers, and you might be prompted to install and configure DNS during installation of the domain controller. If you responded affirmatively to the prompts, DNS is already installed and the default configuration is set automatically. You don't need to reinstall. If you're working with a member server instead of a domain controller or if you haven't installed DNS, complete the following steps to install DNS: -
Click Start, choose Programs or All Programs, Administrative Tools, and then select Configure Your Server Wizard. Click Next. -
Click Next. All the possible server roles are shown with an indication of which roles have already been configured. Select DNS Server and then click Next. -
Click Next. The wizard installs DNS and begins configuring the server. As necessary, insert the Windows Server 2003 CD when prompted. -
The Configure A DNS Server Wizard starts. Click Next. -
Select Configure Root Hints Only to specify that only the base DNS structures should be created at this time. -
Click Next. The wizard searches for existing DNS structures and modifies them as necessary. -
Click Finish twice. Close the Manage Your Server console. From now on, DNS should start automatically each time you reboot the server. If it doesn't start, you'll need to start it manually. See the section of this chapter entitled "Starting and Stopping a DNS Server." Configuring a Primary DNS Server Every domain should have a primary DNS server. This server can be integrated with Active Directory or it can act as a standard primary server. Primary servers should have forward lookup zones and reverse lookup zones. Forward lookups are used to resolve domain names to IP addresses. Reverse lookups are needed to authenticate DNS requests by resolving IP addresses to domain names or hosts . Once you install the DNS Server service on the server, you can configure a primary server by completing the following steps: -
Start the DNS console. Click the Start menu, choose Programs or All Programs as appropriate, choose Administrative Tools, and then select DNS. This displays the DNS console shown in Figure 20-1. Figure 20-1. Use the DNS console to manage DNS servers on the network. 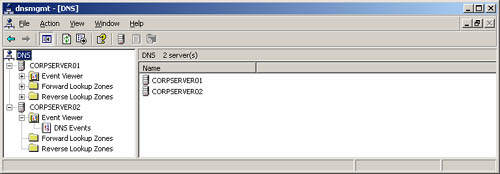 -
If the server you want to configure isn't listed in the tree view, you'll need to connect to the server. Right-click DNS in the tree view and then choose Connect To DNS Server. Now do one of the following: -
If you're trying to connect to a local server, select This Computer and then click OK. -
If you're trying to connect to a remote server, select The Following Computer and then type the server's name or IP address. Then click OK. -
An entry for the DNS server should be listed in the tree view window of the DNS console. Right-click the server entry and then, from the shortcut menu, choose New Zone. This starts the New Zone Wizard. Click Next. Note An alternative to the DNS console is to use the Services And Applications node in Computer Management. Access this node and then click DNS.
-
As Figure 20-2 shows, you can now select the zone type. If you're configuring a primary server integrated with Active Directory (domain controller), select Primary Zone and ensure that Store The Zone In Active Directory is selected. If you don't want to integrate DNS with Active Directory, select Primary Zone and then clear the Store The Zone In Active Directory check box. Click Next. Figure 20-2. In the New Zone Wizard, select the zone type. 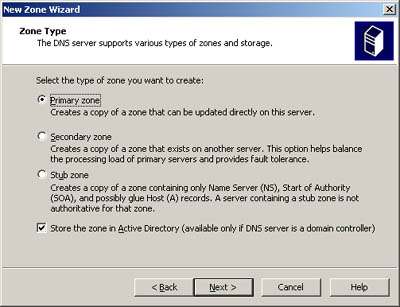 -
If you're integrating the zone with Active Directory, choose a replication strategy, otherwise proceed to Step 6. -
To All DNS Servers In The Active Directory Forest Choose this strategy if you want the widest replication strategy. Remember, the Active Directory forest includes all domain trees that share the directory data with the current domain. -
To All DNS Servers In The Active Directory Domain Choose this strategy if you only want to replicate DNS information within the current domain and child domains of the current domain. -
To All Domain Controllers In The Active Directory Domain Choose this strategy if you want to replicate DNS information to all domain controllers within the current domain and child domains of the current domain. Although this strategy gives wider replication for DNS information within the domain, not every domain controller is a DNS server as well (and you don't need to configure every domain controller as a DNS server either). -
Click Next. Select Forward Lookup Zone and then click Next. -
Type the full DNS name for the zone. The zone name should help determine how the server or zone fits into the DNS domain hierarchy. For example, if you're creating the primary server for the microsoft.com domain, you should type microsoft.com as the zone name. Click Next. -
If you're configuring a primary zone that isn't integrated with Active Directory, you need to set the zone file name. A default name for the zone's DNS database file should be filled in for you. You can use this name or type a new file name. Click Next. -
Specify whether dynamic updates are allowed. You have three options: -
Allow Only Secure Dynamic Updates When the zone is integrated with Active Directory, you can use access control lists (ACLs) to restrict which clients can perform dynamic updates. With this option selected, only clients with authorized computer accounts and approved ACLs can dynamically update their resource records in DNS when changes occur. -
Allow Both Nonsecure and Secure Dynamic Updates Choose this option to allow any client to update its resource records in DNS when changes occur. Clients can be secure or nonsecure. -
Do Not Allow Dynamic Updates Choosing this option disables dynamic updates in DNS. You should use this option only when the zone isn't integrated with Active Directory. -
Click Next and then click Finish to complete the process. The new zone is added to the server and basic DNS records are created automatically. -
A single DNS server can provide services for multiple domains. If you have multiple parent domains, such as microsoft.com and msn.com , you can repeat this process to configure other forward lookup zones. You also need to configure reverse lookup zones. Follow the steps listed later in the chapter in the section entitled "Configuring Reverse Lookups." -
You need to create additional records for any computers you want to make accessible to other DNS domains. To do this, follow the steps listed later in this chapter in the section entitled "Managing DNS Records." Real World Most organizations have private and public areas of their network. The public network areas might be where Web, File Transfer Protocol (FTP), and external e-mail servers reside. Your organization's public network areas shouldn't allow unrestricted access. Instead, they should be configured as a part of perimeter networks (also known as DMZ, demilitarized zone, and screened subnet) and refer to areas protected by your organization's firewall that have restricted external access and no access to the internal network or be in a completely separate and firewall-protected area. The private network areas are where the organization's internal servers and workstations reside. On the public network areas, your DNS settings are in the public Internet space. Here, you might use a .com, .org, or .net DNS name that you've registered with an Internet registrar and public IP addresses that you've purchased or leased. On the private network areas, your DNS settings are in the private network space. Here, you might use adatum.com as your organization's DNS name and private IP addresses as discussed in the section of Chapter 16 entitled "Configuring TCP/IP Networking." | Configuring a Secondary DNS Server Secondary servers provide backup DNS services on the network. If you're using full Active Directory integration, you don't really need to configure secondaries. Instead, you should configure multiple domain controllers to handle DNS services. On the other hand, if you're using partial integration, you might want to configure secondaries to lessen the load on the primary server. On a small or medium- sized network, you might be able to use the name servers of your Internet service provider (ISP) as secondaries; in this case you should contact your ISP to configure secondary DNS services for you. Since secondary servers use forward lookup zones for most types of queries, reverse lookup zones might not be needed. But reverse lookup zone files are essential for primary servers, and they must be configured for proper domain name resolution. If you want to set up your own secondaries for backup services and load balancing, follow these steps: -
Start the DNS console and connect to the server you want to configure, as described previously. -
Right-click the server entry and then, from the shortcut menu, choose New Zone. This starts the New Zone Wizard. Click Next. -
For Zone Type, select Secondary Zone. Click Next. -
Secondary servers can use both forward and reverse lookup zone files. You'll create the forward lookup zone first, so select Forward Lookup Zone and then click Next. -
Type the full DNS name for the zone then click Next. -
Type the IP address of the primary server for the zone and then click Add. If you want to copy zone data from other servers in case the first server isn't available, repeat this step. -
Click Next and then click Finish. -
On a busy or large network, you might need to configure reverse lookup zones on secondaries. If so, follow the steps listed in the following section of this chapter, "Configuring Reverse Lookups." Configuring Reverse Lookups Forward lookups are used to resolve domain names to IP addresses. Reverse lookups are used to resolve IP addresses to domain names. Each segment on your network should have a reverse lookup zone. For example, if you have the subnets 192.168.10.0, 192.168.11.0, and 192.168.12.0, you should have three reverse lookup zones. The standard naming convention for reverse lookup zones is to type the network ID in reverse order and then use the suffix in-addr.arpa. With the previous example, you'd have reverse lookup zones named 10.168.192.in-addr.arpa, 11.168.192.in-addr.arpa, and 12.168.192.in-addr.arpa. Records in the reverse lookup zone must be in sync with the forward lookup zone. If the zones get out of sync, authentication might fail for the domain. You create reverse lookup zones by doing the following: -
Start the DNS console and connect to the server you want to configure in the way described previously. -
Right-click the server entry and then, from the shortcut menu, choose New Zone. This starts the New Zone Wizard. Click Next. -
If you're configuring a primary server integrated with Active Directory (domain controller), select Primary Zone and ensure that Store The Zone In Active Directory is selected. If you don't want to integrate DNS with Active Directory, select Primary Zone and then clear the Store The Zone In Active Directory check box. Click Next. -
If you're configuring a reverse lookup zone for a secondary server, select Secondary Zone and then click Next. -
If you're integrating the zone with Active Directory, choose a replication strategy: -
To All DNS Servers In The Active Directory Forest Choose this strategy if you want the widest replication strategy. Remember, the Active Directory forest includes all domain trees that share the directory data with the current domain. -
To All DNS Servers In The Active Directory Domain Choose this strategy if you only want to replicate DNS information within the current domain and child domains of the current domain. -
To All Domain Controllers In The Active Directory Domain Choose this strategy if you want to replicate DNS information to all domain controllers within the current domain and child domains of the current domain. Although this strategy gives wider replication for DNS information within the domain, not every domain controller is a DNS server as well (and you don't need to configure every domain controller as a DNS server either). -
Select Reverse Lookup Zone. Click Next. -
Type the network ID for the reverse lookup zone. The values you enter set the default name for the reverse lookup zone. Click Next. Note If you have multiple subnets on the same network, such as 192.168.10 and 192.168.11, you can enter only the network portion for the zone name. That is, you'd use 168.192.in-addr.arpa and allow the DNS console to create the necessary subnet zones when needed.
-
If you're configuring a primary or secondary server that isn't integrated with Active Directory, you need to set the zone file name. A default name for the zone's DNS database file should be filled in for you. You can use this name or type a new file name. Click Next. -
Specify whether dynamic updates are allowed. You have three options: -
Allow Only Secure Dynamic Updates When the zone is integrated with Active Directory, you can use ACLs to restrict which clients can perform dynamic updates. With this option selected, only clients with authorized computer accounts and approved ACLs can dynamically update their resource records in DNS when changes occur. -
Allow Both Nonsecure And Secure Dynamic Updates Choose this option to allow any client to update its resource records in DNS when changes occur. Clients can be secure or nonsecure. -
Do Not Allow Dynamic Updates Choosing this option disables dynamic updates in DNS. You should use this option only when the zone isn't integrated with Active Directory. -
Click Next and then click Finish to complete the process. The new zone is added to the server and basic DNS records are created automatically. Once you set up the reverse lookup zones, you need to ensure that delegation for the zone is handled properly. Contact the Information Services department or your ISP to ensure that the zones are registered with the parent domain.  |