Scheduling Tasks on Local and Remote Systems
|
| < Day Day Up > |
|
Whatever you can execute at the command line can be configured as a scheduled task, including command-line utilities, scripts, applications, shortcuts, and documents. You can also specify command-line arguments. At times when you schedule tasks, you’ll do so for the computer to which you are currently logged on (that is, a local system). More typically, however, when you schedule tasks you’ll do so for remote systems throughout your network from your local computer (that is, a remote computer).
Introducing Task Scheduling
The following Windows features work together to enable local and remote task scheduling:
-
Task Scheduler The Windows service that controls task scheduling. This service must be running for each system on which you want to schedule tasks. Task Scheduler logs on as the LocalSystem account by default and usually doesn’t have adequate permissions to perform administrative tasks. Because of this, you should configure each task individually to use an account with adequate user privileges and access rights to run the tasks you want to schedule. You should also make sure that the Task Scheduler service is configured to start automatically on all the systems for which you want to schedule tasks. Be sure to set the Task Scheduler startup and logon account options appropriately.
-
File And Printer Sharing For Microsoft Networks The Windows networking component that allows other computers to access resources on a system. This component must be installed and enabled on each system that you want to access and control remotely through the task scheduler. It also enables many other remote-management functions.
| Note | Errors that you may see if the File And Printer Sharing For Microsoft Networks component isn’t installed or enabled include “RPC Server unavailable” and “Network path not found.” See the section in Chapter 16 titled “Configuring Additional Networking Components” in Microsoft Windows Server 2003 Administrator’s Pocket Consultant (Microsoft Press, 2003), for details on installing and configuring networking components. |
Each scheduled task runs only one program, utility, or script, and can be configured to run
-
At a specific time and date, such as at 5:45 P.M. on October 25, 2004
-
At a specified interval, such as every Monday, Wednesday, and Friday at 5:45 P.M.
-
When a specific system event occurs, such as when someone logs on to the system
Event-based tasks deserve special attention because they don’t always work as you might expect and include tasks triggered by
-
System Start If you schedule a task to run when the system starts, Task Scheduler runs the task as a noninteractive process whenever the computer is started. The task will continue to run until it finishes, is terminated, or the system is shut down. Keep in mind that only the owner of the task or an administrator can terminate running tasks.
-
System Logon If you schedule a task to run when a user logs on, Task Scheduler runs that task whenever anyone logs on (regardless of who configured the task to run), and continues to run until it finishes, is terminated, or the user logs off. Logon tasks can run interactively or noninteractively, depending on how they are configured.
Tip If a user configures an interactive task using his or her logon and someone else logs on, the task runs with the original user’s permissions and may not terminate when the other user logs off (because it is owned by someone else and the current user may or may not have appropriate permissions to terminate the task). Further, with Fast User Switching on Windows XP, logon tasks do not run when you switch users. Logon tasks only run when someone logs on while all users are logged off.
-
System Idle If you schedule a task to run when the system is idle, Task Scheduler runs the task whenever there is no user activity for a specified amount of time. For example, you might create a task that runs only when the system has been idle for five minutes. Keep in mind, however, that subsequent user activity will not terminate the task. The task will continue to run until it finishes or is terminated.
To run multiple commands, programs, and utilities, you can create a command- line script that performs the necessary tasks. Here, you’ll want the script to run with specific user or administrator credentials to ensure that the script has the necessary permissions and access rights. The script should also configure whatever user settings are necessary to ensure that everything it does is under its control and that domain user settings, such as drive mappings, are available as necessary.
| Real World | When you configure tasks to run, you can specify the user account and logon password to use when the task runs. With recurring tasks, this tactic can lead to problems, especially if permissions or passwords change—and they inevitably do. If account permissions or passwords change, you’ll need to edit the task’s properties and supply the new logon credentials for the account. |
Accessing and Scheduling Tasks
Any user can schedule a task on the local computer, and they can view and change the tasks that they’ve scheduled. Administrators can schedule, view, and change all tasks on the local computer. To schedule, view, or change tasks on remote computers, you must be a member of the Administrators group on the remote computer, or you must be able to provide the credentials of an Administrator of the remote computer when prompted.
Regardless of whether you use the Scheduled Task Wizard or Schtasks, you can access and manage a system’s tasks using the Scheduled Tasks folder, which you can think of as your central interface for task scheduling. You can access the Scheduled Tasks folder on a local system with either of the following techniques:
-
Start Control Panel and then click Scheduled Tasks.
-
Start Windows Explorer, click My Computer, then Control Panel, and then Scheduled Tasks.
In a Windows domain, you can access the Scheduled Tasks folder on a remote system by completing the following steps:
-
Start Windows Explorer, then use the My Network Places node to navigate to the computer you want to work with.
-
Click the computer’s icon, and then click Scheduled Tasks, as shown in Figure 4-1.
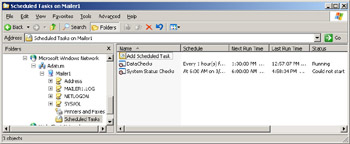
Figure 4-1: The Scheduled Tasks folder shows any tasks currently configured on the system by name, run time, and status.
| Real World | In a workgroup, the easiest way to access the Scheduled Tasks folder on a remote system is to use a Remote Desktop connection. You also can use this technique for computers in a domain, of course, but it isn’t necessary. In either case, you must first ensure that the Allow Users To Connect Remotely To This Computer check box is selected on the Remote tab of the System utility in Control Panel. Next, set up a remote desktop connection by performing the following steps: |
-
Click Start, Programs or All Programs, Administrative Tools, and finally Remote Desktops. This starts the Remote Desktops console.
-
Right-click Remote Desktops below the Console Root in the left pane and then select Add New Connection.
-
Type the computer name or IP address of the workgroup or domain computer you wish to access and the user name and logon information, and then click OK.
For a workgroup computer, you use a user account that is on the computer you are accessing. Afterward, connect to the computer using the Remote Desktop connection by right-clicking the connection and selecting Connect. Now start Windows Explorer on the remote computer and navigate to the Scheduled Tasks folder.
Notice in Figure 4-1 that the Scheduled Tasks folder shows
-
Name The name of the task. Task names can be any string of characters and, like other task properties, are set when you create the task.
-
Schedule The run schedule of the task. “Disabled” means that task has been disabled and will not run.
-
Next Run Time The next date and time the task will run. “Never” indicates the task will not run again after the scheduled run time and is probably a one-time task.
-
Last Run Time The last date and time the task ran. “Never” indicates the task has not run for the first time.
-
Status The current status of the task. “Running” indicates the task has been started by the task scheduler and is running. “Could not start” indicates the task could not be started and that there is a problem with the task.
-
Last Result The exit error code. An error code of zero indicates no error occurred. Any other value indicates some type of error occurred.
-
Creator The user name of the person who created the scheduled task.
Monitoring Scheduled Tasks
The Task Scheduler service doesn’t verify the information you provide or the availability of programs, commands, or utilities. If you don’t specify the correct information, the task simply won’t run or will generate errors when it does run. One way to check tasks is to view their status and last result in the Scheduled Tasks folder. This information pertains to the last time the scheduled task ran. It won’t tell you, however, if there were problems running tasks prior to the last run time. To dig deep and get a better understanding of how tasks are running, you should periodically check the Task Scheduler log file, Schedlgu.txt, located in the %SystemRoot%/Tasks folder.
You can examine the log file by selecting View Log from the Advanced menu when the Scheduled Tasks folder is selected in Windows Explorer. If you examine the task scheduler log, you’ll find
-
Entries that record when the Task Scheduler Service was started and when the service exited (was stopped).
-
Entries that record when tasks are started, when they finished running, and the exit error code. An exit error code of zero (0) means that the task executed normally. Any other exit code indicates an error may have occurred.
| Note | %SystemRoot%\Tasks is a special folder with a view that allows you to work with scheduled tasks. If you access this folder in Windows Explorer, you won’t see the SchedLgU.txt log. It is there, however, and if you access the related directory from the command prompt—by changing the directory to %SystemRoot%\Tasks—you’ll see the log in the listing. |
You may also want a more detailed understanding of what happens when scripts run. To do this, you may want to record the output of commands and utilities in a separate log file, thereby giving you the opportunity to determine that those commands and utilities produced the expected results. As discussed in the previous chapter, you can write command output to a named file by redirecting standard output and standard error. In the following examples, the output of the DEFRAG command is appended to Stat-log.txt and any DEFRAG errors are written to this file as well:
defrag c: >> c:\logs\stat-log.txt 2>&1
defrag d: >> c:\logs\stat-log.txt 2>&1
| Caution | If you are working with a directory, as shown in these examples, the directory must already exist. It will not be created for you, and any errors resulting from the lack of a directory will not be written to the log file. |
| Real World | Writing command output to a log file won’t help you resolve every problem that can occur, but it goes a long way toward ensuring that scheduled tasks run as expected. If you are trying to troubleshoot problems, keep in mind that tasks can fail to run for many reasons, some of which are beyond your control. For example, scheduled tasks won’t run if the system is shut down when the task is scheduled to run. If you want to be notified when tasks are missed, select Notify Me Of Missed Tasks from the Advanced menu when the Scheduled Tasks folder is selected in Windows Explorer. With this feature enabled, a message is displayed when you log on that tells you if you missed a task because the system was shut down. |
|
| < Day Day Up > |
|
EAN: 2147483647
Pages: 114