Command Line Essentials
|
| < Day Day Up > |
|
Each new version of Windows has extended and enhanced the command line. The changes have been dramatic and they’ve not only improved the performance capabilities of the command line but its versatility as well. Today you can do things with the Windows command line that you simply could not do in previous versions of Windows. To help you put the available options to use in the fastest, most productive manner, the discussion that follows explores command shell options and configuration, as well as providing tips for using the command history.
Understanding the Windows Command Shell
The most commonly used command line is the Windows command shell. The Windows command shell is a 32-bit environment for working with the command line. You’ll find the executable (Cmd.exe) in the %SystemRoot%\System32 directory. Other command lines are available, such as the MS-DOS command shell (Command.com) discussed in the next section.
| Note | %SystemRoot% refers to the SystemRoot environment variable. The Windows operating system has many environment variables, which are used to refer to user-specific and system-specific values. Often, I’ll refer to environment variables using the syntax %VariableName%. |
You can start the command shell by using the RUN command. Click Start, select Run, and then enter cmd in the Open field. Or, you can click Start, point to Programs or All Programs (depending on whether you are using the Classic Start Menu or the system’s default Start Menu), Accessories, and then choose Command Prompt.
The environment for the Windows command shell can be initialized in several ways, including passing startup parameters to Cmd.exe or using a custom startup file, which is placed in the %SystemRoot%\System32 directory. Figure 1-1 shows a command shell window. By default, the command line is 80 characters wide and, in Windows Server 2003, the command shell displays 25 lines of text. The default line-count for Windows XP Professional depends on the screen resolution, but always results in at least 25 lines being displayed. When additional text is to be displayed in the command shell window or you enter commands and the command shell’s window is full, the current text is displayed in the window and prior text is scrolled up. If you want to pause the display temporarily when a command is writing output, press Ctrl+S. Afterward, press Ctrl+S to resume or Ctrl+C to terminate execution.
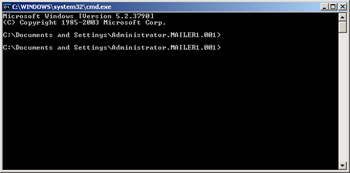
Figure 1-1: The 32-bit command shell is the primary command-line window you’ll use.
| Note | Custom startup files are used for MS-DOS programs that require special configurations. Prior to Windows XP, these files were named Autoexec.bat and Config.sys. Beginning with Windows XP and continuing with Windows Server 2003, these files are renamed Autoexec.nt and Config.nt. The files also get a new location, in %SystemRoot%\System32. |
In this figure from Windows Server 2003, the display text is
Microsoft Windows [Version 5.2.3790]
(C) Copyright 1985-2003 Microsoft Corp.
C:\Documents and Settings\Administrator.MAILER1.001>
Here, the command prompt for the command line shows the current working directory, which by default is %UserProfile%, meaning the user profile directory for the current user. A blinking cursor following the command prompt indicates the command line is in interactive mode. In interactive mode, you can type commands directly after the prompt and press Enter to execute them. For example, type dir and then press Enter to get a listing of the current directory.
The command prompt also has a batch mode, which is used when executing a series of commands. In batch mode, the command prompt reads and executes commands one by one. Typically, batch commands are read from a script file, but batch commands can also be entered at the command prompt, such as when you use the FOR command to process each file in a set of files. (You’ll learn more about batch scripts, loops, and command controls in Chapter 3, “Command Line Scripting Essentials.”)
Whenever you work with the Windows command line, it is important to keep in mind where the commands you are using come from. Native commands (commands built into the operating system by Microsoft) include:
-
Internal commands that exist internally within the command shell and do not have separate executable files
-
External commands that have their own executable files and are normally found in the %SystemRoot%\System32 directory
Table 1-1 shows a list of internal commands for the command shell (Cmd.exe). Each internal command is followed by a brief description.
| Name | Description |
|---|---|
| assoc | Displays or modifies the current file extension associations. |
| break | Sets breaks for debugging. |
| call | Calls a procedure or another script from within a script. |
| cd (chdir) | Displays the current directory name or changes the location of the current directory. |
| cls | Clears the command window and erases the screen buffer. |
| color | Sets the text and background colors of the command shell window. |
| copy | Copies files from one location to another or concatenates files. |
| date | Displays or sets the system date. |
| del (erase) | Deletes the specified file, files, or directory. |
| dir | Displays a list of subdirectories and files in the current or specified directory. |
| echo | Displays text strings to the command line; sets command echoing state (on|off). |
| endlocal | Ends localization of variables. |
| exit | Exits the command shell. |
| for | Runs a specified command for each file in a set of files. |
| ftype | Displays current file types or modifies file types used in file extension associations. |
| goto | Directs the command interpreter to a labeled line in a batch script. |
| if | Performs conditional execution of commands. |
| md (mkdir) | Creates a subdirectory in the current or specified directory. |
| move | Moves a file or files from the current or designated source directory to a designated target directory. Can also be used to rename a directory. |
| path | Displays or sets the command path the operating system uses when searching for executables and scripts. |
| pause | Suspends processing of a batch file and waits for keyboard input. |
| popd | Makes the directory saved by PUSHD the current directory. |
| prompt | Sets the text for the command prompt. |
| pushd | Saves the current directory location and then optionally changes to the specified directory. |
| rd (rmdir) | Removes a directory or a directory and its subdirectories. |
| rem | Sets a remark in batch scripts or Config.sys. |
| ren (rename) | Renames a file or files. |
| set | Displays current environment variables or sets temporary variables for the current command shell. |
| setlocal | Marks the start of variable localization in batch scripts. |
| shift | Shifts the position of replaceable parameters in batch scripts. |
| start | Starts a separate window to run a specified program or command. |
| time | Displays or sets the system time. |
| title | Sets the title for the command-shell window. |
| type | Displays the contents of a text file. |
| verify | Causes the operating system to verify files after writing files to disk. |
| vol | Displays the disk’s volume label and serial number. |
The syntax for using any internal (and most external commands) can be obtained by typing the command name followed by /? at the prompt, such as
copy /?
You’ll find there are many more external commands than internal commands, including ones that are very similar to those built into the command line. Most of these similar commands are extended or enhanced in some way. For example, the external XCOPY command is more versatile than the COPY command because it allows you to copy directory trees as well as files and offers many more parameters. With the external SETX command, you can write environment variable changes directly to the Windows registry, which makes the changes permanent rather than temporary as the SET command does.
| Tip | You can also use SETX to obtain current Registry key values and write them to a text file. While this command is included with Windows Server 2003, it is available on Windows XP Professional only when you install the Windows XP Professional version of the Windows Support Tools. |
Beyond this, the difference between internal and external commands isn’t that important. Many Windows utilities have command-line extensions that allow parameters to be passed to the utility from the command line, and thus are used like external commands. Later in this chapter, I discuss the two key sources for Windows utilities: the Microsoft Windows Support Tools and the Microsoft Windows Server 2003 Resource Kit. You can also find third-party utilities with command-line extensions.
Understanding the MS-DOS Command Shell
The MS-DOS command shell (Command.com) includes 16-bit commands for the MS-DOS subsystem and other subsystems. You can start the MS-DOS command shell using the RUN command. Click Start, select Run, and then enter command in the Open field. Or, within another command line, type command and then press Enter.
| Tip | If you are using the MS-DOS command shell from within Cmd.exe, the command shell title should change to “Command Prompt – Command” to let you know this. When you finish working with Command.com, you can quit the MS-DOS command shell and return to the Windows command line by typing exit. |
The environment for the MS-DOS command shell can be initialized in several ways, including passing startup parameters to Command.com and using a Config.nt startup file, which is placed in the %SystemRoot%\System32 folder. As with Cmd.exe, the MS-DOS command window is 80 characters wide and, depending on operating system and screen resolution, displays at least 25 lines of text by default. When you start an MS-DOS command shell, the standard display text is
Microsoft(R) Windows DOS
(C) Copyright Microsoft Corp 1990-2001.
C:\>
As with the Windows command shell, the MS-DOS command shell has interactive and batch processing modes. It also has native commands built in by Microsoft. These commands are divided into two categories:
-
Internal configuration commands Commands used to configure the MS-DOS subsystem, which should be placed in startup or program information files, such as Config.nt or Autoexec.nt. Configuration commands include BUFFERS, COUNTRY, DEVICE, DEVICEHIGH, DOS, DOSONLY, DRIVEPARM, ECHOCONFIG, FCBS, FILES, INSTALL, LOADHIGH, LASTDRIVE, NTCMDPROMT, SHELL, STACKS, and SWITCHES.
-
Standard external commands Commands that you can type at the command prompt, place in scripts, and in some cases use in startup files. Standard external commands include APPEND, DEBUG, EDIT, EDLIN, EXE2BIN, EXPAND, FASTOPEN, FORCEDOS, GRAPHICS, LOADFIX, MEM, NLSFUNC, SETVER, and SHARE. These MS-DOS commands can also be run in Cmd.exe.
When you execute other commands in the MS-DOS shell, these commands are passed through to the 32-bit command shell where they are executed. This, for example, is why you can use the internal command COPY from within the MS-DOS shell. One detail to note about the MS-DOS shell is that the standard external commands are not available on 64-bit versions of Windows Server 2003.
Configuring Command-Line Properties
If you use the command shell frequently, you’ll definitely want to customize its properties. For example, you can add buffers so that text scrolled out of the viewing area is accessible. You can resize the command shell, change its fonts, and more.
To get started, click the command-prompt icon at the top of the command-shell window or right-click the console’s display bar, and then select Properties. As Figure 1-2 shows, the Command Prompt Properties dialog box has four tabs:
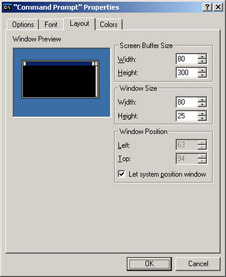
Figure 1-2: Configure the command-line properties for your environment.
-
Options Allows you to configure cursor size, display options, edit options, and command history. Select QuickEdit Mode if you want to use the mouse to cut and paste text within the command window. Clear Insert Mode to use overwrite as the default editing mode. Use the command history to configure how previously used commands are buffered in memory. (You’ll find more on the command history in the next section of this chapter titled,“Working with the Command History.” )
Tip While working with text-only commands and tools, you may want to use Full Screen display mode to reduce the amount of memory used by the command prompt itself. Afterward, type exit to exit the command prompt and return to the Windows desktop.
-
Font Allows you to set the font size and face used by the command prompt. Raster font sizes are set according to their pixel width and height. For example, the size 8 x 12 is 8 screen pixels wide and 12 screen pixels high. Other fonts are set by point size, such as 10-point Lucida Console. Interestingly, when you select a point size of n, the font will be n pixels high; therefore a 10-point font is 10 screen pixels high. These fonts can be designated as a bold font type as well, which increases their screen pixel width.
-
Layout Allows you to set the screen buffer size, window size, and window position. Size the buffer height so that you can easily scroll back through previous listings and script output. A good setting is in the range of 1,000 to 2,000. Size the window height so that you can view more of the command- shell window at one time. A good setting is 45 lines on 800 x 600 screens with a 12-point font. If you want the command-prompt window to be in a specific screen position, clear Let System Position Window and then specify a position for the upper-left corner of the command window using Left and Top.
-
Colors Allows you to set the text and background colors used by the command prompt. Screen Text and Screen Background control the respective color settings for the command-prompt window. Popup Text and Popup Background options control the respective color settings for any popup dialog boxes generated when running commands at the command prompt.
When you are finished updating the command-shell properties, click OK. Windows displays a prompt that asks you to specify how the settings should be applied. Either apply the property changes to the current window only or save the property changes for future windows with the same title, which applies to all command lines you access later. You may also see an option to modify the shortcut that started the current window. In this case, any time you start a command line using the applicable shortcut, it will use these settings.
Working with the Command History
The command history buffer is a feature of the Windows command shell (Cmd.exe) that remembers commands you’ve used in the current command line and allows you to access them without having to retype the command text. The maximum number of commands to buffer is set through the command-line Properties dialog box discussed in the previous section. By default, up to 50 commands are stored.
You can change the history size by completing these steps:
-
Right-click the command shell’s title bar, select Properties, and then click the Options tab.
-
Use the Buffer Size field to set the maximum number of commands to store in the history and then click OK.
-
To save the history setting to use with future command lines, select Save Property Changes For Future Windows or Modify Shortcut That Started This Window as appropriate, and then click OK. Otherwise, just click OK.
You can access commands stored in the history in the following ways:
-
Browsing with the arrow keys Use the up-arrow and down-arrow keys to move up and down through the list of buffered commands. When you find the command you want to use, press Enter to execute it as previously entered. Or you can modify the displayed command text by adding or changing parameters and then pressing Enter.
-
Browsing the command history pop-up window Press F7 to display a pop-up window that contains a listing of buffered commands. Next, select a command using the arrow keys. (Alternatively, press F9, then the corresponding number on the keyboard, and finally the Enter key.) Execute the selected command by pressing Enter, or press Esc to close the pop-up window without executing a command.
-
Searching the command history Enter the first few letters of the command you want to execute and then press F8. The command shell searches through the history for the first command that begins with the characters you’ve entered. Press Enter to execute it. Or, press F8 again to search the history buffer for the next match in the command history.
As you work with the command history, keep in mind that each instance of Cmd.exe has its own set of command buffers. Thus, buffers are only valid in the related command shell context.
|
| < Day Day Up > |
|
EAN: 2147483647
Pages: 114