Section 8.5. Planning, Implementing, and Maintaining Network Security and Infrastructure
8.5. Planning, Implementing, and Maintaining Network Security and InfrastructureSecurity is critically important to ensure the integrity of the network. The way you secure the network will depend on the organization's security policies and the configuration of the network. On a typical network, clients will send requests to servers using TCP/IP, and servers will receive and process the requests. When clients connect to the network using wireless technology or connect to the network using remote access, special considerations must be made to ensure the security of the network is not compromised. 8.5.1. Planning and Configuring Network Protocol SecurityIn addition to IP addresses, computers on TCP/IP networks use specific protocols and ports for communications. Servers configured to use a specific protocol listen on a specific TCP or UDP port for requests from clients. For example, web servers listen on TCP port 80 for Hypertext Transfer Protocol (HTTP) requests. 8.5.1.1. Specifying and configuring port and protocol securityThe Internet Assigned Numbers Authority (IANA) is responsible for assigning the values used for TCP/IP protocols and ports. Commonly used protocols have permanently assigned port numbers, which are referred to as well-known ports. While clients may contact a server on a particular port, the client may in some cases use a randomly assigned port to connect to and communicate with a server. This random port is referred to as an ephemeral port. On a server, you can type netstat -ano at a command prompt to list all TCP and UDP port connections to that server. The output shows, by protocol, which ports are in use, such as: Proto Local Address Foreign Address State PID TCP 192.168.20.10:80 0.0.0.0:0 LISTENING 2581 In the example, process ID 2581 is listening on the local address 192.168.20.10 to port 80. Because this process is using port 80, another program is prevented from using this port as well. Type tasklist /fi "pid eq ProcessNumber" at the command prompt to determine which program is using the port where ProcessNumber is the PID, such as: tasklist /fi "pid eq 2300" Table 8-17 lists the commonly used protocols for Windows Server 2003 and the ports on which those protocols commonly are used. Keep in mind that most protocols can be configured to use different, alternate listen ports. For example, a common alternate listen port for HTTP is 8080.
The most common way to secure a server is to use packet filtering. Packet filtering is used to control the TCP/IP traffic that is permitted to reach a computer or a network, based on specific criteria, such as IP address, IP protocol, TCP port, or UDP port. Packets that do not meet the requirements of a particular filter are discarded. In this way, only packets that meet filter requirements reach a computer or network and are processed. While packet filtering primarily is used by firewalls and routers that connect the internal network to the Internet, you can use packet filtering on your internal network as well. For example, you might want to use it to regulate the flow of traffic from one subnet to another or to limit the types of traffic that can be received by a server. In this case, you could install a firewall between the network segments or enable a software-based firewall on the server for which you want to limit traffic. You could also enable packet filtering on the router that connects the subnets or on the server for which you want to limit traffic. Before you create packet filters, you need to determine the types of traffic that you will permit and the types of traffic that you will deny. You can then configure packet filtering to be inclusive or exclusive:
While the inclusive approach is more secure, it is much more difficult to configure as you must specifically allow all types of permitted traffic. On Windows XP Professional and Windows Server 2003, packet filtering can be configured in several ways. Windows XP Professional and Windows Server 2003 include the Windows Firewall. To start Windows Firewall, click Windows Firewall in the Control Panel. In the default configuration, when Windows Firewall is enabled, all outside sources are blocked from connecting to the computer by default, an the exceptions specified on the Exceptions tab only are allowed. Tip: Do not use Windows Firewall on Windows Server 2003 systems configured as IP routers or for remote access servers. Instead, use the NAT/Basic Firewall features of RRAS. Windows XP Professional and Windows Server 2003 include TCP/IP Filtering. To use TCP/IP Filtering, follow these steps:
When you have configured a server as a router using Routing And Remote Access Service (RRAS), you can configure packet filtering through RRAS. Packet filtering in RRAS is more versatile and configurable than the standard Windows Server 2003 packet-filtering feature. To use packet filtering with RRAS, follow these steps:
8.5.1.2. Planning and configuring an IPSec policy for secure network communicationsTo protect the data being sent between computers on the network, you can use IP Security (IPSec). IPSec is a technology for authenticating and encrypting IP traffic between computers. IPSec operates at the network layer as an extension to the IP protocol itself, and provides end-to-end encryption for IP traffic. The source computer and the intended recipient only an read the encrypted traffic. IPSec secures traffic by encrypting it, and then encapsulating it prior to transmission. Even if packets are captured during transmission from one computer to another, the packets are protected because they can be read only by a computer that has the appropriate key needed to decrypt the data. Because the encrypted data is encapsulated in standard IP datagrams, routers, switches, and other intermediaries handle the encrypted data as they do any other packets. They do not need to be able to read the packets to forward the packets to the appropriate destination. While there are other protocols that provide network traffic encryption, these operate at the application layer and are used to encrypt only specific types of traffic. For example, web servers can be configured to use Secure Sockets Layer (SSL) . SSL encrypts traffic between web clients and web servers. In contrast, IPSec can encrypt any type of traffic and is not dependent on a specific application. IPSec policy is most often implemented when you need to:
With RRAS, remote access clients that establish VPN connections with a RRAS server can use IPSec to enhance security when the Layer 2 Tunneling Protocol (L2TP) is used. When VPN connections are used to connect LANs and WANs, IPSec can also be used with L2TP to enhance security. In either configuration, IPSec is used to encrypt all traffic. Thus, regardless of the destination, all traffic passing over the VPN connection is encrypted and protected. The IPSec standards define two protocols for securing network communications:
IPSec operates either in transport mode or tunnel mode:
IPSec is applied using Group Policy:
In Windows Server 2003, IPSec has four main components:
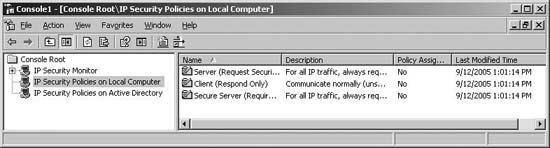
Active Directory has three default IPSec policies:
Only one IPSec policy can be assigned and enforced at a time. To assign and enforce one of these policies, follow these steps:
To create a new policy, follow these steps:
After you create the policy, edit its properties. The wizard automatically opens the policy's properties dialog box when you click Finish. You can display the properties dialog box by right-clicking the policy and selecting Properties (see Figure 8-26). Figure 8-26. Configure rules for the IPSec policy.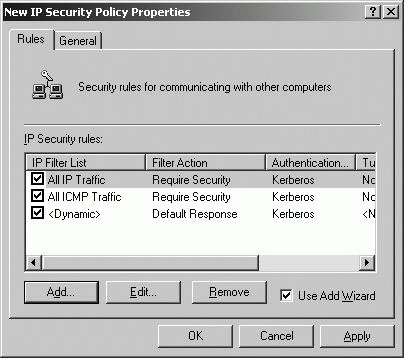 IPSec policies have three components:
With a policy's Properties dialog box open, you can create rules that define IP filter lists and filter actions by clicking Add on the Rules tab, and then following the prompts for the Create IP Security Rule Wizard. To assign and enforce the new policy, right-click the policy and select Assign. To determine whether IPSec policy is applied to a computer, complete these steps:
8.5.2. Planning Secure Network Administration MethodsFor secure network administration of remote computers, Remote Desktop for Administration and Remote Assistance are essential as they increase efficiency by allowing you to centrally and remotely manage systems, regardless of where they are located on the network. For Exam 70-293, you need to know how to configure and use Remote Desktop For Administration and Remote Assistance, as discussed in "Essential Administration Tools" in Chapter 2. Review the related sections in Chapter 2. As part of planning, it is important to understand the possible modes in which each can be used. Remote Desktop For Administration is one of two operating modes for Windows Server 2003 Terminal Services. Using Remote Desktop For Administration, administrators can establish remote connections to client computers. Each server configured with Remote Desktop For Administration can have up to two concurrent connections. If the feature is enabled, any user that is a member of the Administrators group can establish remote desktop connections. Additional remote desktop users can be set as well. Using Remote Assistance, a user can send an invitation asking for troubleshooting help. The helper or expert accepting the request can view the user's desktop and transfer files, and chat with the user needing help through a single interface. Two assistance modes are possible:
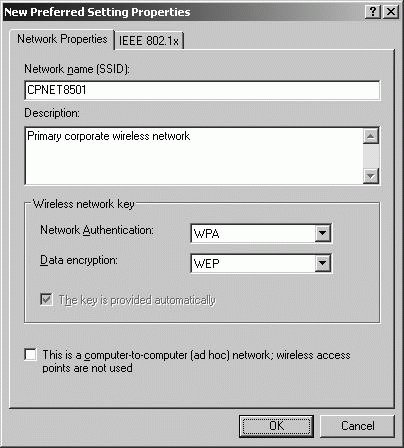
By default, remote assistance invitations are valid for 30 days. In environments where security is a high concern, 30 days typically is too long a period for invitations to remain open. In most cases, you'll want to restrict how long invitations can remain open to one day or less. You can do this through Group Policy. After you open the GPO you want to work with for editing, access Computer Configuration\Administrative Templates\System\Remote Assistance. You can then enable and configure the Solicited Remote Assistance policy, and in this way control how Remote Assistance is used. Both Remote Desktop For Administration and Remote Assistance use TCP port 3389. This port should be open on the internal network to allow these features to be used. To protect your computers, this port should be blocked on external routers and firewalls to prevent users outside the organization from using these features. If you open TCP port 3389 on external routers and firewalls, you may inadvertently open the internal network to attack. 8.5.3. Planning Security for Wireless NetworksAs discussed previously in this chapter under "Planning and Modifying a Network Topology," most wireless networks use technologies based on the IEEE 802.1 specification. Securing a wireless network is different from securing a wired network. On a wireless network, anyone who is within range of one of your wireless access points can gain access to your internal network. Unauthorized users can also intercept wireless signals being broadcast to your network and use information they've gleaned to break into the network. This makes security for wireless networks of critical importance. To protect your internal network, all wireless transmissions should be secured and encrypted. Several technologies are available for authenticating and encrypting wireless transmissions. Wi-Fi Protected Access (WPA) is used for authentication. WPA has two operating modes:
Wireless Equivalency Protection (WEP) encrypts data using private key encryption. All data is encrypted using before it is transmitted, and any computer that wants to read the data must be able to decrypt it using the private key. With Robust Security Network (RSN), wireless devices dynamically negotiate the authentication and encryption algorithms to be used for communications. This allows the supported authentication and encryption algorithms to be changed as needed to address security issues. Most RSN compatible devices can use:
During configuration of wireless networking, you need to specify the name of the wireless network and the mode in which the wireless device will run. Signals generated by wireless devices are omnidirectional. The broadcast range of a wireless device is referred to as its basic service area (BSA). All wireless devices have BSAs. Wireless devices within the same BSA are referred to as basic service sets (BSS). Wireless devices run in one of two operating modes:
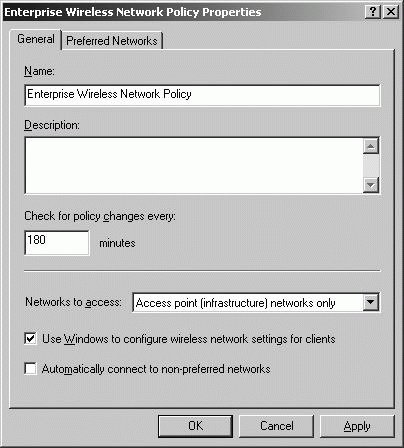
You can prevent unauthorized access and secure wireless transmissions using several different authentication methods. The IEEE 802.11 defines two methods: Open System Authentication and Shared Key Authentication. Windows Server 2003 supports an additional options called IEEE 802.1X. The default authentication method for IEEE 802.11 devices is Open System authentication. As the name implies, this authentication method essentially allows any two wireless devices to communicate with each other. Although the devices identify each other prior to communicating, there is no exchange of passwords, keys, or other security credentials, and there is, therefore, no way for devices to refuse authentication with each other. The Shared key authentication method for IEEE 802.11 devices requires each device to authenticate using a secret key that all devices on the wireless network must have to communicate. Because all devices have the same key, this method isn't very secure. If the shared key is compromised, then the entire network is. The IEEE 802.1X standard defines a method of authenticating and authorizing users connecting to wireless networks. With IEEE 802.1X, wireless devices act as clients of a server, such as a server running RADIUS, and the server handles authentication and authorization using any supported authentication protocols, such as Extensible Authentication Protocol (EAP), Extensible Authentication Protocol Transport Layer Security (EAP-TLS), or Protected EAP (PEAP). By default, a Windows XP Professional computer uses an Open System configuration and can connect to any available wireless network including both ad hoc and infrastructure networks. To enhance security, you should restrict wireless connections to designated infrastructure networks. To configure the client computer directly, follow these steps:
Group Policy can be used to configure clients to use infrastructure networks only. To configure the client computer through Group Policy, follow these steps:
8.5.4. Troubleshooting Security for Data TransmissionIf IPSec is improperly configured, network communications between secured clients and secured servers can fail. The most common reason for this failure is an improper or incompatible configuration of the IPSec components. For example, while a client and server might both be configured to use IPSec for a particular type of traffic, they may be subject to different IPSec policies and therefore, have different filter action settings for this type of traffic. Having different, incompatible settings prevents the client and server from communicating with each other. The best way to determine whether there is an IPSec policy mismatch is to examine the Security logs of both the client and the server. The Security log should contain warning messages if the systems attempted to perform an Internet Key Exchange negotiation that failed. Some IPSec processes are only logged when auditing is enabled. Specifically, you must enable Audit Logon Events and Audit Policy Change for Success and Failure events. The IPSec driver can be configured to log dropped packets as well. To configure logging, type the following command: netsh ipsec dynamic set config ipsecdiagnostics 7 To disable diagnostic logging, type the following command: netsh ipsec dynamic set config ipsecdiagnostics 0 You can monitor IPSec policy to ensure that it is working correctly using IP Security Monitor. To access this snap-in in a console, complete these steps:
Tip: By default, IP Security Monitor connects to the local computer. If you want to monitor IPSec on another computer, right-click the IP Security Monitor node, and then click Add Computer. Expand the computer node, and then select the Active Policy entry to see the active IPSec policy on the designated computer (if any). The Active Policy folder shows the IPSec policy currently assigned according to the specific GPO from which the policy was applied (see Figure 8-30). When you apply IPSec policy at multiple levels within the Active Directory structure, one IPSec policy only is applied, and by default, it is the policy processed last. Also by default, organizational unit policy has precedence over domain policy, and domain policy has precedence over site policy. Figure 8-30. The Active Policy folder shows the IPSec policy currently assigned.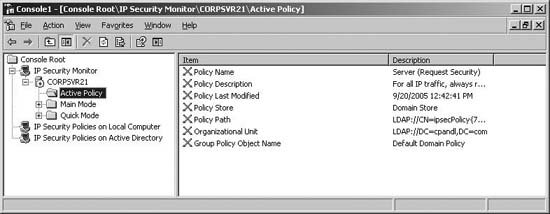 With the IP Security Monitor, you should use the Main Mode or Quick Mode nodes to view current filters, security methods, statistics, and security associations. High failure rates (relative to the level of IPSec activity) under the Statistics node can indicate IPSec configuration problems. If computers cannot make an IPSec connection, check to see whether the number of Authentication Failures increases. If so, authentication is the issue and you should ensure the following:
If computers cannot make an IPSec connection, check to see whether the number of Negotiation Failures increases. If so, check the security method and authentication settings for incorrect configurations. You can view similar IPSec information at a command prompt by typing: netsh ipsec static show all By determining the Resultant Set of Policy for a user or computer, you can determine the specific IPSec policy settings that are being applied to that user or computer. To determine Resultant Set of Policy, follow these steps:
8.5.5. Planning a Security Update InfrastructureExam 70-293 expects you to know to install and configure software update infrastructure as a means of maintaining system security. Several different technologies are available to ensure that Windows computers are up to date with the latest security patches, hot fixes, and service packs, including:
These features were discussed previously in the section "Installing and Configuring Software Update Infrastructure" in Chapter 2. Review the related sections to prepare for Exam 70-293. WSUS requires IIS, BITS, and .NET Framework 1.1. WSUS is the replacement for Software Update Services (SUS). You can use the Microsoft Baseline Security Analyzer (MBSA) to check for common security problems on a single computer or multiple computers. MBSA is not included with Windows Server 2003, but can be downloaded from the Microsoft Downloads site (http://download.microsoft.com). MBSA can detect incorrect security configurations and failure to install security updates. When you run MBSA, it details:
8.5.6. Planning and Configuring a Public Key Infrastructure That Uses Certificate ServicesPublic Key Infrastructure (PKI) provides the components and services necessary to use public and private keys with digital certificates. You can use certificates for authentication and encryption. Two types of certificates are used:
Certificates enable clients and servers to authenticate each other prior to establishing a connection. Because certificates contain public and private encryption keys, they also are used to encrypt and decrypt data. A basic overview of public and private key encryption follows:
Windows Server 2003 includes PKI components and services referred to collectively as Microsoft Certificate Services . Microsoft Certificate Services allow you to issue and manage digital certificates. 8.5.6.1. Identifying the appropriate type of certificate authority to support certificate issuance requirementsCertificate authorities are used to issue digital certificates. A certificate authority (CA) is a trusted agency responsible for confirming the identity of clients and servers, and then issuing certificates that confirm these identities. Before issuing a client certificate, CAs require you to identify the user, the user's organization, and the client application being used. Before issuing a server certificate, CAs require you to identify the organization in which the server is located and the server itself. Certificate servers can be configured as one of four types of CAs:
8.5.6.2. Planning the enrollment and distribution of certificatesThe enterprise root CA is at the top of the enterprise CA hierarchy. There can be only one root CA in an enterprise. All other CAs in the hierarchy must be enterprise subordinate CAs. Enterprise CAs use certificate templates, publish their certificates and revocation lists to Active Directory, and use the information in Active Directory to determine whether to automatically approve or deny certificate enrollment requests. Clients must have access to Active Directory to receive certificates. Tip: Enterprise CAs publish their Certificate Revocation Lists in Active Directory, making it easier to ensure that revoked certificate cannot be used. Stand-alone CAs can use the same type of hierarchy as enterprise CAs. You can create a stand-alone root CA with all other CAs in the hierarchy created as stand-alone subordinate CAs. If you plan to use a single stand-alone CA, this CA must be configured as a stand-alone root CA. Stand-alone CAs do not use templates and are not integrated with Active Directory. They store information locally and by default do not automatically approve or deny certificate enrollment requests. Instead, certificate enrollment requests are maintained in a queue for an administrator to manually approve or deny them. While certificate servers don't have to be dedicated for this sole purpose, it is generally a good idea to have dedicated certificate servers. To protect the integrity of certificate services, you should create multiple levels in the CA hierarchy. In an enterprise, this means setting up an enterprise root CA, and then setting up one or more levels of enterprise subordinate CAs. Then, issue certificates through the subordinate CAs only. This safeguard should help ensure that the root CA's private key can't be easily compromised. 8.5.6.3. Planning for the use of smart cards for authenticationA smart card is a small card-sized device that contains memory and/or integrated circuitry. Windows can use smart cards for authentication during logon. To use smart cards for authentication, you must:
Smart cards contain a user's digital certificate and private key, allowing the user to be authenticated when logging on the network. With smart cards, only enterprise CAs can be used. The reason for this is that smart card certificates are associated with the user's account in Active Directory, and only enterprise CAs store certificates in Active Directory. Tip: Stand-alone CAs do not store certificates in Active Directory and should not be used to issue smart card certificates. Once you've configured your CA infrastructure, you can set up logon for smart cards by completing the following steps:
In Active Directory Users And Computers, you can view and manage the certificates assigned to a user account using the Published Certificates tab of the user's Properties dialog box. This tab is only displayed when View 8.5.6.4. Configuring Certificate ServicesMicrosoft Certificate Services uses IIS. You should install IIS prior to installing Certificate Services. After you install IIS, you can install Certificate Services by completing the following steps:
When you install Certificates Services on a computer running IIS, you can manage Certificate Services using a web browser. Use the URL http://hostname/certsrv/ where hostname is the name of the certificate server. The Certificate Authority console in the Administrative tools menu can also be used to manage Certificate Services. In an enterprise, the certificate server is configured for automatic enrollment by default. This means authorized users can request a certificate, and the CA automatically processes the certificate request so that the user can immediately install the certificate. To view or change the default request processing policy, use the following technique:
For manual processing of requests, you can review pending requests by selecting the Pending Requests node in the Certificate Authority console. |
 Control Panel
  Network Connections
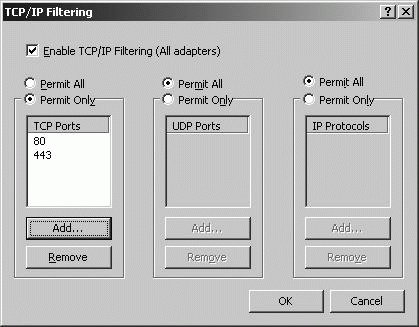
EAN: 2147483647
Pages: 95