Customizing Frames to Match Your Design Needs
Customizing Frames to Match Your Design Needs
One of the useful features about frames is the extent to which standard arrangements can be customized to give your business site a unique look or to highlight content that s especially important. You can create a new frame to call attention to a sales promotion, or to present an advertisement so you can gain more revenue from your online presence. Two of the primary controls for adjusting the characteristics of individual frames are the Frames menu and the Frame Properties dialog box.
Viewing Frame Properties
When you need to control the attributes of frames in minute detail, you should display and adjust the properties of that frame. When you select an individual frame in a frameset by clicking within that frame, the borders are highlighted to let you know it has been selected. When you right-click within a frame, a shortcut menu appears. Choose Frame Properties, and the Frame Properties dialog box appears (see Figure 12-7).
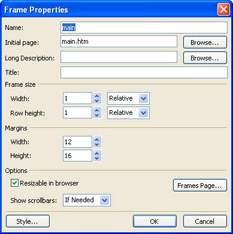
Figure 12-7: Change a frame s size , name , and other attributes using this dialog box.
The first thing you notice in the Frame Properties dialog box is that, in the box at the top, you are asked to specify a Name. Three boxes down, you can assign a Title. Both of these are different from the file name, which you assign when you save a frame. What are all these designations? you ask. The names are as follows :
-
Name When you target a frame so that its contents change when someone clicks a link in another frame, you use the name to identify the target.
-
Title This is the text that appears in the top bar of the viewer s browser window. Titles are important, because they are used by Internet search engines to index your pages. Pick a short, descriptive title that describes each page s contents.
-
File Name The file name is important, because others in your department might need to work on your pages. The filename should ideally describe the contents of the page and/or its position in the frameset.
-
Frame Size Change the frame s size by changing the Width and Row Height values. Use a specific pixel width if you want the frame to accommodate an item whose size you know, such as an image. Use a relative width if the contents of the frame (such as text) can change as the browser window is resized by the user .
-
Resizable In Browser Select this option if you want the viewer to have the ability to resize the frame by dragging its borders.
In a business environment, the Frame Name field is especially important. You need to keep all of a frame s names straight because the public needs to view your Web site without confusion, and other editors in the organization might work on the frames after you do.
| Aha! | Resize Frame Borders Quickly |
Showing or Hiding Frame Borders
You can streamline the appearance of a frames-based design by deciding to hide frame borders. Without borders, frames can be made to flow seamlessly into one another, and viewers can concentrate more easily on the contents of the frames, rather than the borders that separate them. Frame borders are displayed by default. To hide frame borders, follow these steps:
-
Right-click a frame and choose Frame Properties from the shortcut menu.
-
In the Frame Properties dialog box, click Frames Page.
-
In the Page Properties dialog box, click to deselect the Show Borders check box.
Note You can only hide or display frame borders for an entire Web page. You can t have some frames with borders showing, while other frames have no visible borders.
-
Click OK to close Page Properties, then click OK to close Frame Properties.
-
Click Preview to view the page without any visible borders.
| Note | Even if you make borders invisible on a frame, when you work on the page in the FrontPage window you can still see them ”though the invisible frame border appears as a thin gray line that you can still drag if you need to resize the frame. |
Changing Margins
Frames make Web pages more complex and content-rich. As a result, you may need to adjust the margins of your frames in order to make the contents more easily readable. The margin of a frame is the space between any one of the four borders and the text or images within them. By default, the left and right margins of a frame (the width) are 12 pixels. The top and bottom margins of the frame (the height) are 16 pixels. To adjust the margins, right-click the frame, and choose Frame Properties, then change the settings in the Margins section of the Frame Properties dialog box.
| Note | If you set a frame s Width or Height margins to 0, you make the frame s contents bleed to the border. This enables you to align images or text in one frame with images or text in another frame. |
Adjusting Options
It s a good idea to put the viewer in control when it comes to frames. That way, they ll feel better about using the frames layout and overcome any of the bad reputation aspects of frames mentioned earlier in this chapter. The Frame Properties dialog box lets you change the following frame attributes to put viewers more in control:
-
Show scrollbars The Show scrollbars drop-down menu in Frame Properties contains three options. If Needed means FrontPage will only display scrollbars if the text in the frame is longer than the frame can display in a single browser window. This option puts the viewer in control. The other two options do not: Always means the browser will display scroll bars whether the contents extend beyond the bottom of the frame or not; Never means the browser will not show scroll bars in the frame regardless of how long its contents are.
-
Resizable in Browser Select this option in order to let the viewer resize the frame in order to make the frames more readable.
Adding Colors
Each frame within a frameset can have a distinct background color. By giving a frame a different color from those around it, you add visual interest to the Web page, while directing viewers eyes toward the frame s contents. You might want to add color to a frame that contains special sales promotions or news about your company. Just follow these steps:
-
Click in the frame you want to adjust to select it.
-
Choose Format, Background.
-
On the Formatting tab of the Page Properties dialog box, click the Background drop-down menu, and select a background color for the Web page within the selected frame.
-
Click OK.
| Caution | Remember that you are only changing the color to the page that is currently displayed within the frame. If the frame s contents are meant to change because of hyperlinks clicked in other frames, you ll need to change the backgrounds of all the pages that might appear in that frame. |
Splitting or Deleting Frames with the Frames Menu
You may need to adjust the number of frames in your layout in response to changes within your organization. FrontPage s Frames menu makes it easy. The options in the Frames menu become active when you have selected a frame. To split a frame, click anywhere within it to select it. Then choose Frames, Split Frame. The Split Frame dialog box appears (see Figure 12-8). Choose either Split Into Columns or Split Into Rows, then click OK to divide the frame into two equal size rows or columns .
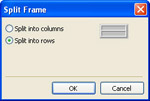
Figure 12-8: Split a frame into two columns or rows using this dialog box.
To delete a frame, first select it, then choose Frames, Delete Frames. When a dialog box appears asking you to confirm that you want to delete the frame, click OK.
EAN: 2147483647
Pages: 179
- Step 1.1 Install OpenSSH to Replace the Remote Access Protocols with Encrypted Versions
- Step 3.3 Use WinSCP as a Graphical Replacement for FTP and RCP
- Step 4.1 Authentication with Public Keys
- Step 4.5 How to use OpenSSH Passphrase Agents
- Step 4.7 Using Public Key Authentication for Automated File Transfers