Using Shared Borders
Most sites have common page banners, navigation structures and contact information. But individually editing page banners, link bars or contact information in pages isn t the best use of your time. Instead, you should define common areas, called shared borders , that pages within the site share, and then add the common elements to these shared border areas.
Understanding Shared Borders
Sites you create using advanced templates and wizards have shared borders. Your sites should have shared borders, too. Not only does it make sites easier to manage, it also gives sites a consistent look and feel.
You can add shared borders to four areas of the page:
-
Left When you share the left sides of pages, the pages have a common left border. Most of the time, the left border area is used to provide navigation links and buttons , called link bars. Link bars are also used with other shared borders.
-
Right When you share the right sides of pages, the pages have a common right border. Right borders are used less frequently than other types of shared borders, but are another alternative.
-
Top When you share the tops of pages, the pages have a common header. Typically, page headers will have a banner or other graphic that introduces the purpose of the page, as well as a link bar.
-
Bottom When you share the bottom of pages, the pages have a common footer. Typically, page footers will have contact information, copyright notifications, and the date the page was last modified.
Figure 5-6 shows a page with top, left and bottom borders. As you can see, the top and left borders use a link bar, and the bottom border includes contact, copyright and update information.
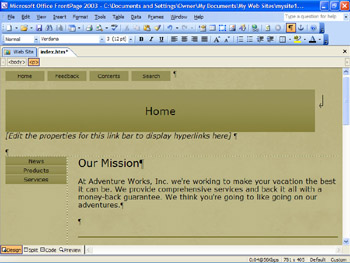
Figure 5-6: Pages can have top, left, right and bottom shared borders; this page uses all but a right shared border.
Top and bottom borders stretch across the entire width of the page. The height or size of a top or bottom border is determined by the amount of information within it.
| Note | Because you don t want these border areas to fill the browser window, you should limit the amount of text and graphics you add to these areas. Use only what is necessary and you ll have happier visitors . |
Between the top and bottom border you ll find the main text of the page, as well as the left or right borders, if they ve been defined. Left and right borders stretch down the length of the page, and are as wide as their widest element. Don t create wide left or right borders. If you do, users may have to scroll left and right to see the contents of the page.
Adding Shared Borders to Sites and Pages
You ll use shared borders in one of two ways. Either set default borders for an entire site, or add borders to individual pages.
-
To assign shared borders to a site, open the site for editing in FrontPage, then select Format, Shared Borders.
Note If the Shared Borders option is dimmed, you won't be able to select it. To fix this, enable shared borders as a page option. Click Format, Page Options. Afterward, on the Authoring tab of the Page Options dialog box, select Shared Borders and then click OK.
-
To assign shared borders to individual pages within a site, select the pages in the Folder List, then choose Format, Shared Borders.
-
Choose the shared borders that you want to display. If you use the top or left border, you can add link bars as well.
Once shared borders are added to a site, editing the contents of a border area in any page and saving the page updates the contents of the border area for all pages. The reason for this is that the borders are actually saved as separate Web pages, so when you edit the contents of a border area, you re actually editing the individual page that defines the shared border. Thus, you can make a change once, and be sure it is applied throughout the site.
Editing Shared Border Properties
Shared border properties determine the background color or picture that is used in the shared border area. By default, the background color is set to automatic, and the background picture is undefined . If the site uses themes, these default settings tell FrontPage to get the property values from the theme. Otherwise, the default color and background of a particular browser is used.
If you want to set the background color or picture for shared borders, follow these steps:
-
Right-click an open area of the shared border, then select Shared Border Properties. This displays the Border properties dialog box, as shown in Figure 5-7.

Figure 5-7: Shared borders can get their background colors and pictures from the current theme, or you can specify your own background colors and pictures as shown here. -
Use the Border list to select the shared border area you want to work with first.
-
If you want to set the background color, click Color, then use the Color selection list to choose the color you want to use.
-
If you want to set a background picture, click Picture, then click Browse. Afterward, use the Open File dialog box to find the background picture you want to use.
Note You can select both a background color and a picture. In this case, the user s browser will display the border area using the color while the picture is loading. If the user has elected not to display pictures, or their browser doesn t support pictures, only the background color is displayed.
-
Repeat steps 2 through 4 if you want to set the background color or picture for other shared borders.
-
Click OK when you are finished.
EAN: 2147483647
Pages: 179