Going Live: Publishing Your Web Site
When you re finished creating content, previewing pages, and verifying hyperlinks (see Chapter 19, Administering Web Sites ), the time comes to move your pages from your own computer to a Web server, where they can be accessed by other Web surfers. This process is called publishing your Web site. FrontPage makes it easy to publish to a server that is running the FrontPage Server Extensions or SharePoint Team Services (an extended server, in other words), as well as FTP or WebDAV servers.
Publishing a Web to an Extended Server
If you are using a server that supports the Microsoft FrontPage Server Extensions or SharePoint Team Services, FrontPage makes the publishing process a matter of a few mouse clicks. The advantage of publishing on one of these extended servers is that you can create advanced features, such as feedback forms and discussion Webs, and also take advantage of the collaboration tools on a SharePoint site. You first need to set up the properties of the extended server that will host your Web site:
-
Click View, Remote Web Site.
-
When the message Click Remote Web Site Properties... appears, look in the toolbar immediately above FrontPage s Design view, and click Remote Web Site Properties (see Figure 17-3).
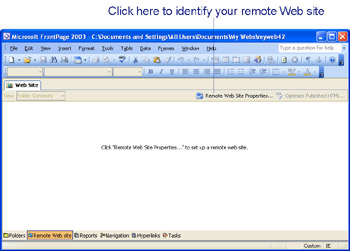
Figure 17-3: Click Remote Web Site Properties to set up the site where you want to publish. -
When the Remote Web Site Properties dialog box appears (see Figure 17-4 on the following page), select the publishing method that applies to your own Web server setup:
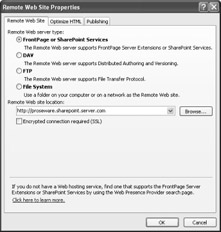
Figure 17-4: Select the type of server that will hold your Web site, and enter its URL.-
FrontPage or SharePoint Services Choose this option if your Web server has one of these sets of server extensions installed.
-
DAV Choose this option if your server supports Distributed Authoring and Versioning, a standard that allows workgroups to collaborate on shared files.
-
FTP Choose this option if you use File Transfer Protocol to publish files from your local computer to the Web server.
-
File System Choose this option if you are going to publish your site to a location on your own computer or on a shared network folder.
-
-
Enter the URL of the Web site in the Remote Web Site Location box. Click OK.
FrontPage immediately connects to the remote Web site, and displays both the Local Web Site and Remote Web Site contents (see Figure 17-5). Once you are connected, select Local To Remote under Publish All Changed Pages, then click Publish Web Site to move your pages from your local site to the remote location.
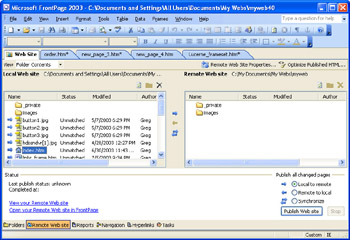
Figure 17-5: FrontPage displays both the local and remote versions of your Web site.
Gaining Flexibility by Publishing with FTP Server View
File Transfer Protocol (FTP) servers are typically provided by Internet Service Providers (ISPs) to give their customers Web server space for their personal or business Web sites. There are other reasons why you might publish using FTP, however. For instance, different workgroups may be creating content and editing your Web site. This might happen with a large organization that has different branch offices. Some offices might use FrontPage to create Web content, while others might use a tool like Macromedia Dreamweaver. When you can t predict how files will be created, opt for flexibility by publishing to an FTP site.
| Lingo | File Transfer Protocol ( FTP ) has been around longer than the Web itself. It s a communications method intended solely for moving files from one computer to another on a network. |
When you publish to an FTP site, you ll need the server name, username, and password from your Internet Service Provider, as well as the name of the directory where your Web site files are stored. Once you have this data close at hand, follow steps 1 and 2 from the preceding section. When the Remote Web Site Properties dialog box appears, click FTP, and enter the URL for the FTP site. Then click OK. When the Name And Password Required dialog box appears (see Figure 17-6), enter the name and password needed to connect to your FTP server, then click OK.
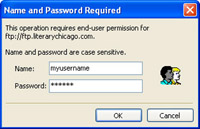
Figure 17-6: FrontPage enables you to enter the password and username required to connect to an FTP server.
| Caution | When you enter the URL of your Web site in the Remote Web Site Properties dialog box, be sure to include the protocol (in this case, ftp:// ). The URL should take the form ftp://ftp.myftpserver.com . |
Maintaining Functionality by Publishing a Web to Local File
Publishing doesn t have to take place over the Internet. It s a good idea to create a backup of a Web site, either on your own computer or, better yet, on a shared folder on another computer on your local network. In case your own machine experiences serious damage, you can use the backup version to update your site as needed. You might wonder why you would want to publish a Web site, rather than simply copying the Web site s files and folders from one location to another. Publishing ensures that you don t forget any files you need, and that you maintain your Web site s structure. It also ensures that any FrontPage Web page components you ve included on your pages will actually function.
| See Also | See Chapter 13, Using FrontPage Components, for a detailed examination of Web components you can add to your site with FrontPage. |
To publish your site to a local folder, open The Remote Web Site Properties dialog box as explained in preceding sections. Then:
-
Select File System.
-
In the Remote Web Site Location box, enter the UNC form (such as \\server\folder\subfolder) of the path leading to the web you want to publish. Or click Browse if you need to locate a server on your local network. Click OK.
Caution Make sure there aren t any blank spaces or capital letters in the name of the folder to which you are going to publish your files. UNIX or UNIX-style Web server operating systems don t work well with blank spaces or capital letters , and in the interest of compatibility, FrontPage doesn t allow you to use them either.
-
Enter the username you use to access your Web server, if one is required, and then enter your password.
-
Select Save This Password In Your Password List, if you want your password to be automatically entered for you in the future. Click OK.
-
Once the local site appears in Remote Site View, select Local To Remote under Publish All Changed Pages, then click Publish Web Site to move your pages from your local site to the remote location.
| Lingo | Universal Naming Convention ( UNC ) is a way of locating a file on a filesystem that is machine-independent . Rather than specifying a drive letter and path (such as C:\Program Files\folder\subfolder), UNC uses the form \\server\share\path\filename. |
Controlling Document Changes by Publishing with WebDAV
If the server to which you publish your site exists on a corporate intranet, it may support an advanced protocol for collaborative document authoring called WebDAV. FrontPage 2003 now supports publishing to servers which use this Web content management framework, allowing files to be locked, so that they can t be overwritten (if you and coworker are both working on the same document, you won t undo one another s changes). WebDAV uses XML, which enables you to save metadata about a file (such as its author, title, subject, and creation date) along with the file s actual contents. This allows you to search for files created by a particular author, or edited on a specific date.
| Lingo | WebDAV ( Web-based Distributed Authoring and Versioning ), is a protocol developed by the World Wide Web Consortium, designed specifically for publishing and maintaining files on the Web. It allows information about a file to be stored in such a way that editors/authors can make changes to the file, or its properties, without overwriting changes that other editors/authors have already made to the file. |
Publishing to a WebDAV server is pretty much the same as publishing to an FTP server: open the Remote Site View Properties dialog box, as described in preceding sections, select DAV, enter the URL of the server in Remote Web Site Location (which will probably include your username, or directory name), and click OK to display the server s contents in Remote Site View. Select Local To Remote under Publish All Changed Pages, then click Publish Web Site to move your pages from your local site to the remote location.
| See Also | If you want to find out more about WebDAV, you ll find an excellent introductory article on the subject at http://ftp.ics.uci.edu/pub/ietf/webdav/intro/webdav_intro.pdf. |
EAN: 2147483647
Pages: 179