Gaining Control By Specifying Form Results
Simply specifying whether FrontPage should save form data as a text or HTML file, or as an e-mail message doesn t give you a lot of options. Once you begin to receive form information from your visitors , you ll probably want to customize the results, so that the information comes to you in a clearer way. Even if you ve already saved the form, identified the form handler, and published the form, you can still customize the form results at any time to make the form more useful. By controlling form results, you make FrontPage a front-end tool for presenting the data you need to keep your organization running smoothly.
Name and Format the Results File
Sometimes, you want to have form data presented in chronological order. Other times, you d rather see the most recent information presented first. Changing such options gives you the ability to view form data the way you re going to work with it in preparing projections, budgets , or marketing proposals.
-
Right-click anywhere in the form you want to edit, and choose Form Properties from the shortcut menu.
-
Click Options.
-
Click the down arrow next to the File Format drop-down list, and choose the format in which you d like to receive the data (see Figure 14-16).
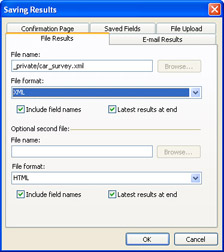
Figure 14-16: FrontPage gives you many options for saving form data. -
Check Include Field Names if you want the file to include the names of each field, as well as the data.
-
Click the Optional Second File section of the File Results tab, and fill out the File Name box, if you want to specify a second file to receive the results ”to present one set of results in a plain-text document and another in HTML, for instance. Click OK.
| Aha! | Prioritize Your Form Results |
Adding Flexibility by Saving Form Results as XML
Extensible Markup Language (XML) enables you to use HTML-style markup tags to identify data elements. You can create tags that identify the data you have received from the form. By saving form results in XML format, you can easily open and work with them in other applications that support XML.
To save form results in XML format, follow steps 1 to 3, as presented in the preceding section Name and Format the Results File. Then choose XML from the File Format drop-down list.
| Aha! | Test Your Form Handler |
Organizing Your E-mailed Form Information
Having form responses e-mailed to you is convenient , but in a business environment where you might receive dozens of e-mail messages per day, you need to get all the help you can when it comes to organizing your e-mail and responding to it efficiently . FrontPage can help in several ways. You can have the program alert you to the message s conents, and even configure a filter that can automatically file the message for you. Just follow these steps:
-
Right-click the form that has been set up to e-mail results to you, and choose Form Properties from the shortcut menu.
-
Click Options, and click E-Mail Results.
-
Click the down arrow next to the E-Mail Format box (see Figure 14-17 on the following page), and choose a formatting option for the e-mail messages.
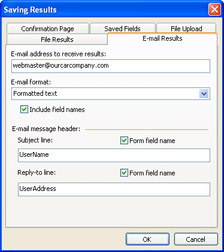
Figure 14-17: Use these options to define the format of e-mailed results. -
Enter a subject line for the e-mail messages you receive in the Subject Line box, if you want FrontPage to include the subject line in the form results, to remind you exactly what is being submitted. This is especially important if you have several forms on your Web site, and visitors submit information on a wide variety of topics. Including the subject line enables you to use your e-mail program s Filters option to automatically file the message in a predesignated folder if you wish to.
-
Enter information in the E-mail message header section of the a standard subject line for messages you send in response to users who submit form information to you. Click OK.
| Aha! | Enter a Reply-To Line |
Learning More by Saving Additional Information
When you save form results, you normally save only the fields that you have included in the form. But you can learn even more about the data that was submitted by taking advantage of FrontPage s ability to let you save additional form information. The additional information can prove useful when you analyze the results. Follow these steps:
-
Open the Saved Results dialog box for the form (see Steps 1 through 3 under Organizing Your Emailed Form Information ).
-
Click Saved Fields.
-
Check one of the options in the Additional Information To Save section (see Figure 14-18) if you want the form results to include the name of the user s computer, the username of the individual who filled out the form, or the user s browser type.
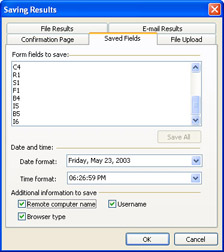
Figure 14-18: Saving additional form information can help with analysis. -
Specify a Date format or time format in the Date And Time section if you want to save the date and time the form data was submitted. Click OK.
| See Also | One of this book s authors, Greg Holden, explored the ins and outs of setting up an e-commerce Web site with FrontPage in the book E-Commerce Essentials with Microsoft FrontPage , also published by Microsoft Press. |
| |
A Web store ”Web site that is intended to sell goods or services to the general public ”has goals that are different than informational or community-building Web sites. You need to make it as easy as possible for customers to locate what they want. You then have to present sales items in an attractive way. Sales information must be backed up with high-quality customer service. It s important to market your site so that it will reach a well-defined target audience. You need to be able to process transactions online as well.
Many of those goals can be achieved by creating Web page forms. Forms are needed to enable your prospective customers to make inquiries, and to enable your actual, current customers to select items and submit shipping and payment information. For instance, one of the most important forms on any e-commerce Web site is one that the customer fills out after making a purchase. It enables the customer to submit payment and shipping information to the store s site. In order to protect customer information, you should store credit card information, addresses, and other personal information, on a secure server that encrypts data using Secure Sockets Layer (SSL), a set of technologies that is designed to protect information transmitted over the World Wide Web. Microsoft bCentral enables you to use FrontPage to create such forms, and store them on Microsoft bCentral s own secure server. You can also create Web pages that include Buy buttons , which allow customers to store selections in an electronic holding area called a shopping cart, until they are ready to be purchased. Find out more about Microsoft bCentral at http://www.bcentral.com ).
One thing you can use to help create Web store forms is Microsoft bCentral, Microsoft s hosting service for Web-based businesses. bCentral provides its customers with a variety of services for setting up Web stores. One of those services, Customer Manager, includes forms that help you receive and track information and inquiries submitted by the customers who visit your site. bCentral integrates with FrontPage through a utility called Microsoft bCentral Customer Manager.
| |
EAN: 2147483647
Pages: 179