Backing Up Exchange Server
Windows provides a backup utility, called Backup, for creating backups on local and remote systems. Backup has special extensions that allow you to create online backups of Exchange Server 2007. You use Backup to do the following:
-
Archive Exchange configuration and user data
-
Access media pools reserved for Backup
-
Access remote Exchange servers through My Network Places
-
Create snapshots of the System State for backup and restore
-
Schedule backups through the Task Scheduler
-
Recover Exchange configuration and user data
You create backups using the Backup utility's Backup tab or the Backup Wizard. Both techniques make use of default options set for the Backup utility. You can view or change the default options by clicking Tools and then selecting Options. The account you use for backup and restore should be a member of both the Backup Operators and Server Operators groups.
Starting the Backup Utility
You can access the Backup utility in several ways:
-
On the Start menu, select Run. In the Run dialog box, type ntbackup, and then click OK.
-
On the Start menu, select Programs or All Programs as appropriate, select Accessories, select System Tools, and then select Backup.
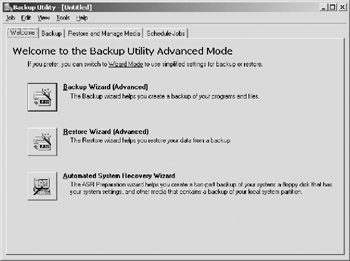
The first time you use the Backup utility, it starts in basic wizard mode. As an administrator, you'll want to use advanced mode, because it gives you more options. Clear the Always Start In Wizard Mode check box, and then click Advanced Mode. You should now see the main Backup utility interface. As shown in Figure 18-1, the standard interface has four tabs that provide easy access to key features. These tabs are as follows:
-
Welcome Introduces Backup and provides buttons for starting the Backup Wizard, the Restore Wizard, and the Automated System Recovery Wizard.
-
Backup Provides the main interface for selecting data to back up. You can back up data on local and mapped network drives.
-
Restore And Manage Media Provides the main interface for restoring archived data. You can restore data to the original location or to an alternate location anywhere on the network.
-
Schedule Jobs Provides a month-by-month job schedule for backups. You can view executed jobs, as well as jobs scheduled for future dates.

Figure 18-1: The Windows Backup utility provides a user-friendly interface for backup and restore.
Backing Up Exchange Server with the Backup Wizard
The procedures you use to work with the Backup Wizard are similar to those you use to back up data manually. You can perform backups with Exchange Server online or offline. For online backups, verify that the Exchange System Attendant and Microsoft Information Store services are running before starting a backup. For offline backups, verify that all Exchange services are stopped before performing a backup.
You start and work with the wizard by completing the following steps:
-
Start the Backup utility in advanced mode. On the Welcome tab, click Backup Wizard. If wizard mode is enabled, click Advanced Mode, and then click Backup Wizard.
-
Click Next. Select Back Up Selected Files, Drives, Or Network Data, and then click Next again.
-
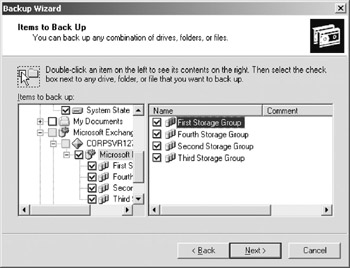
As shown in Figure 18-2, choose the user data you want to back up. You make selections by selecting or clearing the check boxes associated with a particular drive or folder. When you select a top-level folder, all the subfolders are selected. When you clear a check box for a top-level folder, check boxes for the related subfolders are cleared as well. Key backup options for Exchange Server are as follows:

Figure 18-2: Choose the Exchange data to back up.-
q To create a full backup that includes all Exchange servers in the organization, you need to select the Microsoft Information Store node of each individual server. Expand Microsoft Exchange Server, expand the node for the first server that you want to back up, and then select the Microsoft Information Store check box. Afterward, expand the node for the next server that you want to back up, and then select the Microsoft Information Store check box, and so on.
-
q To back up specific Exchange servers, expand Microsoft Exchange Server, expand the node for the server that you want to back up, and then select the Microsoft Information Store check box.
-
q To back up all user databases on a specific Exchange server, expand Microsoft Exchange Server, expand the node for the server that you want to back up, and then select the Microsoft Information Store check box.
-
-
To back up individual databases on an Exchange server, expand Microsoft Exchange Server, expand a server, expand Information Store, expand the storage group you want to work with, and then select the check box for the database you want to back up.
-
If you want to back up configuration data, choose additional items. Key options are as follows:
-
q To back up Exchange Server 2007 and Windows settings, select all hard disk drives where Windows and Exchange Server are installed. Normally, this means backing up the root of the C drive and the drives used by Exchange Server.
-
q To back up the Windows registry and Active Directory settings, expand My Computer, and then select the System State check box. System State data includes essential system files needed to recover the local system. All computers have System State data, which you must back up in addition to other files to restore a complete working system.
-
-
Click Next, and then select the Backup Media Type. Choose File if you want to back up to a file. Choose a storage device if you want to back up files and folders to a tape or removable disk.
-
Select the backup file or media you want to use. If you're backing up to a file, select a location from those available, or click Browse to specify a file location and name. If you're backing up to a tape or removable disk, choose the tape or disk you want to use. Afterward, type a name for the backup you are creating, such as Exchange Backup January 2008.
Note When you write backups to a file, the backup file normally has the .bkf file extension. You can use another file extension if you want. Note also that you use Removable Storage to manage tapes and removable disks.
-
Click Next. Click Advanced if you want to override default options or schedule the backup to be run as a job. Then follow steps 8–11. Otherwise, skip to step 12.
-
Select the type of backup to perform. The available types are: Normal, Copy, Differential, Incremental, and Daily. Click Next.
-
You can now set the following options for verification and compression, and then click Next:
-
q Verify Data After Backup Instructs Backup to verify data after the backup procedure is completed. If selected, every file on the backup tape is compared to the original file. Verifying data can protect against write errors or failures but requires more time than a backup without verification.
-
q If Possible, Compress The Backup Data To Save Space Allows Backup to compress data as it's written to the storage device. This option is available only if the device supports hardware compression and only if the drives are compatible to read the compressed information, which might mean that only a drive from the same manufacturer can recover the data.
-
-
Set options for copying data to the designated file, tape, or removable disk. To add the backup after existing data, select Append This Backup To The Existing Backups. To overwrite existing data, select Replace The Existing Backups. If you're overwriting data, you can specify that only the owner and an administrator can access the archive file by selecting the Allow Only The Owner And Administrator Access To The Backup Data check box. Click Next.
-
Determine when the backup will run. Select Now to run the backup now, and then click Next. Select Later to schedule the backup for a specific date. If you want to schedule the backup for a later date, type a job name, click Set Schedule, set a run schedule, and then click OK. When you click Next, if you've scheduled the backup, you'll have to enter an account name and password to add it to the schedule. This account must have Backup Operator privileges or be a member of a group that has Backup Operator privileges.
-
Click Finish to start the backup. You can cancel the backup by clicking Cancel in the Backup Progress dialog box. When the backup completes, click Close to complete the process, or click Report to view the backup log.
| Note | Backup selection scripts and backup logs are stored in %Userprofile%∖Local Settings∖Application Data∖Microsoft∖WindowsNT∖NTBackup∖Data. Backup selection scripts are saved with the .bks extension. Backup logs are saved with the .log extension. You can view these files with any standard text editor, such as Microsoft Notepad. |
Backing Up Exchange Server Manually
You don't have to use a wizard to back up Exchange Server 2007. You can configure backups manually by completing the following steps:
-
You can perform backups with Exchange Server online or offline, provided that you keep in mind the following:
-
q You can perform online backups only when key Exchange services are running. Verify that the Exchange System Attendant and Microsoft Information Store services are running before starting a backup.
-
q You can perform offline backups only when all Exchange services are stopped. Verify that all Exchange services are stopped before starting a backup.
-
-
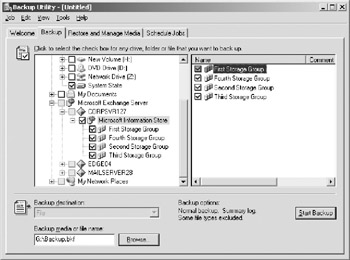
Start Backup. If wizard mode is enabled, click Advanced Mode, and then click the Backup tab, shown in Figure 18-3. Otherwise, just click the Backup tab.

Figure 18-3: Use the Backup tab to configure backups by hand, and then click Start Backup. -
Clear any existing selections on the Backup tab by selecting New from the Job menu and clicking Yes when prompted.
-
Select the items you want to back up by selecting or clearing the check boxes associated with a particular drive or folder. When you select a top-level folder, all the subfolders are selected. When you clear a check box for a top-level folder, check boxes for the related subfolders are cleared as well. Key backup options for Exchange Server are as follows:
-
q To create a full backup that includes all Exchange servers in the organization, you need to select the Microsoft Information Store node of each individual server. Expand Microsoft Exchange Server, expand the node for the first server that you want to back up, and then select the Microsoft Information Store check box. Afterward, expand the node for the next server that you want to back up, select the Microsoft Information Store check box, and so on.
-
q To back up specific Exchange servers, expand Microsoft Exchange Server, expand the node for the server that you want to back up, and then select the Microsoft Information Store check box.
-
q To back up all user databases on a specific Exchange server, expand Microsoft Exchange Server, expand the node for the server that you want to back up, and then select the Microsoft Information Store check box.
-
q To back up individual databases on an Exchange server, expand Microsoft Exchange Server, expand a server, expand Information Store, expand the storage group with which you want to work, and then select the check box for the database you want to back up.
-
-
If you want to back up configuration data, choose additional items. The key options are as follows:
-
q To back up Exchange Server 2007 and Windows settings, select all hard disk drives where Windows and Exchange Server are installed. Normally, this means backing up the root of the C drive and the drives used by Exchange Server.
-
q To back up the Windows registry and Active Directory settings, expand My Computer, and then select the System State check box. System State data includes essential system files needed to recover the local system. All Computers have System State data, which you must back up in addition to other files to restore a complete working system.
-
-
Use the Backup Destination drop-down list to choose the media type for the backup. Choose File if you want to back up to a file. Choose a storage device if you want to back up files and folders to a tape or removable disk.
Note When you write backups to a file, the backup file normally has the .bkf file extension. You can use another file extension if you want. Note also that you use Removable Storage to manage tapes and removable disks.
-
In Backup Media Or File Name, select the backup file or media you want to use. If you're backing up to a file, type a path and file name for the backup file, or click Browse to find a file. If you're backing up to a tape or removable disk, choose the tape or disk you want to use.
-
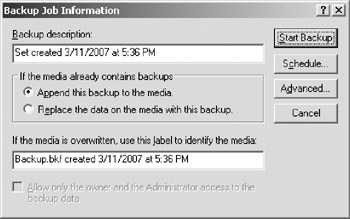
Click Start Backup. The Backup Job Information dialog box appears, shown in Figure 18-4. You use the options in this dialog box as follows:

Figure 18-4: Use the Backup Job Information dialog box to configure backup options and information as necessary, and then click Start Backup.-
q Backup Description Sets the backup label, which applies to the current backup only.
-
q Append This Backup To The Media Adds the backup after existing data.
-
q Replace The Data On The Media With This Backup Overwrites existing data.
-
q If The Media Is Overwritten, Use This Label To Identify The Media Sets the media label, which is changed only when you're writing to a blank tape or overwriting existing data.
-
-
Click Advanced if you want to override the default options. The advanced options are as follows:
-
q Back Up Data That Is In Remote Storage Archives placeholder files for Remote Storage with the backup. This ensures that you can recover an entire file system with necessary Remote Storage references intact.
-
q Verify Data After Backup Instructs Backup to verify data after the backup procedure is completed. If you select this check box, Backup compares every file on the backup tape to the original file. Verifying data can protect against write errors or failures.
-
q If Possible, Compress The Backup Data To Save Space Allows Backup to compress data as it's written to the storage device. This option is available only if the device supports hardware compression and only if the drives are compatible to read the compressed information, which might mean that only a drive from the same manufacturer can recover the data.
-
q Automatically Back Up System Protected Files With The System State Backs up all the system files in the %SystemRoot% folder in addition to the boot files that are included with the System State data.
-
q Backup Type The type of backup to perform. The available types are: Normal, Copy, Differential, Incremental, and Daily.
-
-
Click Schedule if you want to schedule the backup for a later date. When prompted to save the backup settings, click Yes. Type a name for the backup selection script, and then click Save. In the Set Account Information dialog box, type the account name and password to run the scheduled backup job. In the Scheduled Job Options dialog box, type a job name, click Properties, and then set a run schedule. Skip the remaining steps.
Note Backup selection scripts and backup logs are stored in %Userprofile% ∖Local Settings∖Application Data∖Microsoft∖WindowsNT∖NTBackup∖Data. Backup selection scripts are saved with the .bks extension. Backup logs are saved with the .log extension. You can view these files with any standard text editor, such as Notepad.
-
Click Finish to start the backup operation. You can cancel the backup by clicking Cancel in the Set Information and Backup Progress dialog boxes.
-
When the backup is completed, click Close to complete the process, or click Report to view the backup log.
EAN: 2147483647
Pages: 119