Customizing a Personal Site
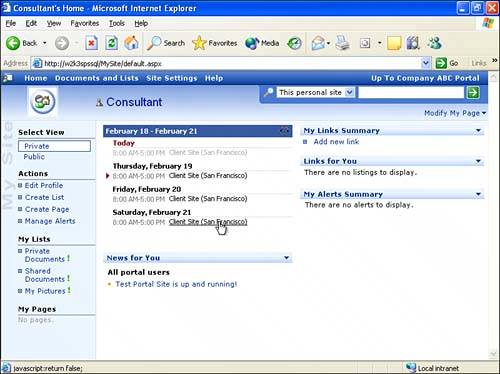
| Personal sites are provided by SharePoint Portal Server 2003 and are created for each user when My Site is clicked for the first time from the Portal home page title bar. Of course, the user needs to be a member of a site group that has the Create Personal Site right, and Create Sites right. Personal sites provide users with a template that they can turn into a powerful information center that can be a central location for saving and sharing key documents and information. Personal sites also are a way for individuals to present information about themselves to the rest of the organization. Personal sites provide two views: the Personal view only the owner can see and the Public view available to other users. Both views can be modified to meet the user's needs, and this section gives an overview of some of the most useful features that can easily be leveraged. Figure 20.1 shows the standard Private view and contains the Web Parts My Calendar, News for You, My Links Summary, Links for You, and My Alerts Summary. Figure 20.1. My Site standard page. An option is provided on the left-hand task pane to Set as Office Default Website. When this option is activated, Office 2003 applications add a My Site option to Open and Save As dialog boxes, and the personal site also appears in drop-down lists of locations when creating meeting and document workspace sites. Figure 20.2 shows a sample Save As window from Microsoft Word 2003, which includes the My Site icon in the Save In pane. Figure 20.2. Save As My Site window.
This is a great way to get users used to working with their personal sites and help them shift away from the standard file share model, so users can be encouraged to select this option when setting up their personal sites. Users can control who has access to their Shared Documents folder by following these steps:
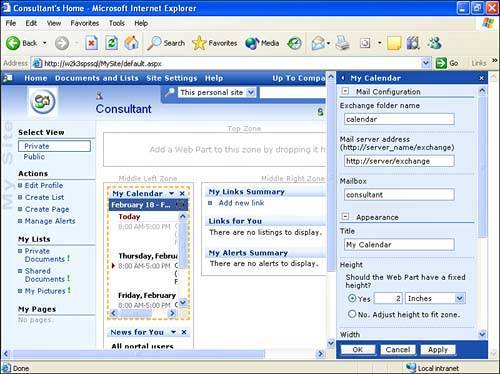
Users should receive training on how to manage access to their personal site so that they understand what is possible and recommended by the organization. This level of understanding also helps them understand the overall levels of security and control available for sites and Web Parts. Configuring My CalendarUsing these standard Web Parts and the others available through the Modify My Page options, the user can quickly configure his personal site to serve as a central workspace that connects to Exchange 2003 and commonly accessed files. A good place to start is to configure My Calendar to connect to an Exchange 2003 Server and then customize its appearance on the private view of My Site. To connect My Calendar to an Exchange calendar, follow these steps:
The bar that previously read My Calendar is now hidden because the Frame Style of None was selected, so the look is cleaner, and less space is taken up. Also in Figure 20.4, the cursor is hovering over the appointment title, and its underlined status shows that it can act as a hyperlink. If the title of the appointment is clicked, the appointment opens and displays the Outlook appointment information. Adding Items to My LinksAnother standard Web Part available on the personal site is My Links Summary. Showing users how to add links should help them see new ways of saving time by having a central location that is easy to find where they can organize their information and facilitate access to that information. To add a new link, follow these steps:
If a user doesn't know the exact URL, he can copy and paste the URL from Internet Explorer. Or if linking to a SharePoint 2003 Web page, the Add to My Links option is generally available. Using Portal AlertsAlerts can be set on the portal as well as in site collections. The My Alerts Web Part captures and summarizes alerts on the portal level but not the site level. This is an easy way for the user to tell whether any changes occur to portal areas and can also include other items:
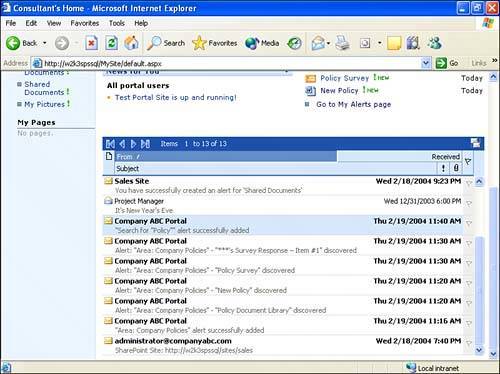
It is important to realize that these alerts are separate from the alerts a user can set within Windows SharePoint Services site collections. These alerts need to be managed by the user from the Site Settings page of the top-level website, and by selecting My Alerts on this site. Figure 20.6 shows the Change Area alert for an alert created by the user Consultant in the Company Policies area on the portal. The Consultant requested to have the alert update My Alerts Summary and for an email to go to his email account immediately when items are discovered or changed in this area. Note that filter items can also be added, to further refine the alert, and specify that the alert is sent only if an item contains or does not contain a specific word or words. Figure 20.6. Change Area alert.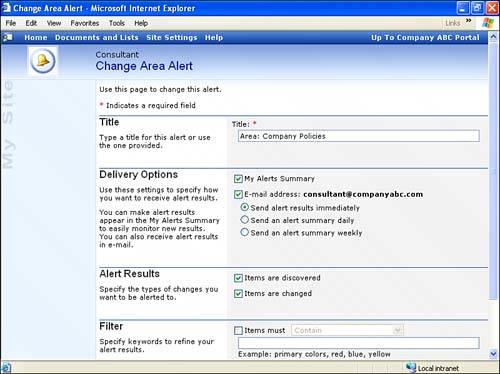 Figure 20.7 shows the personal site for the user Consultant after an alert was added to the Company Policies area, and some changes were made to the area. Beneath the heading Area: Company Policies (4), the first three alerts are listed. If the heading is clicked on, all four alerts are shown. The first item is labeled "***'s Survey Response"; because this survey is anonymous, the user's name is replaced by the asterisks. Figure 20.7. My Site with My Alerts Summary.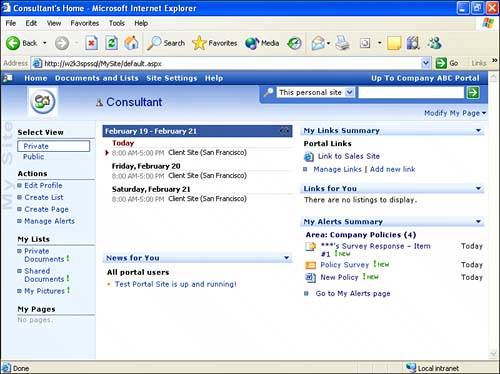 It should be clear at this point that My Alerts Summary is a powerful way for the user to leverage the value of the personal site and to stay in touch with changes that interest him on the portal. The user could, for example, be immediately notified if a new employee is added to the portal, if a new document is posted to a portal-level library, or if any new item with a specific word, such as "policy" is added to the portal. Or if alerts are specified to be sent out in a daily or weekly summary, the user receives summary emails listing all the different items that have changed. A best practice is to discuss the pros and cons of alert frequencies with end users to help them decide which are best for them. Immediate alerts on a heavily used portal or site collection may overwhelm the user's in-box with emails, so for all but the most urgent of situations, daily summaries are recommended. For managers or individuals peripherally involved with a project, but who want to be kept abreast of changes, the weekly summary can be best. Adding My Inbox to the Personal SiteAssuming Exchange is being used, the personal site can include a Web Part that provides access to the user's Inbox. Although this probably won't replace the use of the regular Outlook client, it can provide a quick way to access email from the central location, which can be handy for remote use because the user can simply access her personal site from a remote location and have access to the Inbox right there. To add the My Inbox Web Part, follow these steps:
Because email is so heavily used by most network users, having the inbox available from the personal site leverages the capabilities of the site and reduces the overall number of applications the user needs to have open at one time. Once again this can be especially useful for remote users. Adding a Document-Management Page to the Personal SiteAt this point, the personal site being used in these examples is getting pretty crowded, and the user may want to add a new page to his site, which allows extra space to add new Web Parts and continue the customizing process. To add a new page, follow these steps:
In this example, the new page is titled "Documents," and the Private Documents, Shared Documents, My Pictures, Image, and Page Viewer Web Parts were added. Figure 20.10 shows the results after these Web Parts were configured. The Image Web Part points to the graphics image titled Sunset stored in the My Pictures Web Part and adds a level of customization and personalization to the site (and some color!). The Page Viewer Web Part (titled Client Files on Server) points to a file share. Figure 20.10. Documents page example.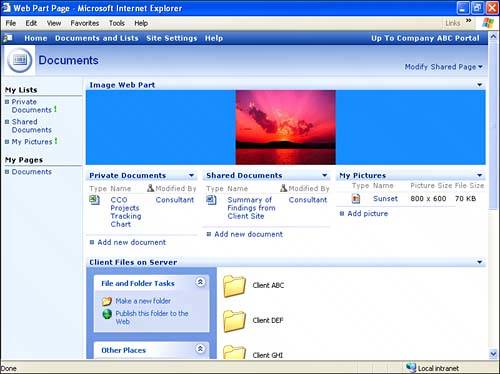 The functionality of the Page Viewer is somewhat limited and different from the normal Explorer functionality. Drilling down through folders is accomplished by double-clicking on the folder name, but there is no "up arrow" to go back to the previous level. Pressing F5 or the Refresh button refreshes the initial view of the folder. This can be confusing to users who are used to the normal navigation process through Explorer, where a back arrow always is available. With this level of functionality available from within a SharePoint 2003 personal site, the user can interact with files on essentially the same level as with Explorer. For a remote user, this can be a powerful toolset because it can eliminate the need to also use VPN or Terminal Services to perform daily activities. For example, without the Page Viewer Web Part and the Show Common Tasks in Folders features, a user who wants to print a file from a network share would have to gain access to the file through a VPN, open the file, and then print. With the Page Viewer Web Part configured to provide access to the shared folder, the user can simply access her personal site, select the file, and choose Print this File from the File and Folder Tasks, or right-click on the file and choose Print. A number of other functions can also be performed, including moving or copying the file, emailing it to a co-worker, and compressing (zipping) the file. My Network Places can also be accessed from the Other Places section of the common tasks, which can save a trip to the desktop. Other Places also includes shared files, My Documents, and My Computer, all of which are commonly used and handy to have readily available in the Page Viewer Web Part. |


EAN: 2147483647
Pages: 288