Working with Document Workspaces
| SharePoint includes templates for different types of workspaces. A document workspace site contains Web Parts that promote document collaboration. The default configuration of the document workspace site includes Web Parts for announcements, tasks, links, and shared documents. In addition, the members of the site are shown. The Quick Launch sidebar provides access to contacts and events lists, as well as to a general discussion board. Using the document workspace site for collaboration, the tasks list can be used to assign members milestone dates or to-do items, or it can be used to create a to-do list for yourself. Tasks can be added through the tasks list Web Part or from the Quick Launch area, depending on site configuration. If the tasks list List View is on the page (as it is by default), simply click on Add New Task to get to the page for entering the task details. The information entered for a task includes a name and description of the task, status (for example, not started, in progress, completed), percent complete, who it's assigned to, start date and time, and due date and time. An alert can be entered for the task so that a notification message is sent if the task is modified. Tasks are covered in more detail in Chapter 12, "Managing and Using SharePoint Lists." The links list can be used to provide hyperlinks to information associated with the document, or information used for research. The hyperlinks can be either to other documents or to sites, or network file shares where related documents might be stored. CAUTION If a link is added to a file share, it will generally only be accessible if the client has direct access to the share. For example, using a link to a file share from home won't work unless you have a VPN connection or are using Terminal Services to access the corporate network. Document workspaces can be created either from the browser interface or from Microsoft Office 2003 applications. However, before a workspace can be created under a SharePoint site, the site owner must grant the appropriate permission to that user. To allow users of a site to create workspaces, the administrator should follow these steps:
Creating a Document Workspace Using the SharePoint Browser-Based InterfaceUsing the SharePoint browser interface, there are multiple ways to create a document workspace. One way is to use the Create page of a Windows SharePoint Services site as outlined in the following steps:
A document workspace can also be created for a specific document in a document library: NOTE This method cannot be used if the document library is already in a document workspace site.
When a document workspace is created in this manner, a copy of the document is placed in a document library on the new document workspace where it can be worked on. Figure 13.1 shows a default document workspace and the document "Network Upgrade Proposal" is visible in the Shared Documents library on the home page. Figure 13.1. Sample document workspace.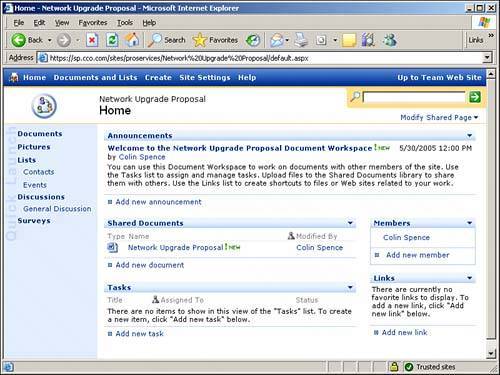 When the modifications to the document are completed, the document can be published back to the document library where it was originally stored. This is done by clicking the Edit arrow and then selecting Publish to Source Location, as shown in Figure 13.2. Figure 13.2. Publish to Source Location option.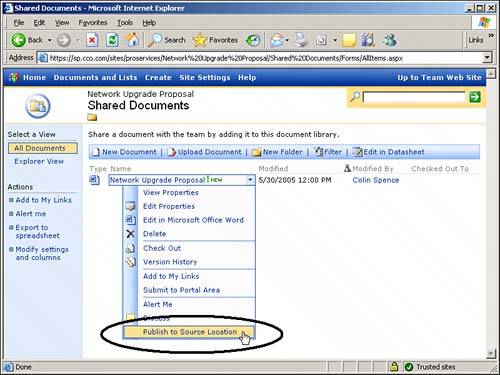 NOTE Documents can be published back to their original location only if the document workspace was created from a document stored in a document library. If the document workspace was created using the Create page, this feature is not available. CAUTION Other users can still access the document stored in the original document library (doc0) on the Windows SharePoint Services site after a document workspace has been created which contains a copy of the original (Doc1). This means that there really are two different documents in existence (Doc0 and Doc1), each of which can be modified. To stop users from modifying the original document (Doc0), the user who created the document workspace should check out the document from the original library so it is locked for editing by any other members of the site. This person should make a note in a comments column (if one exists) that the document (Doc0) is in a document workspace and currently being worked on with a team. If the user forgets to check out the document from the original library, and someone makes changes to it (creating Doc0a), and the user later uses the Publish to Source Location option, the now modified original (Doc0a) will be overwritten by the modified version from the workspace (Doc1a). Doc1a will now show as the current version in the document library on the Windows SharePoint Services site. If versioning is on for the original library, Doc0a will be viewable, otherwise the other changes are lost. Using Microsoft Office 2003 to Create a Document WorkspaceDocument workspaces can be created directly from Microsoft Office 2003 versions of Word, Excel, and PowerPoint 2003. Workspaces can be created only for documents of type .doc, .dot, .xls, .xlt, .ppt, .pot, and .mht (single file web pages). This provides a convenient method for creating workspaces where there is a need for collaboration. In addition, creating workspaces from Office applications is a good method for getting people to start using the features of SharePoint because there is less resistance to change when users are in an application they are already familiar with. The process of creating a workspace from Word 2003 is covered in Chapter 9, "Using Word 2003, Excel 2003, and Outlook 2003 with SharePoint Technologies." A document workspace can also be created from Outlook by sending a shared attachment. Sending a shared attachment automatically creates a document workspace for the attachment, and the recipients of the email are automatically made members of the workspace. When they open the email, they can either save the attachment to a local drive and thus create their own copy, or they can browse to the shared workspace and work on the shared version of the document. This process is also covered in Chapter 9. From this point on, each time the document is edited, prompts appear for updating the workspace and/or the local copy of the document. The workspace copy can be updated with the local one, the local one can be updated with the workspace copy, or changes from the two can be merged together. The type of updating that is performed depends on options set within the Microsoft Office 2003 application Shared Workspace task pane (Tools/Shared Workspace/Options). Taking Advantage of the Members Web PartIn a document workspace, the Members Web Part is used to view the users who have been given permission to access the site. This Web Part is put on the home page by default. Clicking on a member's name displays the member's user information. Email and instant messages can be sent to the member by clicking the smart tag next to the member's name (assuming a compatible messaging service is installed). Meetings can also be scheduled through the smart tag. The same information and features for members are available in the Microsoft Office 2003 applications (Word, Excel, and PowerPoint) through the Shared Workspace task pane. Adding Members to a Document WorkspaceAny user who has an email address or is a member of the network can be added as a member to the document workspace. In addition, cross-site groups can also be added as members. This provides the flexibility of including people outside the local domain, and even outside the corporate network, as participants in the workspace. For example, a corporate marketing department could collaborate with an outside advertising firm in a document workspace for producing a new marketing strategy. Only users with the Create Subsite right or members of the Administrator site group can add members to a site. Members can be added from the SharePoint workspace or from the Microsoft Office 2003 application. To add members from the document workspace site, follow these steps:
|
EAN: 2147483647
Pages: 288