| InfoPath allows the easy creation of XML-enabled forms so that an organization can enhance its capability to collect, manage, and share information. SharePoint 2003 offers a form library, which is specifically designed to store XML forms and requires an application such as InfoPath to create these forms. InfoPath is used for both form creation and for actually filling out the forms, so is required on the workstation of anyone accessing its forms. InfoPath forms are by default saved in XML format but can be exported in .mht format, which is easily viewed from a browser. New forms can be designed based on the many templates provided, or a new form can be designed from scratch. Existing data sources can be accessed, and a form can be created based on its structure. Data can only be imported from The following example creates a form library and then modifies an existing template for a quick demonstration of the process and the results: 1. | From a top-level website, click on Create; then select Form Library.
| 2. | Enter a name for the form library and a description so that users know the purpose of the form (in this case, Sales Reports). Choose whether the library will be available on the Quick Launch bar (in this case, Yes). Decide whether versioning will be activated to track changes to forms after they have been created (in this case, No). Then select the Sales Report form and click Create. A number of other predesigned forms are available, several of which are shown in Figure 10.20.
Figure 10.20. Creating a form library. 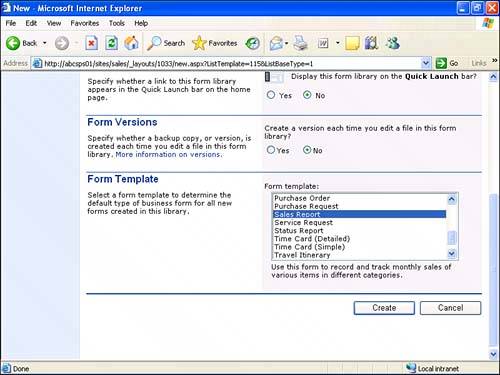
| 3. | The form library then opens. Click on Fill Out This Form in the toolbar. InfoPath then opens, and the form appears, as shown in Figure 10.21. Note that the request date and time are automatically filled out. You may be asked whether you want to set Microsoft Office as the default program for opening and editing .xml files, so select Yes if you want it to be.
Figure 10.21. Sales Report form in InfoPath. 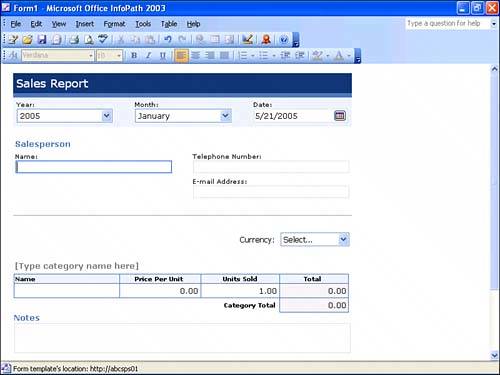
|
The form can either be used "as is" or modified with FrontPage 2003 to meet the organization's requirements. To modify the form, follow these steps: 1. | From FrontPage 2003, click on Tools, Design This Form, and the form becomes editable (assuming that you have sufficient rights to modify the form in SharePoint 2003).
| 2. | Click once in the Name field to select the field; then click on Data Source in the Design Tasks task pane on the right-hand side of the screen. Note that singleName is highlighted.
| 3. | Click on the arrow next to the item singleName and select Drop-Down List Box from the menu, as shown in Figure 10.22. The field under the Salesperson label changes into a drop-down list box and contains the word "Select" in it (circled in Figure 10.23).
Figure 10.22. Editing a form in InfoPath. 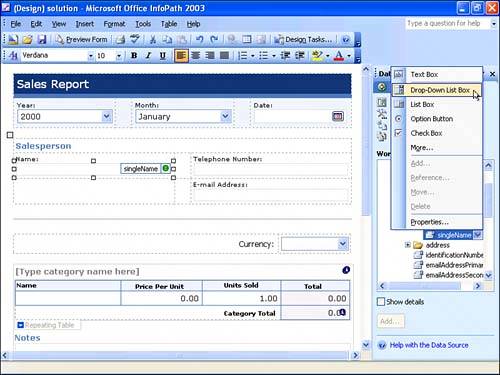
Figure 10.23. Drop-Down List Box Properties window. 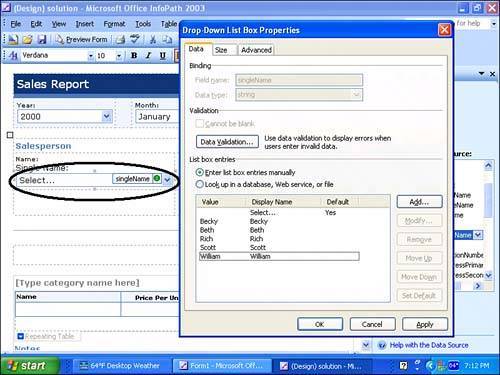
| 4. | Right-click on the drop-down list under the Salesperson label and select Drop-Down List Box Properties. Figure 10.23 shows the Drop-Down List Box Properties window, where several values have been added manually, which provides the choices the user can select from when working with the form. New entries can be added by clicking on Add. Click OK when complete.
| 5. | Notice in Figure 10.23 that the drop-down list box has extra text above it (Name: and Single Name:) which needs to be fixed. To do so simply highlight "Single Name:" and delete it.
| 6. | Click on the Preview Form button in the toolbar, or choose File, Preview Form from the menu and choose Default.
| 7. | The form displays as it appears when being filled out. Click the down arrow in the Single Name field; the names added should appear.
| 8. | Close the preview and save the form. The initial form that was loaded will still be open. Close any other version of the form still open and return to the SharePoint 2003 form library.
| 9. | Click on Fill Out This Form, and the result should look like Figure 10.24. The user filling out the form can now choose one of the names in the drop-down list.
Figure 10.24. Adding a new form to a form library. 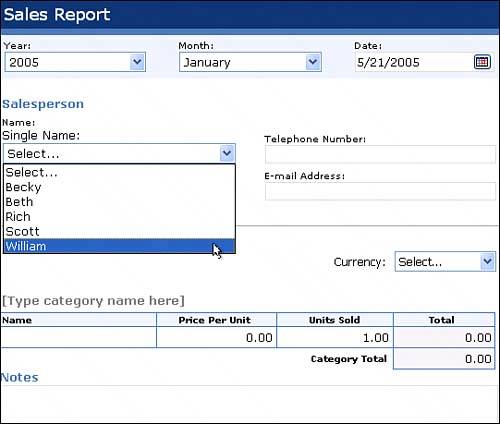
|
The SharePoint 2003 form list saves each form as a different item in the library. Each behaves as an item in a document library would and can be edited, checked out, or deleted. An alert can be set on a specific item, or a workspace can even be created. For example, if an employee, in the previous example, requested a vacation during a particularly busy time, the HR manager might create a document workspace and solicit input from the project manager managing that resource, the account executive, and others to help reach a decision. Figure 10.25 shows the All Forms view for the Sales Report form library after several Sales Report forms have been completed. Figure 10.25. Sales Report form library. 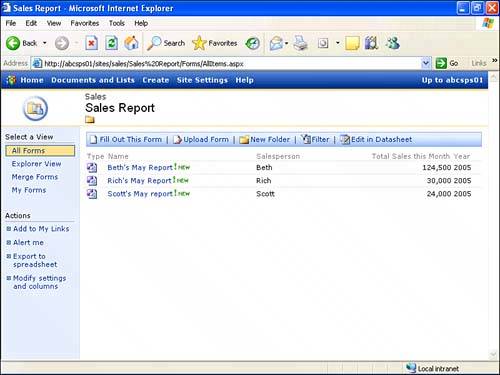
The information can be sorted and filtered in a number of ways, as well as exported to Excel or Access. Note that under Select a View, the option to Merge Forms is available, and Figure 10.26 shows the results of this operation, where all three forms were chosen to be merged (the merged form is circled in Figure 10.26). This is an easy way to create a consolidated report of sales activities, which can then be exported to Excel or to a web page from InfoPath if needed. Figure 10.26. The Sales Report form library with a merged form. 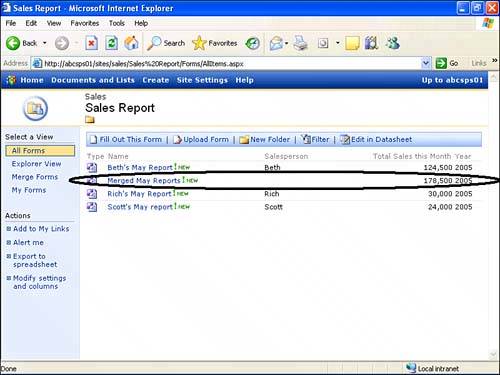
|