Migrating Team Services Sites to Windows SharePoint Services
| Significant changes have been made to the SharePoint technologies in the 2003 version of the product. In addition to adding and changing features that the software provides, changes were made to the "back end" or supporting infrastructure that the typical SharePoint user never sees. Therefore, for the best chance of a successful migration, it is highly recommended to review the items listed in this section and perform any of the listed procedures that apply before doing the actual migration. Configuring the SharePoint Team Services Server Prior to MigrationThere are configuration changes and updates that should be applied to the "source" or the SharePoint Team Services environment as well as options that need to be configured in the destination, or Windows SharePoint Services environment. This section discusses the changes and updates that should be made to the SharePoint Team Services environment before migrating. The changes/updates are as follows:
Install the Update for SharePoint Team Services v1.0Ensure that the server running SharePoint Team Services has the latest up-to-date patches. In addition, an update was released by Microsoft (ows1002.exe) that enables Team Services 1.0 to work better with the Microsoft SharePoint Migration tool (Smigrate). This update can be downloaded from Microsoft's Web site using the following URL: http://go.microsoft.com/fwlink/?LinkID=13275&clcid=0x409 This update must be installed from an account that is a member of the local administrator's group on the server. Configure the Team Services Site to Be Read-OnlyBecause the backup and restore process may take several hours to complete (depending on the size of the site), it is best to make the Team Services site read-only to ensure restoring the latest version of the site that users see. In general, even if the site is small, it is a good practice to set it to read-only to ensure integrity and consistency. The site can be set to read-only by enabling only browsing and viewing rights on the server through the Set List of Available Rights page. This setting applies to all sites and subsites on the server. The steps are as follows:
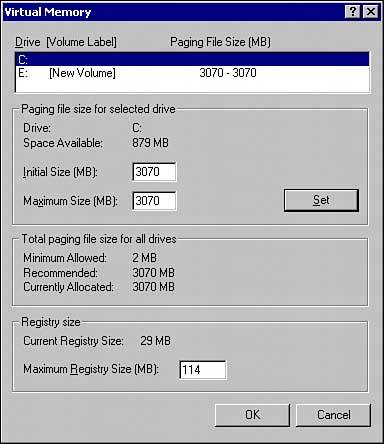
Increase the Paging File SizeIf a large website is being migrated and additional virtual memory is required, increase the page file size. If the SharePoint Migration tool is being run from a front-end web server, the page file size should also be increased. In these situations, the page file should be at least 1GB. The steps for changing this are as follows:
Figure 8.1 shows an example of configuring the page file size. Figure 8.1. Changing the virtual memory page file size.
Configuring the Destination Server SettingsThis section describes settings that should be configured in the destination Windows SharePoint Services environment, before migrating sites from a SharePoint Team Services environment. Some of these settings are Internet Information Services (IIS) settings, and some are changed using SharePoint Central Administration. In either case, the changes should be made from an administrator account on the local server. Increasing the Internet Information Services (IIS) Timeout SettingBecause some of the processes involved in the migration may take some time to complete, the timeout setting in IIS should be increased. To do this, perform the following steps:
Enabling the Migration of the Anonymous User Access SettingsIf the anonymous user access settings are to be migrated from the SharePoint Team Services environment, anonymous access must be enabled in IIS (on the target server). Perform these steps:
Disabling Full-Text Searching in SQL Server 2000 if Destination Is Using SQL 2000If SQL is being used for storing content, full-text search should be disabled to improve the performance of the migration. If SQL full-text searching is disabled, performance can improve by as much as 40%. After the migration is complete, full-text search can be enabled. To disable full-text searching, follow these steps:
Doubling a Quota LimitIf quotas have been implemented on the destination virtual server, and the site being migrated is close to the quota limit, the quota limit should be increased to prevent the possibility that the migration may fail due to exceeding the quota. To change the quota limit follow these steps:
Changing the Virtual Server Uploads and Alerts SettingsTo minimize problems associated with migrating large files or groups of files, the Virtual Server Upload Setting should be increased. The number associated with this setting applies not only to a single file being uploaded but is also the maximum allowed for the total size of a group of files or content being uploaded. Another virtual server setting that should be changed during the migration is the number of alerts. If alerts are being used by site members, a large number will probably be generated as a result of the migration. Therefore, the number of alerts a user can create should be set at a high level. After the migration is complete, these two settings should be readjusted to reflect levels that are reasonable based on site usage patterns. To change these settings, follow these steps:
Figure 8.2 shows an example of the section of the Virtual Server Settings page where the maximum upload size and the maximum number of alerts can be changed. Figure 8.2. Changing virtual server upload and alerts limits.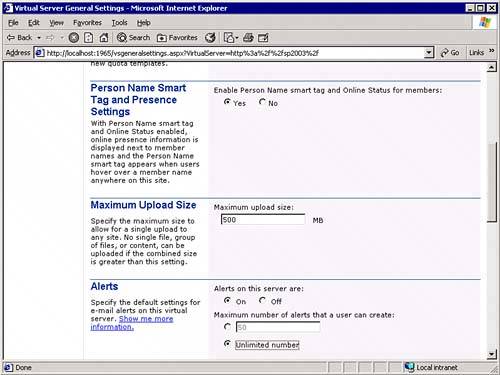 Creating a Top-Level Empty Site on the Destination ServerThe last step to perform before migrating a SharePoint Team Services site to Windows SharePoint Services is to create a blank site that will contain the migrated Team Services site. The site can be a new virtual server, a new top-level website on an existing virtual server, or a subsite under an existing top-level site. Regardless of the level, when creating this site, do not apply a site template. CAUTION If a template is applied to the site, the migration will fail and a new site will need to be created. SharePoint Central Administration, Site Administration, or the Create page can be used to create the destination site. When the process gets to the point where you're asked to select a template, close the browser window. This creates the site but does not apply a template. The following sections describe the SharePoint Central Administration and Site Administration methods for creating an empty site that can be used as a destination site for migrated content. If Windows SharePoint Services Central Administration is used for creating the destination website, follow these steps:
Figure 8.3 shows an example of the page for entering the information for a top-level website. Figure 8.3. Creating a top-level website for migrating content.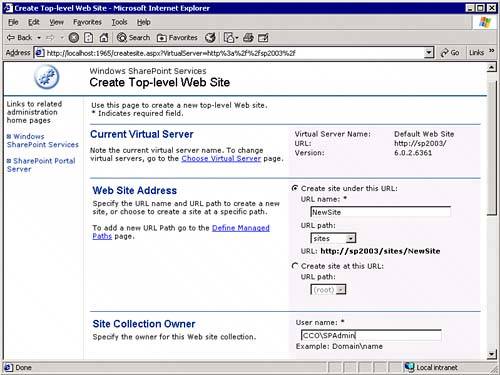 If Site Administration in Windows SharePoint Services is used for creating the destination website, follow these steps:
CAUTION If a template is selected and applied to the site, the migration will not work. Disabling Blocked File TypesWhen performing a SharePoint migration, it is typically desirable to have all files migrated. If there are files that should not be migrated, they should be cleaned up on the original sites before the migration process starts. Therefore, to ensure that all file types are migrated, file types may need to be removed from the Blocked File Types list. This is done as follows:
TIP To make it easy to add the file types back into the exclusion list after the migration is complete, cut and paste the file types into a document as you remove them. After the migration, the document can be used to cut and paste the file extensions back into the Blocked File Types area. After the migration is complete, add any necessary file types back into the exclusion list. NOTE The Blocked File Types list applies to all sites on the server or in the server farm. Additional Items to Check/VerifyThere are a few additional things to consider when migrating from SharePoint Team Services to Windows SharePoint Services. These are described in the following sections. Turning Off Internet Explorer Enhanced Security ModeInternet Explorer may have been installed with the Enhanced Security mode. During the migration process, this should be disabled to prevent problems accessing SharePoint Team Services sites. After the migration is complete, it can be enabled again. Verifying User Account and Email AddressesIf the server being used as the destination server for the migrated sites is set up in Active Directory account creation mode, and if the users from the original site are to be migrated, each user in the site that is being migrated must have a valid and unique email address. If a user does not have an email address, no account is created for the user. In Active Directory account creation mode, only one account is created for each email address. Therefore, if two users share an email address, only one account is created with the rights from both users merged together. After the migration is complete, the passwords for the newly added users must be reset, and email notifications manually created and sent to the users to notify them about their logon information. If you do not want to automatically create user accounts in Active Directory account creation mode, use the "x" parameter when running the SharePoint Migration tool. If Active Directory account creation mode is not being used, verify that all users have valid accounts in the domain where the content is to be restored. If the user does not have a valid account in the domain, the user account is not restored. Verifying Space Requirements for Temporary Files Created During Backup and MigrationThe SharePoint Migration tool creates temporary files when performing the backup/migration process. On the server where the backup file is created, there needs to be enough space to hold all the content from the original site plus about 25% more. These temporary files are created in the same folder as the backup file. When the restore process takes place, the files are saved periodically to a Temporary Internet Files folder on the same server as the SharePoint migration (Smigrate) tool. Therefore, the Smigrate server needs to have enough free space to store about 20% of the content from the original Web server. Using In-Place Migration to Migrate from Team Services to Windows SharePoint ServicesWith SharePoint, it is not possible to do an in-place upgrade where just the SharePoint software is installed on the same server where Team Services is installed. SharePoint Team Services works in Internet Information Services (IIS) 5.0 isolation mode, whereas Windows SharePoint Services requires IIS 6.0 worker process isolation mode. Therefore, Windows SharePoint Services cannot function until IIS is upgraded to 6.0. On the flip side, Team Services applications cannot run with IIS 6.0 worker process isolation mode. In addition, the SharePoint 2003 products require Windows Server 2003, so the operating system needs to be upgraded. However, an in-place migration can be performed where the Team Services sites are "migrated" off the server using the Smigrate tool and then restored back to the server after it has been upgraded with Windows Server 2003 and Windows SharePoint Services. NOTE The applicable procedures from the sections "Configuring the SharePoint Team Services Server Prior to Migration" and "Configuring the Destination Server Settings" both earlier in this chapter should also be followed. The basic steps for performing an in-place migration are as follows:
Using a Parallel Migration Strategy to Migrate from Team Services to Windows SharePoint ServicesThe parallel migration strategy involves installing a new Windows SharePoint Services server and then copying the information to that server. To do this, use the following steps:
TIP If the SharePoint Migration tool cannot identify the owner of a piece of content, the account that restored the backup file is assigned ownership. For this reason, a best practice is to create a separate user account for restoring the backup file. It does not matter what the name is as long as it is meaningful to the people involved in the migration. However, the email address should be the address of a person who is knowledgeable about the migration because notices about content owner issues are forwarded to this email address. Using the SharePoint Migration Tool to Migrate SitesThe SharePoint Migration (Smigrate) tool is the utility used to migrate SharePoint Team Services sites to Windows SharePoint Services. Smigrate, when used in backup mode, backs up SharePoint Team Services sites to a FrontPage Web Package (.fwp) archive file. It can also be used to back up FrontPage Server Extensions 2002 sites and Windows SharePoint Services sites. When Smigrate is used with the r (restore) parameter, it imports the .fwp file to a server running Windows SharePoint Services. Smigrate is a command-line utility installed with Windows SharePoint Services by default into the following folder: %systemdrive%\Program Files\Common Files\Microsoft Shared\Web Server Extensions\60\Bin The utility can also be downloaded from Microsoft's website. It can be run from any computer running Windows 2000 SP3 or later. It does not have to be run from a computer that has Windows SharePoint Services loaded. TIP When migrating a SharePoint Team Services site that contains many subsites, back up each subsite, or logical groupings of subsites, into separate .fwp files. This provides more flexibility when importing the sites to Windows SharePoint Services for specifying the site hierarchy and for specifying other elements such as security and quotas. Smigrate either has to be run from an account that has administrator privileges on both the SharePoint Team Services site and the Windows SharePoint Services site, or credentials must be supplied on the command line for an account that has administrator privileges. Table 8.1 shows the parameters that can be entered when running the utility.
An example of the Smigrate command for backing up a site and all subsites, and where the existing backup file is overwritten, is as follows: Smigrate.exe w http://STSServer/TeamSite f c:\BackupFolder\SiteBackup.fwp y A sample of using Smigrate to restore the site is as follows: Smigrate.exe r w http://WSSServer/UpgSite -f c:\BackupFolder\SiteBackup.fwp Because the functionality has changed between SharePoint Team Services and Windows SharePoint Services, some elements of the SharePoint Team Services sites may not migrate successfully. The smigrate.log file, stored in the %temp% directory for the user account, contains a list of items that were and were not migrated successfully. |
EAN: 2147483647
Pages: 288