Lab 15b: Configuring Voice over IP-Part I
| < Free Open Study > |
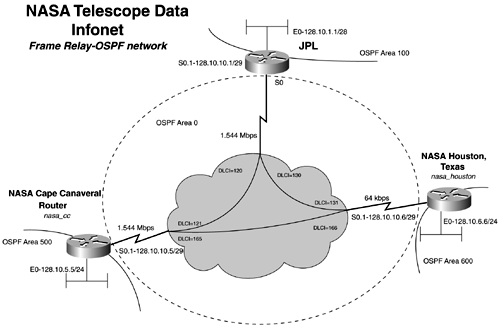
Lab 14: Configuring Frame Relay Networks, Traffic Shaping, OSPF, & DLSw/LLC2 ”Part IILab WalkthroughAttach the three routers in a back-to-back manner to the frame switch. Use V.35 cables or CSU/DSUs with crossover cables to connect the routers to the frame switch. Create the three LANs by the use of switches or hubs/MAUs. This lab requires you to configure IP and OSPF. The order in which you will configure the network will be first the LANs for IP, second the WAN for IP, and finally OSPF. When the physical connections are complete, assign IP addresses to all LAN interfaces, as depicted in Figure 5-9. Be sure that you can ping the router's local LAN interface before moving on. Figure 5-9. IP Addressing Map Beginning with the JPL router, follow the four-step process for configuring Frame Relay. First, set the encapsulation type on the s0 interface to frame-relay. The second step is to set the LMI type. In this case, it is ANSI. Therefore, you need to statically set it to ANSI with the frame-relay lmi-type ansi command. The third step involves statically mapping IP addresses to DLCIs. The JPL router requires two frame-relay map statements, one pointing out DLCI 120 for IP address 128.10.10.5, and one pointing out DLCI 130 for IP address 128.10.10.6. Example 5-32 shows the configuration for the JPL router up to this point. Example 5-32 JPL Frame Relay Configurationinterface Serial0 no ip address encapsulation frame-relay no ip mroute-cache frame-relay lmi-type ansi ! interface Serial0.1 multipoint ip address 128.10.10.1 255.255.255.248 frame-relay map ip 128.10.10.5 120 broadcast frame-relay map ip 128.10.10.6 130 broadcast Before you address any routing issues, as Step 4 of the Frame Relay configuration process indicates, you should configure the other two legs of the Frame Relay network. The nasa_cc and nasa_Houston configurations are similar. Each site will have one frame-relay map statement pointing at the jpl router and one pointing at the other nasa site. Example 5-33 lists the nasa_cc and nasa_houston Frame Relay configurations, respectively. Example 5-33 Frame Relay Configurations for the NASA Routershostname nasa_cc interface Serial0 no ip address no ip directed-broadcast encapsulation frame-relay no ip mroute-cache frame-relay lmi-type cisco ! interface Serial0.1 multipoint ip address 128.10.10.5 255.255.255.248 no ip directed-broadcast frame-relay map ip 128.10.10.1 121 broadcast frame-relay map ip 128.10.10.6 165 broadcast ________________________________________________________________ hostname nasa_houston ! interface Serial0 no ip address encapsulation frame-relay ! interface Serial0.1 multipoint ip address 128.10.10.6 255.255.255.248 frame-relay map ip 128.10.10.1 131 broadcast frame-relay map ip 128.10.10.5 166 broadcast ! To test the configuration of the frame-relay map statements, ping the remote serial interface of the NASA routers from the jpl router. When you have connectivity to all your local devices, LAN and WAN, you can begin to configure a routing protocol. To learn more about configuring OSPF over Frame Relay, skip forward to Chapter 12, "Link-State Protocols: Open Shortest Path First (OSPF)." This lab covers only minor configuration details. Starting with the jpl router, configure OSPF by adding two network statements, one for LAN in Area 100 and one for the WAN in Area 0. Be careful to use a precise wildcard mask of 0.0.0.7 for the LAN and 0.0.0.15 for the WAN. To ensure that adjacencies are built, add a neighbor statement for each NASA site. Example 5-34 shows the OSPF configuration for the routers. Example 5-34 OSPF Configurationshostname jpl ! router ospf 2001 network 128.10.1.0 0.0.0.15 area 100 network 128.10.10.0 0.0.0.7 area 0 neighbor 128.10.10.5 priority 1 neighbor 128.10.10.6 priority 1 ! ________________________________________________________________ hostname nasa_cc ! router ospf 2001 network 128.10.5.0 0.0.0.255 area 500 network 128.10.10.0 0.0.0.15 area 0 neighbor 128.10.10.6 priority 1 neighbor 128.10.10.1 priority 1 ! ________________________________________________________________ hostname nasa_houston ! router ospf 2001 network 128.10.6.0 0.0.0.255 area 600 network 128.10.10.0 0.0.0.7 area 0 neighbor 128.10.10.5 priority 1 neighbor 128.10.10.1 priority 1 At this point, you should have full IP connectivity. Test this by ping ing and viewing the OSPF neighbors with the show ip ospf neighbors command. Ensure that every router has two neighbors. If no adjacencies are formed , be sure to check the network statements and the IP addresses on the serial interface, along with the frame-relay map statements for configuration errors. The final portion of the lab requires applying FRTS to the serial interface of the JPL router. To accomplish this, you must first enable FRTS and then configure and apply a Frame Relay map class to frame-relay map statements. To enable FRTS, use the command frame-relay traffic-shaping under the Serial 0 interface. Next, you need to configure a map class for each PVC, depending on the values given. The key values that you need to set in each map class are as follows : adaptive shaping becn frame-relay cir frame-relay bc frame-relay be frame-relay mincir You need a map class called 64k, and you need to primarily define the pvc to nasa_houston. The map class has adaptive shaping BECN response mode enabled. The cir is 1544000. bc is 1/8 of the remote port speed, or 8000. The be field should be set not to exceed the other port speed of 64000. The be bit in this model is set to 64000; in the field, this value matches the QoS parameters that the WAN provider supplies . The mincir on this port is set to the actual CIR on the link. In this network, that is set at 32 kbps. Example 5-35 demonstrates the configuration needed for the 64k map class. Example 5-35 64k Frame Relay Map Class! map-class frame-relay 64k frame-relay cir 1544000 frame-relay bc 8000 frame-relay be 64000 frame-relay mincir 32000 frame-relay adaptive-shaping becn ! When the map class is defined, apply it to the PVC with the frame-relay class class_name command, specifically frame-relay class 64k. To verify that the map class is applied, perform a show frame-relay pvc command or the show frame-relay pvc 130 command for more details, as in Example 5-36. Ensure that the values highlighted are equal to the ones that you entered. Example 5-36 show frame-relay pvc 130 Command Outputjpl# show frame-relay pvc 130 PVC Statistics for interface Serial0 (Frame Relay DTE) DLCI = 130, DLCI USAGE = LOCAL, PVC STATUS = ACTIVE, INTERFACE = Serial0.1 input pkts 396 output pkts 391 in bytes 30732 out bytes 30800 dropped pkts 0 in FECN pkts 0 in BECN pkts 0 out FECN pkts 0 out BECN pkts 0 in DE pkts 0 out DE pkts 0 out bcast pkts 0 out bcast bytes 0 Shaping adapts to BECN pvc create time 03:55:53, last time pvc status changed 02:07:28 cir 1544000 bc 8000 be 64000 limit 9000 interval 5 mincir 32000 byte increment 1000 BECN response yes pkts 225 bytes 17320 pkts delayed 0 bytes delayed 0 shaping inactive Serial0.1 dlci 130 is first come first serve default queueing Output queue 0/40, 0 drop, 0 dequeued jpl# The optional portion of this lab calls for creating a DLSw with LLC2 encapsulation between the two NASA routers, using Frame Relay encapsulation. For the local peer, you can simply use the LAN address. You also need to create a remote peer, with Frame Relay encapsulation type. You will define a bridge group on Ethernet 0 and tie to this to the DLSw bridge group . Using the Frame Relay encapsulation type creates an LLC2 peer. To transport this type of traffic directly encapsulated in Frame Relay, you need to use the frame-relay map llc dlci_number broadcast command. Example 5-37 lists the configuration for the nasa_cc and nasa_houston routers, respectively, highlighting the DLSw portions of the config. Example 5-37 DLSw over Frame Relay, NASA Configurationshostname nasa_cc ! ip subnet-zero ! dlsw local-peer peer-id 128.10.5.5 dlsw remote-peer 0 frame-relay interface Serial0.1 165 dlsw bridge-group 1 ! interface Ethernet0 ip address 128.10.5.5 255.255.255.0 no ip directed-broadcast bridge-group 1 ! interface Serial0 no ip address no ip directed-broadcast encapsulation frame-relay no ip mroute-cache frame-relay lmi-type cisco ! interface Serial0.1 multipoint ip address 128.10.10.5 255.255.255.248 no ip directed-broadcast frame-relay map llc2 165 broadcast frame-relay map ip 128.10.10.1 121 broadcast frame-relay map ip 128.10.10.6 165 broadcast ! router ospf 2001 network 128.10.5.0 0.0.0.255 area 500 network 128.10.10.0 0.0.0.15 area 0 neighbor 128.10.10.6 priority 1 neighbor 128.10.10.1 priority 1 ! ip classless ! bridge 1 protocol ieee ! ________________________________________________________________ hostname nasa_houston ! ! dlsw local-peer peer-id 128.10.6.6 dlsw remote-peer 0 frame-relay interface Serial0.1 166 dlsw bridge-group 1 ! interface Ethernet0 ip address 128.10.6.6 255.255.255.0 bridge-group 1 ! interface Serial0 no ip address encapsulation frame-relay ! interface Serial0.1 multipoint ip address 128.10.10.6 255.255.255.248 frame-relay map llc2 166 broadcast frame-relay map ip 128.10.10.1 131 broadcast frame-relay map ip 128.10.10.5 166 broadcast ! router ospf 2001 network 128.10.6.0 0.0.0.255 area 600 network 128.10.10.0 0.0.0.7 area 0 neighbor 128.10.10.5 priority 1 neighbor 128.10.10.1 priority 1 ! no ip classless ! bridge 1 protocol ieee Use the show dlsw peer command to verify the peer is in a "connect" state. For more information on DLSw and verifying and testing the DLSw portion, see Chapter 13, "Configuring Bridging and Data Link Switching Plus." For reference, Example 5-38 lists the configuration of the jpl router. Example 5-38 jpl Router Configurationhostname jpl ! interface Ethernet0 ip address 128.10.1.1 255.255.255.240 media-type 10BaseT ! interface Serial0 no ip address encapsulation frame-relay no ip mroute-cache frame-relay traffic-shaping frame-relay lmi-type ansi ! interface Serial0.1 multipoint ip address 128.10.10.1 255.255.255.248 frame-relay class 64k frame-relay map ip 128.10.10.5 120 broadcast frame-relay map ip 128.10.10.6 130 broadcast ! router ospf 2001 network 128.10.1.0 0.0.0.15 area 100 network 128.10.10.0 0.0.0.7 area 0 neighbor 128.10.10.5 priority 1 neighbor 128.10.10.6 priority 1 ! ip classless ! map-class frame-relay 64k frame-relay cir 1544000 frame-relay bc 8000 frame-relay be 64000 frame-relay mincir 32000 frame-relay adaptive-shaping becn ! |
| < Free Open Study > |
EAN: 2147483647
Pages: 283