Part VI: Controlling Networks and Network Access
| < Free Open Study > |
Data Link Switching Plus (DLSw+)Data Link Switching (DLSw), as we know it today, was pioneered in 1995 by the Advanced Peer-to-Peer Networking (APPN) Implementers' Workshop (AIW), sponsored by IBM. It was not the first RFC on DLSw. IBM wanted to create a way to transport LLC2 frames across TCP/IP networks and drafted RFC 1434 in 1993. The concept was sound, but it lacked (surprise) multivendor interoperability. The goal of the APPN AIW goal was to evolve the original DLSw RFC, RFC 1434, with new features. The original work later was turned into the first standard for DLSw, titled RFC 1795. RFC 1795 defines what commonly is called Data Link Switching Version 1. DLSw version II was developed in 1997 and is documented in RFC 2166, which provided enhancements that allowed DLSw networks to scale better and provide better availability than either RSRB or standard-only implementations . Cisco Systems refers to its implementation of DLSw as DLSw Plus (DLSw+). One of the most notable features about DLSw+ is the concept of border peers and peer groups. NOTE For the purpose of this text, consider DLSw to be synonymous with DLSW Version 1, Version 2, and Cisco's implementation's DLSW+. When we discuss material where the version or implementation is relevant, we will note that. DLSw+ FeaturesIn 1991, RSRB was the only option that many network engineers had to bridge their Token Ring or LLC2 networks over an IP-based network. In a short time, thousands of RSRB networks were springing up. Soon, however, RSRB networks were sidelined by the newer way to transport LLC2 over an IP network, DLSw. By 1995, all future work on RSRB glided to a halt because the industry clearly was embracing DLSw. Since then, it has surfaced to become the most dynamic and one of the most reliable ways to transport legacy protocols across the modern internetwork. DLSw provides a method of running SNA and NetBIOS over IP. DLSw also provides better scalability, functionality, manageability, and control than RSRB. DLSw addresses several RSRB limitations by including key features such as local acknowledgment for devices on Ethernet and SDLC for physical unit (PU) 2.1 devices. DLSw also provides higher availability with load balancing and backup features. Some of the advantages DLSw+ offers over RSRB are as follows :
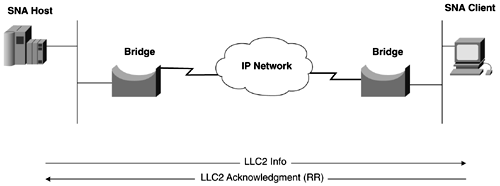
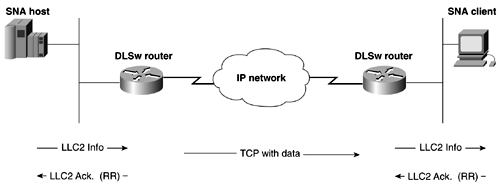
NOTE DLSw, the Only Way to Integrate Legacy Protocols In the field, I have found DLSw+ to be one of the most reliable and fairly straightforward protocols to configure. SNA is a time-sensitive protocol, and the ease in which DLSw transports it across the internetwork is exceptional. When I learned to configure DLSw+, it quickly became my only choice for transporting nonroutable protocols, such as SNA, NetBEUI, and NetBIOS. Hopefully, when you finish this section, you, too, will feel this way. DLSw+ Technical OverviewIEEE 802.2 LLC Type 2 was designed under the assumption that network transit delay would be small and predictable. After all, Token Ring and Ethernet are LAN protocols. When remote bridging is used over vast geographical distances, the network delay can vary drastically with the load on the link. When the delay becomes too large, LLC2 timeouts occur and retransmissions start happening. Because the frame is only delayed, LLC2 can become confused when it starts to see duplicate frames, and it might start tearing down LLC2 sessions. Figure 13-28 illustrates how LLC2 has end-to-end acknowledgment in a traditional bridged environment. Figure 13-28. LLC2 End-to-End Acknowledgment DLSw+ terminates the LLC Type 2 connection on the DLSw+ device/router. LLC Type 2 connections no longer cross the WAN and are exposed to large delays. The only delays that occur at the LLC layer are now on the LAN. This inherently reduces traffic on the WAN as well. SDLC links, polling, and poll response occur locally and no longer transverse the WAN. Broadcasting of search frames is controlled by the DLSw+ router and are no longer flooded after the router locates the target station. Figure 13-29 illustrates how acknowledgments are handled in a DLSw+ environment. Figure 13-29. LLC2 with Local Acknowledgment As mentioned, DLSW+ provides a method of transport for SNA, NetBIOS, and NetBEUI over TCP/IP. DLSW+ refers to routers as peers. When the TCP or other transport protocol makes a connection with another router, it is called a peer connection. When this type of peer connection is formed , a DLSw circuit is established between the two end stations. Data between the two end stations is passed on the circuit. A single peer can support multiple circuits. DLSW+ supports the following circuit types:
By default, every 30 seconds, DLSw+ peers send keepalive messages to all peers. The keepalive mechanism is used to ensure that the peer is alive . If three keepalives are missed, the peer will be torn down. The data-link switch ”or Cisco router, in our case ”uses a Switch-to-Switch Protocol (SSP) to establish DLSw peers. A pair of routers uses a peer connection to multiplex data links over a reliable transport using SSP protocol. Before DLSw can occur between two routers, the routers must establish a peer relationship with each other. The transport protocol for DLSw peer connections is TCP. The Cisco implementation, DLSW+, allows for four types of transport methods :
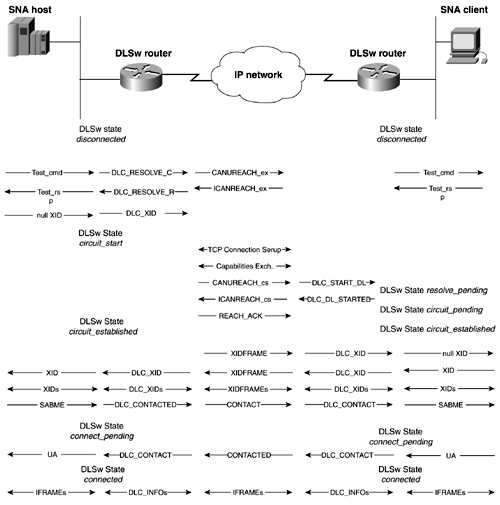
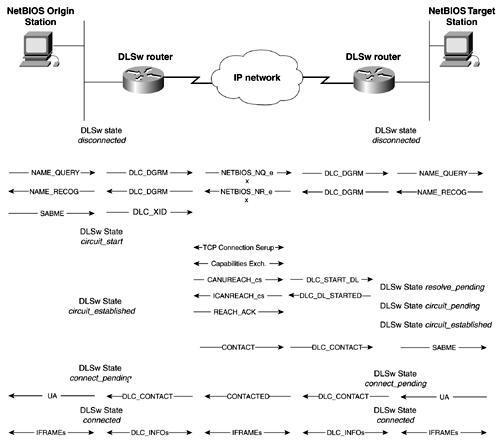
DLSw Circuit EstablishmentCircuit establishment occurs between two end systems. SNA circuit establishment occurs when a SNA TEST or XID explorer frame with a specific MAC address is generated from an end station. The DLSw router sends a CANUREACH frame to each active peer. The correct peer responds with an ICANREACH frame. After a series of XIDs and other information is exchanged, a circuit is established. Each circuit has a unique ID that allows a TCP peer connection to support multiple circuits. The ID is composed of the source and destination MAC address, source and destination LSAPs, and a data-link control port ID. Only when the circuit becomes connected can data can be exchanged between the hosts . Each DLSw router caches the MAC addresses and NetBIOS names to prevent future explorer frames from crossing the network. Figures 13-30 and 13-31 are adopted from RFC 1795 and illustrate the complete process of DLSw circuits for SNA and NetBIOS. Figure 13-30. SNA Circuit Establishment Figure 13-31. NetBIOS Circuit Establishment NetBIOS stations establish circuits in a similar manner. Instead of issuing a CANUREACH frame, NetBIOS issues a NetBIOS NAME-QUERY frame that specifies a NetBIOS name. Figure 13-31 illustrates the complete circuit establishment process for NetBIOS. DLSw Capabilities ExchangeA key process that occurs during DLSw circuit establishment is the capabilities exchange. The capabilities exchange the process that differentiates DLSw from other bridging technologies. The exchange is a special DLSw SSP control message that describes the capabilities of the sending DLSw router. The initial capabilities exchange is always the first SSP message sent when a new connection between two DLSw devices occur. It is used to identify the DLSw version and other options that the DLSw device is capable of. SSP uses the concept of control vectors to exchange information between DLSw devices. Required control vectors must occur first and in the following order:
The remainder of the control vectors can occur in any order:
Cisco's implementation of the TCP connections control vector states that only one TCP connection will be used to transport data. When a DLSw+ circuit first is established, two TCP connections are active. DLSw+ states that the TCP connection with the highest IP address will be torn down, leaving only one TCP connection to transport data. After the capabilities exchange occurs, the DLSw router can proceed to complete circuit setup. Only after a circuit is connected can data be exchanged on it. DLSw Flow ControlDLSw uses a form of adaptive pacing for flow control. DLSw specifies two independent, unidirectional circuit flow-control mechanisms on a per-circuit basis. DLSw uses a dynamic window based on buffer size , TCP transmit queue, and end station flow-control mechanisms. DLSw RIF Termination and RIF PassthroughDLSw supports RIF termination when used with source-route bridges. All remote devices/bridges appear to be attached to the virtual ring. By default, the RIF is terminated by the DLSw router. DLSw peers also can be configured to have RIF passthrough. When configuring RIF passthrough, be sure that the virtual rings on both peers match and that both peers have RIF passthrough enabled. Canonical and Noncanonical Address FormatsRecall from Chapter 2 that Ethernet uses canonical bit format and Token Ring uses noncanonical format. When DLSw receives a frame from Ethernet, it converts it to noncanonical format. DLSw works strictly in noncanonical format as it passes data from peer to peer. When the frame arrives at the interface it is destined for, DLSW checks to see whether the interface is Ethernet or Token Ring. If the interface is Ethernet, the frame is converted back to canonical format and is sent out the interface. If the interface is Token Ring, the frame is passed unchanged to the Token Ring interface. Care should be taken whenever using SNA attached Ethernet devices so that they operate in canonical format. Most SNA devices, such as IBM 3174s, do operate in canonical format on Ethernet. Configuring DLSw+For the purpose of this text, we will discuss configuring DLSw only with Token Ring and Ethernet networks. For comprehensive information on configuring DLSw for FDDI, SDLC, and QLLC, see Cisco IOS Bridging and IBM Network Solutions , by Cisco Press. Configuring DLSw involves a four-step task. Essentially , you need to create a bridge for the LAN interface and define local and remote DLSw peers. Naturally, there will be a few steps in between, but basically, that is all there is to configure for DLSw. This might again explain why it has become so popular so quickly. The four-step task lists the steps necessary to configure DLSw:
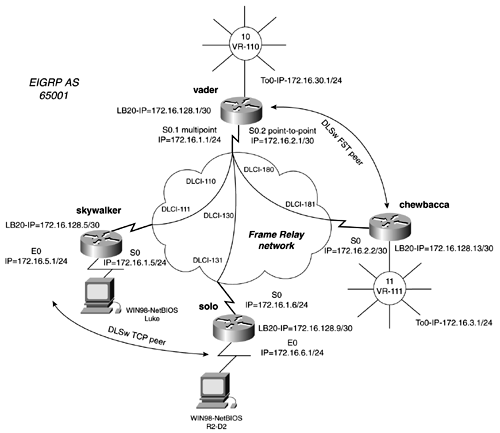
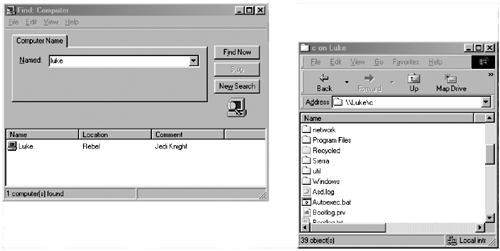
Practical Example: DLSw TCP and FST PeersFigure 13-32 models a Frame Relay network connecting four routers. In this model, you will want to create two types of DLSw connections. From the router skywalker, you want to create a TCP peer to the router solo. From the vader router, you want to create an FST peer to the router chewbacca. Figure 13-32. DLSw TCP and FST Peers Begin by focusing the TCP peer between skywalker and solo. Following the four-step configuration process, begin by creating loopback interfaces on skywalker and solo. When the loopback interfaces are configured and IP addresses are assigned to them, make sure that they are advertised by the routing protocol. The loopback address will serve as the local and remote peers, so it is essential that IP connectivity exits between them. In this model, you are using EIGRP as the routing protocol, so EIGRP must advertise all loopback addresses. Before moving on to Step 2, be sure that you can ping all the relevant IP addresses in the model. You do not want to waste time troubleshooting peers if IP connectivity does not exist. In Step 2, you configure the DLSw local peer for each router. Remember, the IP address that you will use will be the loopback addresses. To configure the local peer, use the global configuration command dlsw local-peer peer-id ip_address. For example, to configure the local peer for the skywalker router, enter dlsw local-peer peer-id 172.16.128.5. After the local peers are configured, define a transparent bridge group. For Ethernet networks, you must configure transparent bridging on the Ethernet segment where the end stations reside. The transparent bridge group then is linked to DLSw with the global command dlsw bridge-group bridge-group. Example 13-22 lists the relevant portions of the configuration of the solo router, up to this point. Example 13-22 DLSw TCP Configuration of the solo Routerhostname solo ! <<<text omitted>>> ! dlsw local-peer peer-id 172.16.128.9 To configure the remote peer for TCP, use the global command dlsw remote-peer 0 tcp ip_address. Unless you are using a DLSw port list, use 0, which implies that no list is in use. The previous example demonstrated the use of this command on the solo router. Example 13-23 lists the configuration of the skywalker router. Example 13-23 DLSw TCP Configuration of the skywalker Routerhostname skywalker ! <<<text omitted>>> ! dlsw local-peer peer-id 172.16.128.5 dlsw remote-peer 0 tcp 172.16.128.9 dlsw bridge-group 1 ! interface Loopback20 ip address 172.16.128.5 255.255.255.252 ! interface Ethernet0 ip address 172.16.5.1 255.255.255.0 bridge-group 1 ! interface Serial0 ip address 172.16.1.5 255.255.255.0 encapsulation frame-relay no arp frame-relay frame-relay map ip 172.16.1.6 111 broadcast frame-relay map ip 172.16.1.1 111 broadcast no frame-relay inverse-arp frame-relay lmi-type cisco ! <<<text omitted>>> ! router eigrp 65001 network 172.16.0.0 no auto-summary ! <<<text omitted>>> ! bridge 1 protocol ieee To verify the configuration, you can view the status of the peers with the show dlsw peers command. Example 13-24 displays the output of this command on the solo router. Only when the peer is in a connect state can it create a circuit transport data. It is important to note that a "connected peer" does not mean that DLSw is fully functional. DLSw circuits, denoted by the ckts column, are the only indication that an end-to-end session exists within a TCP peer. We will discuss this command more in the next section. Example 13-24 show dlsw peers Command Output solo# show dlsw peers Peers: state pkts_rx pkts_tx type drops ckts TCP uptime TCP 172.16.128.5 CONNECT 255 444 conf 0 1 0 00:39:33 Total number of connected peers: 1 Total number of connections: 1 solo# Example 13-25 demonstrates another way to view more comprehensive information about a DLSw circuit. The command used in this example is show dlsw circuits. Example 13-25 show dlsw circuits Command Output solo# show dlsw circuits Index local addr(lsap) remote addr(dsap) state uptime 1778384900 0000.613c.dc82(F0) 0005.332e.2a25(F0) CONNECTED 00:12:27 Total number of circuits connected: 1 NOTE In this model, we use Windows 98 workstations with NetBEUI and Windows networking enabled to create DLSw circuits. Using Windows networking provides a great application for testing DLSw. To actually create a circuit, you must browse the network neighborhood and log into that workstation and access a network resource, such as viewing a drive. It is important to test your network with as many real applications as possible. This is the only way to actually tell whether your configurations are successful. For example, in this model, if you did not have workstations, you would never see a circuit be created. So, you might be thinking, "This is okay ”I can status the peers and DLSw capabilities, and get a good idea that my configuration works." But let's just say you forgot to enable bridging on the Ethernet interface. The peer will still become active, and, really, from a DLSw point of view, everything is configured properly. However, because of this critical error, DLSw forwards any traffic to the Ethernet segment. Figure 13-33 displays the workstation R2-D2 finding and then viewing the files on luke. Figure 13-33. Using Windows 9x to Test DLSw To configure the FST peer in the model, you can begin adding the loopback interfaces and addresses to the vader and chewbacca routers. In Step 2, you add a local peer to each router, pointing at the loopback interface just created. The command for a local FST peer is identical to that of a TCP peer. For example, on the vader router, the syntax would be dlsw local-peer peer-id 172.16.128.1, and on the chewbacca router, it would be dlsw local-peer peer-id 172.16.128.13. The next step is to configure source-route bridging using a virtual ring for all the interfaces that have end stations on them. The virtual ring is the link that ties DLSw to the source-route bridge. There is no need to configure a command similar to the dlsw bridge-group command. Step 4 calls for configuring a DLSw remote FST peer. The syntax to accomplish this on the chewbacca router would be dlsw remote-peer 0 fst 172.16.128.1. Example 13-26 lists the configurations of the chewbacca and vader routers, respectively. Example 13-26 FST Peer Configurations of the chewbacca and vader Routershostname chewbacca ! <<<text omitted>>> ! source-bridge ring-group 111 Again, to view the status of a peer, you can use the show dlsw peer command, as shown in Example 13-27. Example 13-27 Status of the FST Peer on the chewbacca Router chewbacca# show dlsw peers Peers: state pkts_rx pkts_tx type drops ckts TCP uptime FST 172.16.128.1 CONNECT 1635 1371 conf 0 1 - 02:23:08 Expected: 230 Next Send: 194 Seq errors: 0 Total number of connected peers: 1 Total number of connections: 1 chewbacca# The "Big show" and "Big D" for DLSw+The show and debug commands for DLSw+ are comprehensive; there are many commands and subcommands for debugging and display DLSw+ info . Again, instead of listing every possible show and debug command relating to DLSw, we will focus on just a few, or the "Big show " and "Big D." For reference, the examples presented in the sections on each of these significant show and debug commands are generated from the previous model. The "Big D" for DLSw consists of debug dlsw peers, debug dlsw core , debug dlsw reachability, and their subcommands. As with all debug commands, the output can be rather plentiful, so make sure that logging is enabled with the global configuration command logging buffered 10000. The syntax for the "Big show " and the "Big D" is as follows: show dlsw peer [ interface interface_name ip-address ip_address_of_peer] show dlsw reachability [ mac-address mac_address ][ netbios-name name ] show dlsw circuits [ detail ] [ circuit_number ] [ mac-address address sap-value value circuit_id ] show dlsw capabilities [ interface type number ip_address ip_address local ] debug dlsw peers [ interface type number ip_address ip_address ] debug dlsw reachability [ error verbose ] [ netbios sna ] debug dlsw core [ flow-control messages ] [ state xis ] show dlsw peer CommandThis command displays current peer information for static peers and connected peers. The output in Example 13-28 lists the peer type, TCP, FST, or interface number for direct encapsulated peer. The type field describes whether the peer is configured, promiscuous, or a peer on demand (POD). Example 13-28 show dlsw peer Command Output skywalker# show dlsw peer Peers: state pkts_rx pkts_tx type drops ckts TCP uptime TCP 172.16.128.9 CONNECT 1863 847 conf 0 1 0 04:19:26 Total number of connected peers: 1 Total number of connections: 1 The possible states that a peer can be in are as follows:
The show dlsw peer also displays the number of packets transmitted and received, along with drops. The TCP column is the TCP queue for the peer. This number should remain low, less than 10 and at 0 a majority of the time. A high TCP number is an indication of congestion or throughput problems to the remote peer. The ckts column lists the number of active circuits on the peer. show dlsw reachability CommandThis command is useful when verifying what end stations DLSw has in its current cache. The reachability cache is a table that the DLSw checks when it receives a request to initiate a session. It checks the cache in an attempt to locate the resource requested . If the destination address is not in the cache, DLSw queries its peers. Example 13-29 lists the output of this command. Example 13-29 show dlsw reachability Command Output on the solo Router solo# show dlsw reachability DLSw Local MAC address reachability cache list Mac Addr status Loc. port rif 0000.613c.dc82 FOUND LOCAL TBridge-001 --no rif-- 0006.3acf.7aa6 FOUND LOCAL TBridge-001 --no rif-- DLSw Remote MAC address reachability cache list Mac Addr status Loc. peer 0005.332e.2a25 FOUND REMOTE 172.16.128.5(2065) max-lf(1500) DLSw Local NetBIOS Name reachability cache list NetBIOS Name status Loc. port rif R2-D2 FOUND LOCAL TBridge-001 --no rif-- DLSw Remote NetBIOS Name reachability cache list NetBIOS Name status Loc. peer LUKE FOUND REMOTE 172.16.128.5(2065) max-lf(1500) solo# The Status field describes the local peer's relationship with that entry. The Location field describes whether the end station is considered local or remote to the router. The possible values for the status field are listed here:
Other information includes the displaced peer/port or the peer the station is accessible from. The RIF and largest frame also are listed. The value ” no rif ” in the RIF fields means that the station does not support a RIF, such as an Ethernet station. It is important to note that this information is cached, so entries will be aged and flushed. If a station currently is sending or trying to send data, it should be listed in the output of the command. show dlsw circuits CommandUse this command to display end-to-end sessions of peers using TCP encapsulation or Frame Relay direct encapsulation with local acknowledgment. This command displays the local MAC address and remote address along with SAP that they are using. Example 13-30 lists the circuit between the workstations luke and R2-D2. The SAP value is (F0), for NetBIOS. The second half of the example shows the detailed listing of circuit. Example 13-30 show dlsw circuits Command Output on solo Routersolo# show dlsw circuits Index local addr(lsap) remote addr(dsap) state uptime 2919235595 0000.613c.dc82(F0) 0005.332e.2a25(F0) CONNECTED 00:01:17 Total number of circuits connected: 1 solo# show dlsw circuits detail Index local addr(lsap) remote addr(dsap) state uptime 2919235595 0000.613c.dc82(F0) 0005.332e.2a25(F0) CONNECTED 00:01:28 PCEP: 49AC68 UCEP: 142AFC Port:TB1 peer 172.16.128.5(2065) Flow-Control-Tx CW:20, Permitted:39; Rx CW:20, Granted:29; Op: Repeat Congestion: Low(02), Flow Op: Half: 0/0 Reset 0/0 RIF = --no rif-- Bytes: 2702/6467 Info-frames: 41/31 XID-frames: 0/0 UInfo-frames: 0/0 Total number of circuits connected: 1 solo# Circuits can be in one of two states, CONNECTED or CKT_ESTABLISHED. When the circuit is registering as CKT_ESTABLISHED, DLSw has set up the circuit properly, but the end stations have not, or cannot, initiated a session across the circuit. A restart of the end station might help clear this condition. show dlsw capabilities CommandThis command lists the control vectors that the local peer will exchange with other peers during the capabilities exchange. The output of this command is useful when SAP and NetBIOS filters are applied to DLSw peers. Example 13-31 lists the output of this command. Example 13-31 show dlsw capabilities Command Output on solo Router solo# show dlsw capabilities DLSw: Capabilities for peer 172.16.128.5(2065) vendor id (OUI) : '00C' (cisco) version number : 2 release number : 0 init pacing window : 20 unsupported saps : none num of tcp sessions : 1 loop prevent support : no icanreach mac-exclusive : no icanreach netbios-excl. : no reachable mac addresses : none reachable netbios names : none V2 multicast capable : yes DLSw multicast address : none cisco version number : 1 peer group number : 0 peer cluster support : no border peer capable : no peer cost : 3 biu-segment configured : no UDP Unicast support : yes Fast-switched HPR supp. : no NetBIOS Namecache length : 15 local-ack configured : yes priority configured : no cisco RSVP support : no configured ip address : 172.16.128.5 peer type : conf version string : Cisco Internetwork Operating System Software IOS (tm) 2500 Software (C2500-JS-L), Version 12.1(2)T, RELEASE SOFTWARE (fc1) Copyright (c) 1986-2000 by cisco Systems, Inc. Compiled Tue 16-May-00 15:28 by ccai debug dlsw peers CommandFigures 13-30 and 13-31 from the previous section can be useful when used in conjunction with the debug s listed. Use the figures as a guide to help you locate where in the data flows you might be having a problem. This command provides comprehensive information about the peer status and current actions. Use this debug when a peer will not connect or stay active. Example 13-32 lists the output from the debug DLSw peers during a NetBIOS session establishment. Example 13-32 debug dlsw peer Command Output During NetBIOS Session Establishmentsolo# debug dlsw peers DLSw peer debugging is on solo# 01:55:59: %SYS-5-CONFIG_I: Configured from console by console 01:55:59: %LINEPROTO-5-UPDOWN: Line protocol on Interface DLSw Port0, changed state to up 01:56:00: DLSw: passive open 172.16.128.5(11000) -> 2065 01:56:00: DLSw: START-TPFSM (peer 172.16.128.5(2065)): event:TCP-RD PIPE OPENED state:DISCONN 01:56:00: DLSw: dtp_action_c() opening write pipe for peer 172.16.128.5(2065) 01:56:00: DLSw: END-TPFSM (peer 172.16.128.5(2065)): state:DISCONN->WWR_RDOP 01:56:00: DLSw: Async Open Callback 172.16.128.5(2065) -> 11010 01:56:00: DLSw: START-TPFSM (peer 172.16.128.5(2065)): event:TCP-WR PIPE OPENED 01:56:00: DLSw: dtp_action_i() write pipe opened for peer 172.16.128.5(2065) 01:56:00: DLSw: CapExId Msg sent to peer 172.16.128.5(2065) 01:56:00: DLSw: END-TPFSM (peer 172.16.128.5(2065)): state:WWR_RDOP->WAIT_CAP 01:56:00: DLSw: START-TPFSM (peer 172.16.128.5(2065)): event:SSP-CAP MSG RCVD st ate:WAIT_CAP 01:56:00: DLSw: dtp_action_j() cap msg rcvd from peer 172.16.128.5(2065) 01:56:00: DLSw: Recv CapExId Msg from peer 172.16.128.5(2065) 01:56:00: DLSw: received fhpr capex from peer 172.16.128.5(2065): support: false , fst-prio: false 01:56:00: DLSw: Pos CapExResp sent to peer 172.16.128.5(2065) 01:56:00: DLSw: END-TPFSM (peer 172.16.128.5(2065)): state:WAIT_CAP->WAIT_CAP 01:56:00: DLSw: START-TPFSM (peer 172.16.128.5(2065)): event:SSP-CAP MSG RCVD st ate:WAIT_CAP 01:56:00: DLSw: dtp_action_j() cap msg rcvd from peer 172.16.128.5(2065) 01:56:00: DLSw: Recv CapExPosRsp Msg from peer 172.16.128.5(2065) 01:56:00: DLSw: END-TPFSM (peer 172.16.128.5(2065)): state:WAIT_CAP->WAIT_CAP 01:56:00: DLSw: Processing delayed event:SSP-CAP EXCHANGED - prev state:WAIT_CAP 01:56:00: DLSw: START-TPFSM (peer 172.16.128.5(2065)): event:SSP-CAP EXCHANGED s tate:WAIT_CAP 01:56:00: DLSw: dtp_action_k() cap xchged for peer 172.16.128.5(2065) 01:56:00: DLSw: closing read pipe tcp connection for peer 172.16.128.5(2065) 01:56:00: DLSw: END-TPFSM (peer 172.16.128.5(2065)): state:WAIT_CAP->PCONN_WT 01:56:00: DLSw: Processing delayed event:TCP-PEER CONNECTED - prev state:PCONN_W T 01:56:00: DLSw: START-TPFSM (peer 172.16.128.5(2065)): event:TCP-PEER CONNECTED state:PCONN_WT 01:56:00: DLSw: dtp_action_m() peer connected for peer 172.16.128.5(2065) 01:56:00: DLSw: END-TPFSM (peer 172.16.128.5(2065)): state:PCONN_WT->CONNECT 01:56:31: DLSw: START-TPFSM (peer 172.16.128.5(2065)): event:DLX-KEEPALIVE REQ s tate:CONNECT 01:56:31: DLSw: dtp_action_q() keepalive request from peer 172.16.128.5(2065) 01:56:31: DLSw: Keepalive Response sent to peer 172.16.128.5(2065)) 01:56:31: DLSw: END-TPFSM (peer 172.16.128.5(2065)): state:CONNECT->CONNECT debug dlsw reachability CommandThis command provides a clear picture of the end station's MAC address and the associated SSAPs and DSAPs. The debug also provide information on the message type that is being issued by that end station. Use this debug if end stations are not showing up in the DLSw reachability cache. Example 13-33 demonstrates the output from this command Example 13-33 debug dlsw reachability Command Output During a NetBIOS NAME_QUERY solo# debug dlsw reachability DLSw reachability debugging is on at event level for all protocol traffic 09:51:40: CSM: Received CLSI Msg : UDATA_STN.Ind dlen: 79 from DLSw Port0 09:51:40: CSM: smac 0000.613c.dc82, dmac c000.0000.0080, ssap F0, dsap F0 09:51:40: CSM: Received frame type NETBIOS NAME_QUERY from 0000.613c.dc82, DL0 09:51:40: CSM: Received CLSI Msg : CONECT_STN.Ind dlen: 47 from DLSw Port0 09:51:40: CSM: smac 0000.613c.dc82, dmac 0005.332e.2a25, ssap F0, dsap F0 09:51:43: CSM: Received CLSI Msg : UDATA_STN.Ind dlen: 86 from DLSw Port0 09:51:43: CSM: smac 0006.3acf.7aa6, dmac ffff.ffff.ffff, ssap AA, dsap AA debug dlsw core CommandThis command provides visibility to virtually everything that is occurring in the DLSw code. If no subcommands are added, all core debugging is enabled. Naturally, this command generates a lot of output and should be used to narrow down specific problems. Again, use this command in the field only with console logging buffered. DLSw+ Advanced ConfigurationDLSw provides many features that allow for easier peer configuration, explorer control, and backup and filtering capabilities. This section covers configuration of some of the more advanced features of DLSw+. These features include the following:
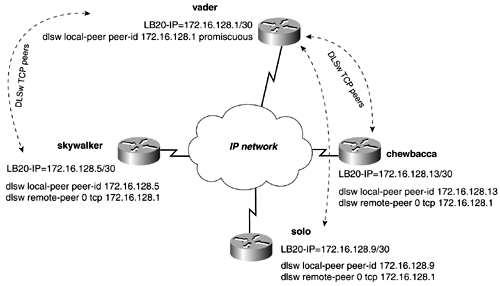
DLSw+ Promiscuous Peer ConfigurationDLSw+ allows you to configure different types of peers. The peer types that you have configured up to this point have been static peers. That is, a remote peer needs to be defined for every DLSw peer that you want to connect to. In large DLSw networks, where there are many peers, this type of configuration can be rather lengthy. When a local peer is configured in promiscuous mode, it automatically accepts peer connections from remote peers without having a specific remote peer configured. To configure a local peer as promiscuous, use the following syntax: Router(config)# dlsw local-peer peer-id ip_address promiscuous Figure 3-34 illustrates a DLSw+ network, with the vader router using its local peer as promiscuous. With the local peer as promiscuous, there is no need to configure any remote-peer statements for the skywalker, solo, and chewbacca routers. The remote routers, however, still need a remote-peer statement pointing at the promiscuous peer. Figure 13-34. Promiscuous Peers Promiscuous peers have standard default values for all remote peers that connect to them. For example, use this command if you want to change keepalive values or other such parameters for the remote peers that connect to the promiscuous peers. To change these default values or apply access lists, use the following syntax: Router(config)# dlsw prom-peer-defaults [bytes-netbios-out bytes-list-name ] [ cost 1-5 ] [ dest-mac destination_mac_address ] [ dmac-output-list access-list-number ] [ host-netbios-out host-list-name ] [ keepalive seconds ] [ lf largest_frame_516-11407 ] [ LSAP-output-list list ] [ tcp-queue-max size ] DLSw+ Backup ConfigurationsDLSw offers a couple of methods to configure redundancy, depending on whether you want to keep the DLSw peer active. One method is configuring a peer as a backup peer. When a peer is configured as backup, it becomes active only when the router loses connectivity to the primary peer or DLSw router. The other method is used primarily to provide peer stability during a link failure. In this method, you tweak DLSw timeout and keepalives, to essentially keep the peer up during a routing protocol convergence, or during the time that it takes to activate a DDR or backup link. DLSw+ Backup PeersBackup peers are created by simply adding the backup-peer argument to the new remote peer. Before creating a backup peer, you must define the primary peer. The backup peer must point at a different DLSw router than the primary peer. The linger keyword tells the router not to disconnect the backup peer until the primary has been up for X amount of seconds. Without the linger keyword, the primary peer immediately becomes active when connectivity is restored. LLC2 sessions automatically are terminated when the linger timer expires , and this can be an undesirable result of the backup peer. If the linger keyword is omitted, the backup peer stays active when the primary peer comes online, but no new circuits will be created over the backup link. Existing LLC2 circuits on the backup link remain active. Therefore, do not use the linger option if you do not want to terminate active circuits on the backup peer. If a linger value of 0 is used, the backup peer stays active until it fails, despite the status of the primary peer. The positive side of the linger option is that it will greatly stabilize the DLSw peers during situations in which a link might be flapping. The steps and syntax for configuring a backup peer are as follows:
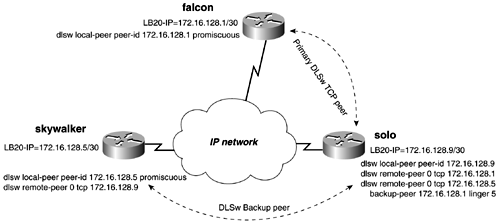
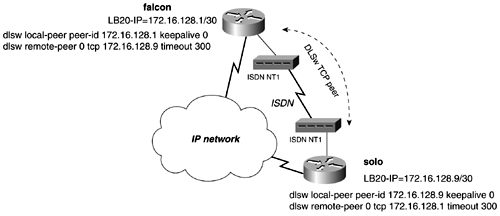
In Figure 13-35, the solo router has a primary peer to the falcon router and a backup peer to skywalker. The peers on falcon and skywalker are configured as promiscuous, so no remote peer statements are needed for DLSw routers to establish a peer connection with these routers. On the router solo, we have configured a backup peer to skywalker. The statement dlsw remote-peer 0 tcp 172.16.128.5 backup-peer 172.16.128.1 linger 5 instructs the solo router to establish a new peer to the skywalker router if the peer to falcon fails. Figure 13-35. Backup and Promiscuous Peers Example 13-34 shows the output of the show dlsw peer command on the solo router from the previous figure. Notice that the backup peer is in a disconnect state while the primary is up. Example 13-34 show dlsw peer Command Output on solo Router Reveals Backup Peer Status solo# show dlsw peer Peers: state pkts_rx pkts_tx type drops ckts TCP uptime TCP 172.16.128.1 CONNECT 1268 190 conf 1 0 0 00:21:56 TCP 172.16.128.5 DISCONN 0 0 conf 0 0 - - Total number of connected peers: 1 Total number of connections: 1 solo# When the primary peer fails, the backup peer to the skywalker router will become active, as in Example 13-35. Example 13-35 show dlsw peer Command Output on solo Router Reveals Backup Peer Status solo# show dlsw peer Peers: state pkts_rx pkts_tx type drops ckts TCP uptime TCP 172.16.128.5 CONNECT 2 4 conf 0 0 0 00:00:29 TCP 172.16.128.1 DISCONN 0 0 conf 0 0 - - Total number of connected peers: 1 Total number of connections: 1 solo# When the primary peer between the solo and falcon routers becomes active again, the solo router waits until after the linger timer expires ”in this example, 5 minutes ”until it disconnects the backup peer and reconnects the primary peer. DLSw+ Backup over DDRThe other method of DLSw+ backup involves keeping the peer connection established during a link failure. For example, if you are using an ISDN link for backup, you might want to keep the peer active while the ISDN line dials and makes a connection. The time for link such as this to converge can exceed the DLSw+ keepalive timers and force the peer down. The DLSw+ keepalives operate on TCP port 2065, which also makes it hard to control significant traffic with ACLs because data and keepalives use the same TCP port number. The no keepalive argument also keeps an ISDN link from dialing because of this type of traffic. Whenever setting the keepalive to 0, DLSw+ cannot tell whether the peer is still active based on keepalives. Therefore, it never tears down the peer based on missed keepalives. By adding a timeout value, the peer automatically is disconnected if no data has been received from a peer for the length of the timeout value. To configure DLSw+ to operate in environments like this, you can control the timeout values and keepalives of DLSw+. To configure this form of backup, follow this two-step process:
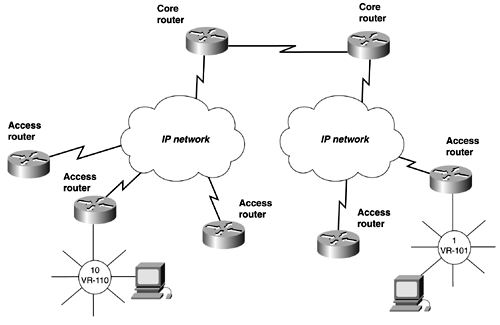
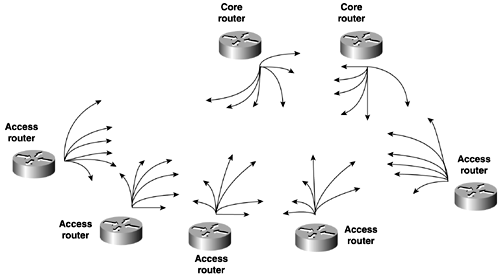
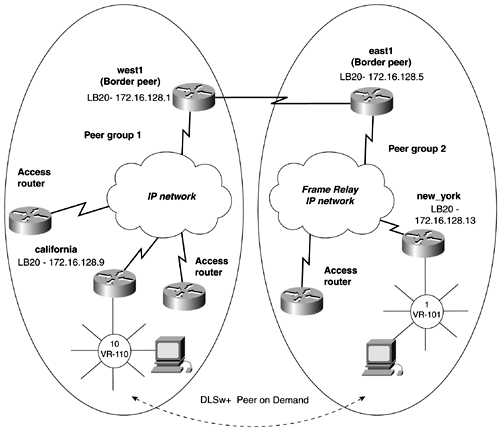
In Figure 13-36, the solo router has a DLSw+ TCP peer and an ISDN backup connection to the falcon router. Figure 13-36. Backup Peers over DDR To keep the peer active while ISDN converges, set the keepalive to 0 and the timeout value to 5 minutes, or 300 seconds. Example 13-36 illustrates the peer from solo to the falcon router remaining active during convergence, while IP connectivity temporary doesn't exist. Example 13-36 DLSw+ Peer Remaining Active, While No IP Connectivity Existssolo# show dlsw peer Peers: state pkts_rx pkts_tx type drops ckts TCP uptime TCP 172.16.128.1 CONNECT 14 2 conf 0 0 0 00:01:37 Total number of connected peers: 1 Total number of connections: 1 solo# ping 172.16.128.1 Type escape sequence to abort. Sending 5, 100-byte ICMP Echos to 172.16.128.1, timeout is 2 seconds: ..... Success rate is 0 percent (0/5) solo# DLSw+ Border Peers, Peer Groups, and Demand PeersBorder peers and peer groups provide an effective way to scale DLSw networks that require any-to-any reachability and to control explorers. A DLSw router that requires any-to-any reachability would need a remote-peer statement to every router that it has a connection to. For example, Figure 13-37 illustrates a common network. Figure 13-37. DLSw Full Reachability Only two workstations are illustrated in the figure, but they represent workstations that would reside on all the LAN segments of the access routers. For the workstations on the access routers to reach any workstations on any other access router, multiple remote peers statements are needed. Figure 13-38 represents all of the remote-peer statements that would be needed for any-to-any reachability to take place. Figure 13-38. TCP Peers Required in a Fully Meshed Network In this small network, you would have to configure 42 remote-peer statements. You easily can see how this type of network doesn't scale well. Besides, the amount of configuration associated with this type of network is the amount of explorer traffic traveling from peer to peer, which is more harmful than some extra keystrokes. Cisco DLSw+ supports the concept of peer groups and border peers and peer-on-demand. A peer group is a group of routers with one or more members designated as a border peer. The border peer's role is to forward explorers for routers in the peer group. When the border peer receives an explorer, it checks its local, remote, and group cache before forwarding the explorer to other routers. When the border peer checks its cache, if it gets a hit in its local cache, it does not forward the explorer to other routers. The remote cache contains information on reachability within the peer group. If the border peer gets a hit on this type of cache, it forwards the explorer only to routers in the same group. The group cache contains information about the other peer groups to which the border peer does not belong. When the border peer gets a hit in this cache, it forwards the explorer only to border peers. Figure 13-39 illustrates how the network would look if you divided it into two peer groups. Each peer group must have one border router to handle the proper forwarding of explorers for that group. The border peers also must have a peer between them. Figure 13-39. DLSw Border Peers and Peer Groups To configure border peers and peer groups, use the following process:
The command dlsw peer-on-demand allows for a peer to be created "on demand," or a demand peer. Do not confuse demand peers with dynamic peers ”these two are different types of peers. The default values for the demand peer can be changed with the following global configuration command: Router(config)# dlsw peer-on-demand-defaults [fst] [bytes-netbios-out bytes-list-name ] [ cost 1-5 ] [ dest-mac destination_mac_address ] [ dmac-output-list access-list-number ] [ host-netbios-out host-list-name ] [ keepalive seconds ] [ lf largest_frame_516-11407 ] [ lsap-output-list list ] [ port-list port-list-number ][ priority] [tcp-queue-max size ] When configuring border peers and peer groups, keep the following rules in mind:
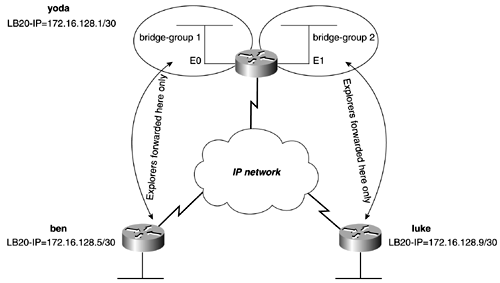
In Figure 13-39, we have assigned IP addresses to routers and divided them into two peer groups. The west router will serve as the border peer for group 1, while the east router will serve as the border peer for group 2. Example 13-37 lists the DLSw configuration of the routers in Figure 13-39. Example 13-37 Configuring Border Peers and Peer GroupsConfiguration of the west router: dlsw local-peer peer-id 172.16.128.1 group 1 border promiscuous dlsw remote-peer 0 tcp 172.16.128.5 ! ! Configurations of the routers in group 1, such as the california router: dlsw local-peer peer-id 172.16.128.9 group 1 promiscuous dlsw remote-peer 0 tcp 172.16.128.1 dlsw peer-on-demand-defaults tcp-queue-max 50 ! Configuration of the east router: dlsw local-peer peer-id 172.16.128.5 group 2 border promiscuous dlsw remote-peer 0 tcp 172.16.128.1 ! ! Configurations of the routers in group 2, such as the new_york router: dlsw local-peer peer-id 172.16.128.13 group 2 promiscuous dlsw remote-peer 0 tcp 172.16.128.5 dlsw peer-on-demand-defaults tcp-queue-max 50 ! Controlling DLSw+ Explorers with Ring Lists, Bridge Group Lists, and Port ListsBecause you can configure only a single local peer on a router, this makes it difficult to control explorers among peers. A ring list allows you to specify which virtual rings or bridge groups will receive explorers from a specific remote peer. For example, in Figure 13-40, the yoda router has two Ethernet interfaces. One Ethernet interface, E0, is in bridge group 1; the other interface, E1, is in bridge group 2. Figure 13-40. DLSw Bridge Group Lists In this model, you want to control DLSw+ so that explorers from the router ben will be forwarded only to the E0 interface, or bridge group 1. Explorers from the router luke should be forwarded only to the E1 interface on the yoda router. To accomplish this type of configuration, DLSw+ supports the use of ring and port lists. To create a ring or port list, use the following procedure:
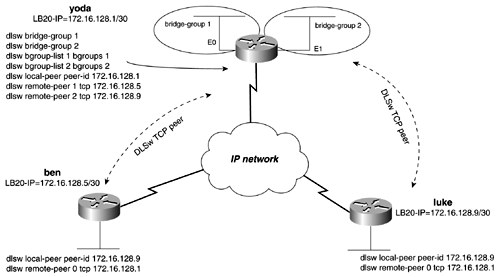
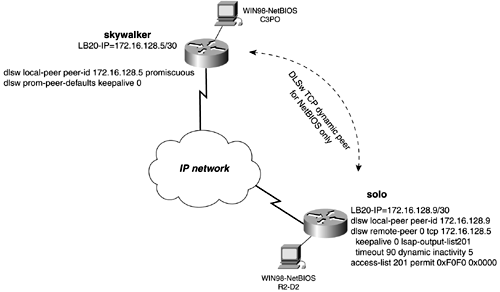
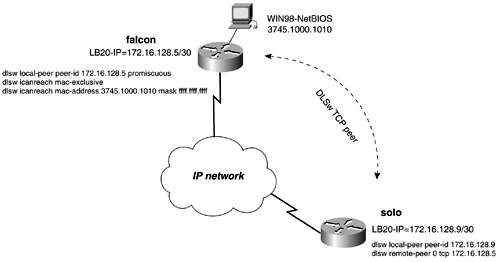
In Figure 13-41, we created two bridge groups on the router yoda. Each bridge group then is added to a DLSw bgroup list. The peer to the router ben will call bgroup list 1, and the peer to the router luke will call bgroup list 2. Figure 13-41. DLSw+ Bridge Group Lists Example Explorers from luke will be forwarded only to the E1 interface on the router yoda. Explorers from the router ben will be forwarded only to the E0 interface on the yoda router. Example 13-38 lists the configuration of the yoda router. Example 13-38 Configuration of the yoda Routerhostname yoda ! <<<text omitted>>> ! dlsw local-peer peer-id 172.16.128.1 dlsw bgroup-list 1 bgroups 1 dlsw bgroup-list 2 bgroups 2 dlsw remote-peer 1 tcp 172.16.128.5 dlsw remote-peer 2 tcp 172.16.128.9 dlsw bridge-group 1 dlsw bridge-group 2 ! interface Loopback20 ip address 172.16.128.1 255.255.255.252 no ip directed-broadcast ! interface Ethernet0 no ip address no ip directed-broadcast media-type 10BaseT bridge-group 1 ! interface Ethernet1 no ip address no ip directed-broadcast media-type 10BaseT bridge-group 2 ! <<<text omitted>>> ! bridge 1 protocol ieee bridge 2 protocol ieee A port list might be used to map traffic on a local interface, either a Token Ring or a serial interface, to a remote peer. The syntax to accomplish this is as follows: Router(config)# dlsw port-list list_number_1-255 [ token-ring serial] interface_number The port list is called in the same manner as the ring list or bridge list, on the remote-peer statement. DLSw+ Dynamic PeersA dynamic peer is yet another type of DLSw peer. A dynamic peer is a peer that becomes active only when certain criteria are met, such as MAC address or SAP type. To configure a dynamic peer, use the keyword dynamic on the remote peer statement. The inactivity timer also should be set when creating a dynamic peer. A dynamic peer will stay active 10 minutes after the last circuit has disconnected from the peer. When you create a dynamic peer, the router automatically adds a timeout value and disables keepalives. This is for the same reasons mentioned in the previous section on configuring backup over DDR. If you are using promiscuous peers with dynamic peers, be sure to modify the default values of the promiscuous peers to disable the keepalives. This can be done with the dlsw prom-peer-defaults command, as mentioned previously. In Figure 13-42, the solo router has a dynamic peer configured to skywalker. The remote-peer statement instructs the peer to be dynamic and to become active only when the output SAP filter 201 is met. The peer will remain active for 5 minutes after the last circuit has disconnected. The router inserts the keepalive 0 and timeout 90 on the remote peer statement automatically. The SAP filter in this example is access list 201, which permits only SAP 0xF0F0, the NetBIOS SAP. We will discuss SAP filters more in the next section. Figure 13-42. DLSw Dynamic Peer Example 13-39 lists the configuration of the solo router, with the dynamic peer configured to skywalker. Example 13-39 Configuration of the solo Routerhostname solo ! <<<text omitted>>> ! dlsw local-peer peer-id 172.16.128.9 dlsw remote-peer 0 tcp 172.16.128.5 keepalive 0 lsap-output-list 201 timeout 90 dynamic inactivity 5 dlsw bridge-group 1 ! interface Loopback20 ip address 172.16.128.9 255.255.255.252 no ip directed-broadcast ! interface Ethernet0 ip address 172.16.6.1 255.255.255.0 no ip directed-broadcast bridge-group 1 ! <<<text omitted>>> ! access-list 201 permit 0xF0F0 0x0000 NOTE Do not confuse dynamic peers with promiscuous or demand peers. This can be hard to do because all of these peer types are dynamic in some form. Configuring DLSw+ Reachability with the icanreach CommandDuring the DLSw+ capabilities exchange, routers also exchange what resources they can reach in the control vectors. This is information that can be statically configured on the router. By configuring what SAP, MAC address, and NetBIOS names the router can reach, it can greatly reduce the number of explorers sent to remote peers. Along with the resources that the router can reach, you can configure the SAP values that the router cannot reach. If a router has a static entry defined by the icannotreach command, it also reports that to its peers. The peer keeps track of what resources it cannot reach and avoids sending explorers to those peers. To configure DLSW+ reachability, use the following commands: Router(config)# dlsw icanreach [ mac-address saps netbios-name ] Router(config)# dlsw icannotreach [ saps ] <0-FE> Even SAP Value (hex) When using the icanreach saps command, be careful because it will deny all other SAPs. In other words, there is an implicit "deny all SAPs" that follow the use of this command. It is best to use the icannotreach command to deny explicit SAPs. Use the mac-exclusive parameters and the netbios-exclusive arguments to advertise reachability to a single address or host. These commands must be used with another statement, dlsw icanreach mac address or netbios name: Router(config)# dlsw icanreach [ mac-exclusive netbios-exclusive ] In Figure 13-43, we have configured DLSw reachability on the falcon router. In this example, the falcon router will advertise that it can reach only a single MAC address, 3745.1000.1010. Example 13-40 lists the configuration needed on the falcon router to accomplish this. Figure 13-43. DLSw Reachablity Example 13-40 Configuration DLSw+ Reachability on the falcon Router! dlsw local-peer peer-id 172.16.128.5 promiscuous dlsw icanreach mac-exclusive dlsw icanreach mac-address 3745.1000.1010 mask ffff.ffff.ffff dlsw bridge-group 1 ! By viewing the DLSw reachability on the solo router in Example 13-41, you can see that the MAC address is the only one being advertised by the falcon router. The status is unconfirmed because it is a static entry. Example 13-41 The DLSw Reachability on the solo Routersolo# show dlsw reach DLSw Local MAC address reachability cache list Mac Addr status Loc. port rif 0000.613c.dc82 FOUND LOCAL TBridge-001 --no rif-- 0006.3acf.7aa6 FOUND LOCAL TBridge-001 --no rif-- 0007.781a.e7a9 FOUND LOCAL TBridge-001 --no rif-- DLSw Remote MAC address reachability cache list Mac Addr status Loc. peer 3745.1000.1010 UNCONFIRM REMOTE 172.16.128.5(2065) DLSw Local NetBIOS Name reachability cache list NetBIOS Name status Loc. port rif R2-D2 FOUND LOCAL TBridge-001 --no rif-- DLSw Remote NetBIOS Name reachability cache list NetBIOS Name status Loc. peer To view details about what addresses and SAP the router now can reach, use the show dlsw capabilities command. Example 13-42 lists the capabilities on the solo router. Notice that one MAC address is reported , and the max-exclusive column now is set to yes. Example 13-42 The DLSw+ Capabilities of the solo Routersolo# show dlsw capabilities DLSw: Capabilities for peer 172.16.128.5(2065) vendor id (OUI) : '00C' (cisco) version number : 2 release number : 0 init pacing window : 20 unsupported saps : none num of tcp sessions : 1 loop prevent support : no icanreach mac-exclusive : yes icanreach netbios-excl. : no reachable mac addresses : 3745.1000.1010 <mask ffff.ffff.ffff> reachable netbios names : none V2 multicast capable : yes DLSw multicast address : none cisco version number : 1 peer group number : 0 peer cluster support : no border peer capable : no peer cost : 3 biu-segment configured : no UDP Unicast support : yes Fast-switched HPR supp. : no NetBIOS Namecache length : 15 local-ack configured : yes priority configured : no cisco RSVP support : no configured ip address : 172.16.128.5 peer type : prom version string : Cisco Internetwork Operating System Software IOS (tm) 2500 Software (C2500-JS-L), Version 12.1(2)T, RELEASE SOFTWARE (fc1) Copyright (c) 1986-2000 by cisco Systems, Inc. Compiled Tue 16-May-00 15:28 by ccai solo# You also can use the dlsw reachability command to help you test DLSw networks. By configuring a router with a dlsw icanreach dummyname, you can easily tell whether your DLSw configuration is working by examining the reachability of its peer routers. |
| < Free Open Study > |
EAN: 2147483647
Pages: 283