Encapsulating Delete Operations in Stored Procedures
| | ||
| | ||
| | ||
You will obtain the best control over database operations if you use stored procedures to perform any operation. Implementing this encapsulation is similar to implementing other actions inside stored procedures. It is most important to control which rows will be deleted by defining the parameter to be used in the WHERE clause.
| Tip | Remember, the fastest operations will be performed if the WHERE clause uses columns belonging to indexes, especially if the columns are from the primary key. |
The simplest example is to use a stored procedure to delete just one row. This code is included in the sample files as \Ch11\AdvWorks\Queries\Sample09.sql.
CREATE PROCEDURE [Sales].[CurrencyRate_Delete] @Id int AS DELETE FROM [AdventureWorks].[Sales].[CurrencyRate] WHERE CurrencyRateID=@id GO
Inside a stored procedure, you may use any DELETE sentence you need, including those that filter by using an IN clause or related tables. Moreover, you can include several Delete instructions inside a stored procedure. The last Delete instruction in the example above was used in SQL Server versions prior to 2000 because the database engine did not include Cascade Delete relationships. When using those versions, if you needed to delete rows in a hierarchical structure, you had to delete them from bottom to top in the hierarchy.
It is a good practice to encapsulate actions performed against the database, thereby isolating them from the application. A stored procedure should have a representative name that states the action it will perform, such as EntirePurchaseOrder_Remove, which will be the only one a developer will call to remove an order. However, the stored procedure can perform several actions, such as removing records from different tables or inserting rows in history tables.
Implementing Pessimistic Concurrency for Delete Operations
The above examples assume that your sentences are the only ones being executed against a database in a given time period. However, in real life, this is a very uncommon situation, for there are often several users connected to a database at the same time.
In a real-life scenario, it is possible that you might want to delete a row that was modified by another user just seconds earlier. If you perform the deletion, you will destroy the other users work. A worst-case scenario could be that changes were made to a table by another user that affect some of the primary key columns that you are using to filter the delete operation. In this situation, you will not be able to delete a row because the primary key that you are looking for no longer exists.
Assume that you have an application to manage the SalesPersonQuotaHistory table. You want to delete an old entry within that table for a sales person. The application may execute the following sentence to retrieve the first entry for sales person id equals 268. This code is included in the sample files as \Ch11\AdvWorks\Queries\Sample10.sql.
SELECT TOP (1) SalesPersonID, QuotaDate FROM Sales.SalesPersonQuotaHistory WHERE (SalesPersonID = 268)
The application obtains the following information:
| SalesPersonID | QuotaDate |
|---|---|
| 268 | 2001-07-01 00:00:00.000 |
Meanwhile, another user changes the row because the month in this specific entry is wrong. The following procedure illustrates what may occur when you try to delete your sales person entry.
Changing Row Information in a Table
-
In SQL Server Management Studio, right-click the Sales.SalesPersonQuotaHistory table and select Open Table.

-
Change the month of the date in the first row in the first column to 08, and move the cursor to the next row to update the information.
-
In a Query window, execute the following sentence to delete the row based on the information previously retrieved. This code is included in the sample files as \Ch11\AdvWorks\Queries\Sample11.sql.
DELETE FROM Sales.SalesPersonQuotaHistory WHERE (SalesPersonID = 268) AND (QuotaDate = CONVERT(DATETIME, '2001-07-01 00:00:00', 102))
You will receive the following message:
(0 row(s) affected)
As you can see, it is important to retrieve the rows affected by a DELETE query to ensure that the deletion occurs since no error is generated when attempting to delete something that no longer exists. Deleting rows after another user has made changes is something you must monitor to keep consistency in your database.
Implementing Optimistic Concurrency for Delete Operations
You can implement several methods to ensure that you are deleting the exact row that you retrieved previously and that no changes have been made to the row during the interim period.
Method 1. Comparing All Columns
You can create a stored procedure that receives parameters for each column in the table and use them in the WHERE clause, as shown in the following example. This code is included in the sample files as \Ch11\AdvWorks\Queries\Sample12.sql.
CREATE PROCEDURE Sales.SalesReason_Delete @SalesReasonID int, @Name nvarchar(50), @ReasonType nvarchar(50), @ModifiedDate datetime AS BEGIN DELETE FROM Sales.SalesReason WHERE (SalesReasonID = @SalesReasonID) AND (Name = @Name) AND (ReasonType = @ReasonType) AND (ModifiedDate = @ModifiedDate) END
However, this method may be expensive when working with tables that have several columns, such as Production.Product and Person.Contact.
Method 2. Using the ModifiedDate Column
In the sample above, the table contains a ModifiedDate column. If that column contains date and time information, you can use it with the primary key to ensure that you are deleting only the row you want (because the primary key identifies it), and you can verify that there have been no changes because the ModifiedDate information remains the same as that which was viewed earlier.
However, you depend on the fact that any update process must update the ModifiedDate column. If another user modifies information outside of your application, you cannot control the update on the ModifiedDate column.
Method 3. Using a Timestamp Column
The timestamp datatype contains special behavior. The SQL Server engine updates it automatically any time a row is updated. If you add a Timestamp column to your table, you can use it as part of your WHERE clause when deleting a row. The following example adds a Timestamp column to a table.
ALTER TABLE Sales.SalesReason ADD LastVersion timestamp NULL GO
Make sure that you obtain the Timestamp value when receiving information from the row.
Using a Timestamp column from .NET When retrieving information from a Timestamp column in Visual Basic, C#, or any other .NET-compatible language, you must deal with arrays of bytes. You can simply manage the byte-to-byte comparison, or you can transform the value you receive to another datatype that is easier to manage in .NET.
Consider the following SELECT statement (included in the sample files as \Ch11\AdvWorks\Queries\Sample13.sql):
SELECT SalesReasonID, Name, ReasonType, ModifiedDate, cast(Lastversion as bigint) AS EasyLastVersion FROM Sales.SalesReason
It converts the Timestamp value to a bigint datatype. This value is much easier to manage in a .NET language, and you can use the same conversion when you want to delete a row.
The following script adds a new row to the table. This code is included in the sample files as \Ch11\AdvWorks\Queries\Sample14.sql.
INSERT INTO [AdventureWorks].[Sales].[SalesReason] ([Name] ,[ReasonType] ,[ModifiedDate]) VALUES ('Test reason' ,'Just for Test' ,getdate()) Now, retrieve the primary key and the Timestamp column just as your application would when it is about to delete a row.
SELECT SalesReasonID, cast(Lastversion AS bigint) AS EasyLastVersion FROM Sales.SalesReason where name='Test reason'
This script returns results similar to those shown below:
SalesReasonID EasyLastVersion ------------- -------------------- 11 3001 (1 row(s) affected)
A stored procedure for deleting the row using both values can be similar to the following script (included in the sample files as \Ch11\AdvWorks\Queries\Sample15.sql).
CREATE PROCEDURE Sales.SalesReason_DeleteChecked @SalesReasonId int, @CheckStamp bigint, @DeletedRecords int=null OUTPUT AS BEGIN DELETE Sales.SalesReason WHERE SalesReasonID=@SalesReasonId AND cast(LastVersion as bigint)=@CheckStamp SET @DeletedRecords=@@ROWCOUNT END
You can now test the stored procedure.
Testing a Stored Procedure
-
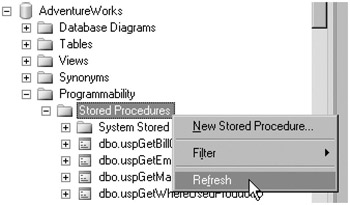
Under the AdventureWorks database, expand the Programmability node.
-
On the Stored Procedures node, right-click and select Refresh.
-
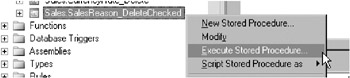
On the Sales.SalesReason_DeleteChecked stored procedure, right-click and select Execute Stored Procedure
-
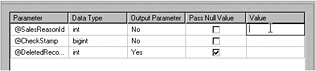
A new window will appear that asks for the stored procedures parameters. Check the Pass Null Value box for the @DeletedRecords parameter, and enter the appropriate values for the others.
-
A script will be created similar to the following (included in the sample files as \Ch11\AdvWorks\Queries\Sample16.sql):
USE [AdventureWorks] GO DECLARE @return_value int, @DeletedRecords int EXEC @return_value = [Sales].[SalesReason_DeleteChecked] @SalesReasonId = 11, @CheckStamp = 3001, @DeletedRecords = @DeletedRecords OUTPUT SELECT @DeletedRecords AS N'@DeletedRecords' SELECT 'Return Value' = @return_value GO
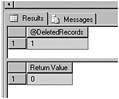
The script will return the following results:
-
Execute the insert script to insert the Test reason again and retrieve the new values. Note these values for use in Step 12 below.
-
On the Sales.SalesReason table, right-click and select Open Table.
-
Locate the last row just added and change the ReasonType value. Move the cursor to update the row.
-
Execute the stored procedure with the new Id and Timestamp that you previously obtained in Step 9 from this new row. Do not retrieve the values once the row has been modified.
-
You will obtain a zero value in @DeletedRecords since the row was updated after you received the Timestamp value. The Timestamp column is updated automatically each time a row is modified.
Method 4. Using a Unique Identifier Column
Starting with SQL Server 2000, a new datatype is available to manage optimistic concurrency. The unique identifier column contains a global unique identifier (GUID), and this column is very useful when synchronizing information with the same structure between different databases and even different servers.
If two different rows in two different databases or servers are updated at exactly the same time, there is a chance that both of them will contain the same Timestamp, which can be a problem during the synchronization process. The unique identifier is guaranteed to be unique no matter where it is generated. However, the GUID value will not be updated automatically during every change as is done with the Timestamp value. As with the ModifiedDate method discussed earlier, you are responsible for ensuring that the unique identifier is updated consistently so that it can be used as a concurrency check.
You can define a unique identifier as follows . This code is included in the sample files as \Ch11\AdvWorks\Queries\Sample17.sql.
ALTER TABLE Production.Culture ADD RowId uniqueidentifier NOT NULL CONSTRAINT DF_Culture_RowId DEFAULT newid() GO
Each time you need to ensure a deletion, include the unique identifier in your select statement and use it as a parameter in the stored procedure to delete the row in the same manner explained earlier.
Triggering Actions Automatically when Deleting Data
Chapter 10, Inserting Data in Microsoft SQL Server 2005, discussed reasons why it may be necessary to control what happens when a process or application inserts a row. When triggering actions automatically in delete operations, the main difference is which virtual table to use. Since you are about to delete rows, the table containing the changes is named deleted.
Using the same Production.ProductHistory table that was used in the previous chapter, it is possible to keep a log concerning the deletions in the Production table. This code is included in the sample files as \Ch11\AdvWorks\Queries\Sample18.sql.
CREATE TRIGGER Production.Product_DeleteTrigger ON Production.Product AFTER DELETE AS BEGIN SET NOCOUNT ON; INSERT INTO [AdventureWorks].[Production].[ProductHistory] ([ProductID],[Name],[ProductNumber],[MakeFlag] ,[FinishedGoodsFlag],[Color],[SafetyStockLevel] ,[ReorderPoint],[StandardCost],[ListPrice] ,[Size],[SizeUnitMeasureCode],[WeightUnitMeasureCode] ,[Weight],[DaysToManufacture],[ProductLine] ,[Class],[Style],[ProductSubcategoryID] ,[ProductModelID],[SellStartDate],[SellEndDate] ,[DiscontinuedDate],[rowguid],[ModifiedDate] ,[Action],[UserName]) SELECT [ProductID],[Name],[ProductNumber],[MakeFlag] ,[FinishedGoodsFlag],[Color],[SafetyStockLevel] ,[ReorderPoint],[StandardCost],[ListPrice] ,[Size],[SizeUnitMeasureCode],[WeightUnitMeasureCode] ,[Weight],[DaysToManufacture],[ProductLine] ,[Class],[Style],[ProductSubcategoryID] ,[ProductModelID],[SellStartDate],[SellEndDate] ,[DiscontinuedDate],[rowguid],GetDate(),'D',USER_NAME() FROM deleted END
| Note | The above code involves an AFTER trigger. The row is deleted before any action takes place in your trigger code. However, you can cancel the deletion if you raise an error from inside the trigger. |
| | ||
| | ||
| | ||
EAN: N/A
Pages: 130