Physically Creating a Database
| | ||
| | ||
| | ||
The final step of the database design process is the physical design. This is the phase in which you finally create the database, tables, and remaining database objects.
Selecting an Appropriate Storage Design for a Database
When creating a database, it is important to understand what constitutes a database, how SQL Server 2005 stores information in the database, and, most importantly, what options exist when designing the database.
What Is a Database?
A database in a relational world is a repository of structured data or, in simpler terms, an organized collection of data. A database is where you create tables, constraints, datatypes, and other data- related objects. Because SQL Server 2005 is a client-server relational database management system (RDBMS), you will rarely access the database files from your application. You will use T-SQL statements to specify the actions that the server must take. Client applications will then open a connection to the server and database and operate within its boundaries.
How Is Information Stored?
A SQL Server database contains the following files, as illustrated in Table 5-10.
| Database File | Optional/Required | File Extension | Objective |
|---|---|---|---|
| Primary | Required | .mdf | Stores database system information, plus the table and index structures where data resides |
| Secondary | Optional | .ndf | Stores table and index structures where data resides |
| Log | Required | .ldf | Provides transactional support to the database and temporarily stores changes in the database |
The following list is a simplified version of the transactional process.
-
Your application sends a group of T-SQL statements in a transaction. To learn more about transactions, see Chapter 10, Using Transactions to Provide Safe Database Concurrency in Microsoft SQL Server 2005: Applied Techniques Step by Step .
-
The server reads the information needed to perform changes to the database. This information is read from primary and/or secondary files. If the information was previously in RAM memory, this step is skipped .
-
The server modifies the information in RAM memory and marks the information as dirty. Dirty means that the information has been modified in RAM, but changes have not been saved to disk.
-
The server saves all modifications in the transaction log. The transaction log keeps a record of all database modifications and will be used in case of server failure.
-
The server informs the application that the transaction is committed. Committed means that the server has saved the modification and the application may continue.
-
Eventually, an event called CHECKPOINT occurs in the server, and all dirty information of committed transactions is saved to disk in primary and secondary files.
Designing Database Storage
When designing database storage, consider the following guidelines.
-
Use formatted disks from the New Technology File System (NTFS) to store database files. NTFS offers better security and recoverability than a file allocation table (FAT) file system.
-
Do not use compressed volumes or files. Compressed volumes dramatically decrease the performance of a database.
-
Use a separate disk or disk subsystem for log files because log files access information in a sequential manner, while data files are accessed randomly using separate disks to increase performance. Separating the log file also increases recoverability. Use different physical disks instead of partitions of the same disk.
-
Use redundant array of inexpensive disks (RAID) technology to store database and log files. Primary and secondary database files are best stored in RAID 5 or RAID 10 disk subsystems. Log files are best stored in RAID 1 or RAID 10 disk subsystems.
-
Spreading the database in multiple disk subsystems increases performance. Use as many disks as possible to distribute the database load. Performance is increased when using primary and secondary files, but not when using multiple log files.
Creating a Database
The following process describes how to create a database using Microsoft SQL Server Management Studio.
Using SQL Server Management Studio to Create a Database
-
From the Start menu, select Programs Microsoft SQL Server 2005 Sql Server Management Studio.
-
Connect to the database engine that will host the database.
-
In Object Explorer, right-click the Databases folder and choose New Database from the context menu.
-
When the New Database dialog box is displayed, name the database.
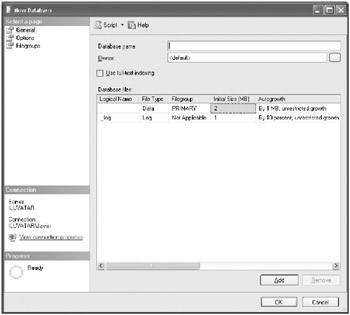
-
In the Database Files grid, scroll to the right to review the path of the file and, if necessary, change the path to support your storage design decisions.
-
If you want to use multiple data files, select the Add button to create secondary files.
-
If necessary, choose options in the Select A Page task pane on the left.
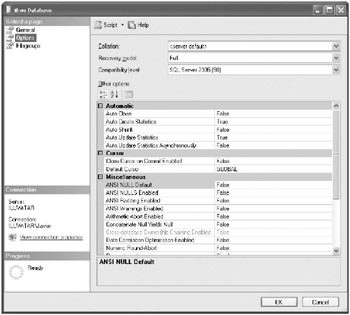
-
Configure the database options.
-
Click OK to create the database.
Using T-SQL to Create a Database
To create a database using T-SQL statements, use the following syntax.
CREATE DATABASE Tests ON (NAME = Tests_dat , FILENAME = 'C:\Data\TestDat.mdf' , SIZE = 20 MB) LOG ON (NAME = Sales_log , FILENAME = 'E:\Logs\TestLog.ldf' , SIZE = 5MB);
Designing Database Schemas to Logically Group Database Objects
Schemas are namespaces that simplify database object management. By using schemas, you can organize tables and other database objects as well as make it easier to grant permissions. Use schemas to create categories of tables, help users and developers navigate your database, or create groups of tables that can be managed from a single point.
Using SQL Server Management Studio to Create Database Schemas
-
Open SQL Server Management Studio.
-
Connect to the database engine that hosts the database.
-
Expand the Databases folder, expand the database you will be working with, and then expand the Security folder.
-
Under the Security folder, right-click the Schemas folder and choose New Schema.
-
When the New Schema dialog box is displayed, name the schema.
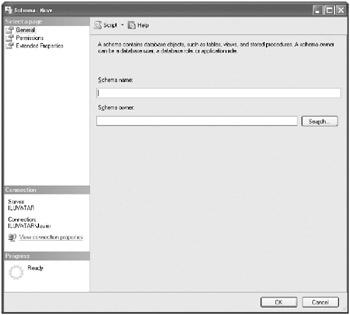
-
Press OK to create the schema.
Using T-SQL to Create Database Schemas
To create a schema using T-SQL statements, use the following syntax:
CREATE SCHEMA Inventory
Creating Tables to Implement a Design
After you have designed your solution, you will begin the implementation of your solution by creating tables to store the data.
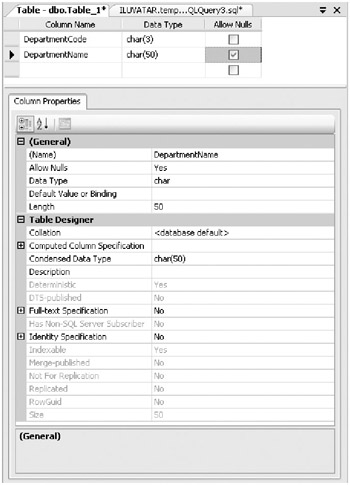
Using SQL Server Management Studio to Create Tables
-
Open SQL Server Management Studio.
-
Connect to the database engine that will host the database.
-
Expand the Databases folder, and expand the database you will be working with.
-
Right-click the Tables folder and choose New Table.
-
Add a column using the Columns grid, name the column, assign a datatype, and specify whether the column will allow NULL values.
-
Additional column configurations may be set in the Column Properties section.
-
Add all necessary columns.
Defining the Primary Key in a Table Using SQL Server Management Studio
-
In the Table Definition window (shown in Step 7 above), select the columns you want to configure as the primary key. (You can re-open this window for an existing table by right-clicking the table in Object Explorer and choosing Modify from the context menu.)
-
Click the Set Primary Key button on the toolbar, or right-click the selected columns and choose Set Primary Key from the context menu.
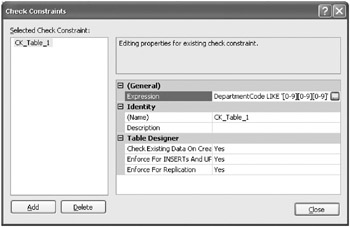
Defining a CHECK Constraint Using SQL Server Management Studio
-
In the Table Definition window, click the Manage Check Constraints button in the toolbar.
-
Select the Add button.
-
In the Expression property, specify the validation expression.
Using T-SQL to Create Tables
To create a table using T-SQL statements, use the following syntax.
CREATE TABLE Employee (EmployeeNumber INT NOT NULL PRIMARY KEY CHECK(EmployeeNumber>0) , EmployeeSSN VARCHAR(15) NOT NULL CHECK(EmployeeSSN LIKE '[0-9][0-9][0-9][0-9]-[0-9][0-9]-[0-9][0-9]-[0-9][0-9][0-9][0-9]') UNIQUE , HireDate SMALLDATETIME NOT NULL CHECK(HireDate>'19950101') , DepartmentCode CHAR(3) NOT NULL FOREIGN KEY REFERENCES Departments(DepartmentCode) , TerminationDateSMALLDATETIMENULL , CHECK(TerminationDate IS NULL OR TerminationDate>HireDate))
| | ||
| | ||
| | ||
EAN: N/A
Pages: 130