|   Create phony accounts and use phony money to test your API code, all without spending a dime .  | Go to http://paypalhacks.com for downloadable code and API updates. | |
PayPal Developer Central includes an environment called the PayPal Sandbox, in which you can test your PayPal Web Services applications, as well as IPN and PDT features (discussed in Chapter 7). The Sandbox looks and behaves like the PayPal web site, with one important exception: no real money is transacted. You can create and access multiple test accounts in the Sandbox, which means that you can create both a business and a buyer account without the hassle of setting up real email, credit card, and bank accounts. Before PayPal created its Sandbox, you would have had to create two real PayPal accounts and use real money to test your code. There was no way to get around this, but you could send test payments in pennies$0.01 for a widget or $0.02 for a gumballand then refund the transactions immediately thereafter. As you can imagine, this process quickly became burdensome. Although some companies (such as Eliteweaver) offered good IPN-testing solutions, ultimately nothing was able to replace the comfort of knowing that your code worked against the real thing. 8.3.1 Creating a Sandbox Account Creating a Sandbox PayPal account is similar to creating a live PayPal account. The web pages look and behave almost identically. Here's how to do it: -
Log into Developer Central with your new developer account and click the Sandbox tab. -
Click the Create Account link, at which point a familiar page appears: the PayPal sign-up page.  | It might be a little jarring to see the PayPal account sign-up page, but if you look to the top-left corner, you'll see a PayPal Sandbox logo, verifying that you did swallow the blue pill and are indeed working within a simulated PayPal environment. | |
-
To create a business account, select the Business Account option. Select your country and click the Continue button. -
On the next page, enter any existing address and phone number. This information never leaves the Sandbox, so the information you enter here makes little difference. Click the Continue button when you're done. -
On the Enter Your Information page, type an email address and password. To make it easy on yourself, use a simple email address such as business@mysite.com and an easy-to-remember password such as qwertyui . You don't have to use a real email account, because the Sandbox emails never leave the Sandbox.  | Real currency is not involved when using the Sandbox, so there isn't much of a security issue. You might choose to use the same password for every Sandbox account you create. Having to manage multiple passwords is pointless and can slow down your development team. | |
-
You also need to provide answers to two security questions. Again, this information never leaves the Sandbox. Enter something obvious, such as your own last name, for Mother's Maiden Name and the city you work in for City of Birth. Finally, enter the Security Measure characters and click the Sign-up button. -
Next, you will be asked to confirm your email address. But before you do, repeat steps 1 through 6 to create a second Sandbox account, from which you can send test payments. To create a buyer account, select Personal Account (instead of Business Account) in step 3. You'll be asked fewer questions this time.  | You might want to create both types of personal accounts (Standard and Premier) to mimic the different types of PayPal users who will be buying things from your site. To create a Premier account, answer Yes when asked "Would you like this to be a Premier Account?" | |
-
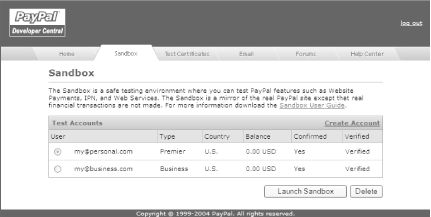
Once both your Business and Personal accounts are set up, they will appear under the Sandbox tab, as shown in Figure 8-2. For each account you create, you will see the email address, the account type, the country in which the account is registered, the account balance and currency, and whether the account is confirmed and verified . Figure 8-2. Buyer and Seller accounts in the Sandbox 
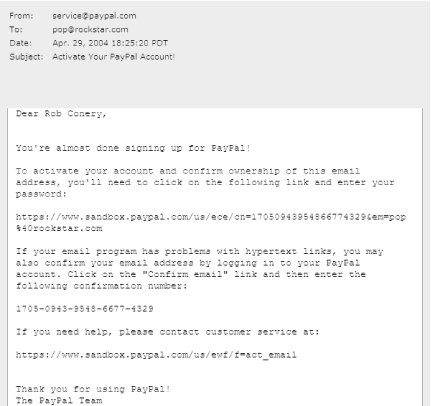
8.3.2 Confirming Your Sandbox Email Addresses Just as you would on the live PayPal site, you must confirm your newly created PayPal Sandbox accounts before you use them. Normally, PayPal would send a real email to a newly added email address for confirmation, but email sent on behalf of pseudo-accounts would be confusing, to the say the least. So, for security and other reasons, PayPal's Developer Central web site includes a self-contained pseudo-email-messaging system to catch and display emails generated by the PayPal Sandbox. To view these emails, log into the Developer Central web site and click the Email tab. A list of emails from PayPal to your various accounts will be displayed here. Click the subject link of any email to open the email message, as shown in Figure 8-3. Figure 8-3. The PayPal Sandbox account verification process 
To confirm your Sandbox account: -
Copy the URL from the Activate Your PayPal Account email. -
Open a new browser window, paste the URL into your browser's address bar, and press Enter. -
Enter the password for your account and click Submit. You will need to follow this process for every new Sandbox account you've created. 8.3.3 Verifying Bank Accounts in the Sandbox PayPal uses bank accounts to verify [Hack #2] that their members are who they say they are.  | Bank accounts are also used to add and withdraw funds [Hack #20] . | |
Adding a bank account to a Sandbox account is relatively straightforward and has the added bonus of instantly making you richat least in the world of the PayPal Sandbox. To add a bank account to your PayPal Sandbox account: -
Log into the Sandbox with your business account and click Add Bank Account on the My Account/Overview page. -
The Add Bank Account page will be conveniently pre- populated with a fake bank account number. Add a name for the account and click Add Account. Be sure to make note of the account numbers used for the bank account, because you will need them in the future to add multiple users or enable other features.  | At the time of this writing, the Sandbox displays this account number only once: at the moment of its creation. So, write it down somewhere, because you won't see it again. One way to remind yourself of this bank account information is to use the routing number and bank account as part of the account name (e.g., BofA-325272157_10448249836185934481 ). If you do forget the account numbers, you might want to abandon this Sandbox account and open another. | |
-
At this point, PayPal would normally make two small deposits into your pseudo-account and then ask you to confirm the amounts that were deposited. However, since the account numbers and the corresponding accounts are fake, you won't be able to visit your bank's web site to get the information [Hack #2] . Instead, PayPal provides an easy way to accomplish this step right on the site. Click the Get Verified link on the My Account/Overview page to view the Get Verified page. -
On the Get Verified page, click "Add and confirm a checking account" to be taken to the Confirm Bank Account page. Select the bank account you would like to confirm and click Submit. Click Continue when you see "Your U.S. Bank Account Has Been Confirmed." Repeat this process for your buyer account. 8.3.4 Adding Funds (and Getting Rich Quick) When you've verified all your accounts, the last step is to put some money in your Personal (buyer) account.  | You do not have to add funds to your account before making a payment, because PayPal will let you fund payments from your fake bank account or fake credit card, just as in real life. | |
To add funds, log into the Sandbox with your Sandbox buyer account, and from the My Account tab, click Add Funds. Click the Transfer Funds from a Bank Account link and follow the instructions. You need to put some money into your Personal account only, since that's the account from which you'll be making your pseudopayments.  | The transaction will be held as Pending until you actually view the details of the transaction and click Clear Transaction or Fail Transaction. For the purposes of this hack, select Clear Transaction here. | |
This might be the most fun of all the things mentioned in this book, because you can, on a whim, transfer any amount of money into your account and become a pseudomillionaire in seconds! (And you thought this was going to be about the coding!) -- Rob Conery and Dave Nielsen |


