Standard Input and Standard Output
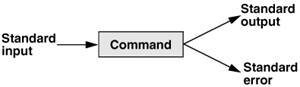
| Standard output is a place that a program can send information, such as text. The program never "knows" where the information it sends to standard output is going (Figure 5-3). The information can go to a printer, an ordinary file, or the screen. Figure 5-3. The command does not know where standard input comes from or where standard output and standard error go The following sections show that by default the shell directs standard output from a command to the screen[1] and describe how you can cause the shell to redirect this output to another file.
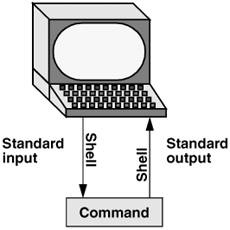
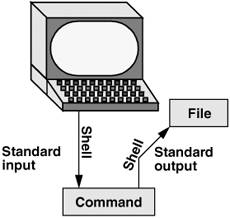
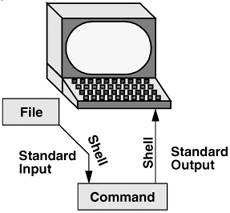
Standard input is a place that a program gets information from. As with standard output the program never "knows" where the information came from. The following sections also explain how to redirect standard input to a command so that it comes from an ordinary file instead of from the keyboard (the default). In addition to standard input and standard output, a running program normally has a place to send error messages: standard error. Refer to page 262 (bash) and page 346 (tcsh) for more information on handling standard error. The Screen as a FileChapter 4 introduced a number of types of files, including device files. A device file resides in the Mac OS X file structure, usually in the /dev directory, and represents a peripheral device, such as a terminal emulator window, screen, printer, or disk drive. The device name that the who utility displays after your login name is the filename of your screen. For example, when who displays the device name ttyp4, the pathname of your screen is /dev/ttyp4. When you work with multiple windows, each window has its own device name. You can also use the tty utility to display the name of the device that you give the command from. Although you would not normally have occasion to do so, you can read from and write to this file as though it were a text file. Writing to it displays what you wrote on the screen; reading from it reads what you entered on the keyboard. Tip: chsh: changes your login shell The person who sets up your account determines which shell you will use when you first log in on the system or when you open a terminal emulator window in a GUI environment. You can run any shell you like once you are logged in. Enter the name of the shell you want to use (bash or tcsh) and press RETURN; the next prompt will be that of the new shell. Give an exit command to return to the previous shell. Because shells you call in this manner are nested (one runs on top of the other), you will be able to log out only from your original shell. When you have nested several shells, keep giving exit commands until you reach your original shell. You will then be able to log out. Use the chsh utility when you want to change your login shell permanently. First give the command chsh. The chsh utility opens in an editor (usually vim) a temporary file describing your account and listing your shell. Enter the absolute pathname of the shell you want to use (/bin/bash or /bin/tcsh) and save the file. When you change your login shell in this manner using a terminal emulator under a GUI, subsequent terminal emulator windows will not reflect the change until you log out of the system and log back in. The Keyboard and Screen as Standard Input and Standard OutputWhen you first log in, the shell directs standard output of your commands to the device file that represents your screen (Figure 5-4). Directing output in this manner causes it to appear on your screen. The shell also directs standard input to come from the same file, so that your commands receive as input anything you type on your keyboard. Figure 5-4. By default standard input comes from the keyboard and standard output goes to the screen cat The cat utility provides a good example of the way the keyboard and the screen function as standard input and standard output, respectively. When you use cat, it copies a file to standard output. Because the shell directs standard output to the screen, cat displays the file on the screen. Up to this point cat has taken its input from the filename (argument) you specified on the command line. When you do not give cat an argument (that is, when you give the command cat followed immediately by RETURN), cat takes its input from standard input. Thus, when called without an argument, cat copies standard input to standard output, one line at a time. To see how cat works, type cat and press RETURN in response to the shell prompt. Nothing happens. Enter a line of text and press RETURN. The same line appears just under the one you entered. The cat utility is working. Because the shell associates cat's standard input with the keyboard and cat's standard output with the screen, when you type a line of text cat copies the text from standard input (the keyboard) to standard output (the screen). This exchange is shown in Figure 5-5. Figure 5-5. The cat utility copies standard input to standard output$ cat This is a line of text. This is a line of text. Cat keeps copying lines of text Cat keeps copying lines of text until you press CONTROL-D at the beginning until you press CONTROL-D at the beginning of a line. of a line. CONTROL-D $ CONTROL-D signals EOF The cat utility keeps copying text until you enter CONTROL-D on a line by itself. Pressing CONTROL-D sends an EOF (end of file) signal to cat to indicate that it has reached the end of standard input and there is no more text for it to copy. The cat utility then finishes execution and returns control to the shell, which displays a prompt. RedirectionThe term redirection encompasses the various ways you can cause the shell to alter where standard input of a command comes from and where standard output goes to. By default the shell associates standard input and standard output of a command with the keyboard and the screen as mentioned earlier. You can cause the shell to redirect standard input or standard output of any command by associating the input or output with a command or file other than the device file representing the keyboard or the screen. This section demonstrates how to redirect input from and output to ordinary text files and utilities. Redirecting Standard OutputThe redirect output symbol (>) instructs the shell to redirect the output of a command to the specified file instead of to the screen (Figure 5-6). The format of a command line that redirects output is command [arguments] > filename Figure 5-6. Redirecting standard output where command is any executable program (such as an application program or a utility), arguments are optional arguments, and filename is the name of the ordinary file the shell redirects the output to. Figure 5-7 uses cat to demonstrate output redirection. This figure contrasts with Figure 5-3 on page 120, where both standard input and standard output are associated with the keyboard and the screen. The input in Figure 5-7 comes from the keyboard. The redirect output symbol on the command line causes the shell to associate cat's standard output with the sample.txt file specified on the command line. Figure 5-7. cat with its output redirected$ cat > sample.txt This text is being entered at the keyboard and cat is copying it to a file. Press CONTROL-D to indicate the end of file. CONTROL-D $ After giving the command and typing the text shown in Figure 5-7, the sample.txt file contains the text you entered. You can use cat with an argument of sample.txt to display this file. The next section shows another way to use cat to display the file. Caution: Redirecting output can destroy a file I Use caution when you redirect output to a file. If the file exists, the shell will overwrite it and destroy its contents. For more information see the "Redirecting output can destroy a file II" caution on page 126. Figure 5-7 shows that redirecting the output from cat is a handy way to create a file without using an editor. The drawback is that once you enter a line and press RETURN, you cannot edit the text. While you are entering a line, the erase and kill keys work to delete text. This procedure is useful for making short, simple files. Figure 5-8 shows how to use cat and the redirect output symbol to catenate (join one after the otherthe derivation of the name of the cat utility) several files into one larger file. The first three commands display the contents of three files: stationery, tape, and pens. The next command shows cat with three filenames as arguments. When you call it with more than one filename, cat copies the files, one at a time, to standard output. In this case standard output is redirected to the file supply_orders. The final cat command shows that supply_orders contains the contents of all three files. Figure 5-8. Using cat to catenate files$ cat stationery 2,000 sheets letterhead ordered: 10/7/05 $ cat tape 1 box masking tape ordered: 10/14/05 5 boxes filament tape ordered: 10/28/05 $ cat pens 12 doz. black pens ordered: 10/4/05 $ cat stationery tape pens > supply_orders $ cat supply_orders 2,000 sheets letterhead ordered: 10/7/05 1 box masking tape ordered: 10/14/05 5 boxes filament tape ordered: 10/28/05 12 doz. black pens ordered: 10/4/05 Redirecting Standard InputJust as you can redirect standard output, so you can redirect standard input. The redirect input symbol (<) instructs the shell to redirect a command's input to come from the specified file instead of from the keyboard (Figure 5-9). The format of a command line that redirects input is command [arguments] < filename where command is any executable program (such as an application program or a utility), arguments are optional arguments, and filename is the name of the ordinary file the shell redirects the input from. Figure 5-9. Redirecting standard input Figure 5-10 shows cat with its input redirected from the supply_orders file that was created in Figure 5-8 and standard output going to the screen. This setup causes cat to display the sample file on the screen. The system automatically supplies an EOF (end of file) signal at the end of an ordinary file. Figure 5-10. cat with its input redirected$ cat < supply_orders 2,000 sheets letterhead ordered: 10/7/05 1 box masking tape ordered: 10/14/05 5 boxes filament tape ordered: 10/28/05 12 doz. black pens ordered: 10/4/05 Utilities that take input from a file or standard input Giving a cat command with input redirected from a file yields the same result as giving a cat command with the filename as an argument. The cat utility is a member of a class of Mac OS X utilities that function in this manner. Other members of this class of utilities include lpr, sort, and grep. These utilities first examine the command line that you use to call them. If you include a filename on the command line, the utility takes its input from the file you specify. If you do not specify a filename, the utility takes its input from standard input. It is the utility or programnot the shell or operating systemthat functions in this manner. noclobber: Avoids Overwriting FilesThe shell provides a feature called noclobber that stops you from inadvertently overwriting an existing file using redirection. When you enable this feature by setting the noclobber variable and then attempt to redirect output to an existing file, the shell displays an error message and does not execute the command. If the preceding examples result in one of the following messages, the noclobber feature has been set. The following examples set noclobber, attempt to redirect the output from echo into an existing file, and then unset noclobber under bash and tcsh: bash $ set -o noclobber $ echo "hi there" > tmp bash: tmp: Cannot overwrite existing file $ set +o noclobber $ echo "hi there" > tmp $ tcsh tcsh $ set noclobber tcsh $ echo "hi there" > tmp tmp: File exists. tcsh $ unset noclobber tcsh $ echo "hi there" > tmp $ You can override noclobber by putting a pipe symbol (tcsh uses an exclamation point) after the symbol you use for redirecting output (>|). In the following example, the user first creates a file named a by redirecting the output of date to the file. Next the user sets the noclobber variable and tries redirecting output to a again. The shell returns an error message. Then the user tries the same thing but using a pipe symbol after the redirect symbol. This time the shell allows the user to overwrite the file. Finally, the user unsets noclobber (using a plus sign in place of the hyphen) and verifies that it is no longer set. $ date > a $ set -o noclobber $ date > a bash: a: Cannot overwrite existing file $ date >| a $ set +o noclobber $ date > a For more information on using noclobber under tcsh, refer to page 363. Caution: Redirecting output can destroy a file II Depending on which shell you are using and how your environment has been set up, a command such as the following may give you undesired results: $ cat orange pear > orange cat: orange: input file is output file Although cat displays an error message, the shell goes ahead and destroys the contents of the existing orange file. The new orange file will have the same contents as pear because the first action the shell takes when it sees the redirection symbol (>) is to remove the contents of the original orange file. If you want to catenate two files into one, use cat to put the two files into a temporary file and then use mv to rename this third file: $ cat orange pear > temp $ mv temp orange What happens in the next example can be even worse. The user giving the command wants to search through files a, b, and c for the word apple and redirect the output from grep (page 46) to the file a.output. Unfortunately the user enters the filename as a output, omitting the period and inserting a SPACE in its place: $ grep apple a b c > a output grep: output: No such file or directory The shell obediently removes the contents of a and then calls grep. The error message may take a moment to appear, giving you a sense that the command is running correctly. Even after you see the error message, it may take a while to realize that you destroyed the contents of a. Caution: Redirection works with the data fork of a file only Redirecting output from a command works only with the data fork of a file and not with the resource fork (page 93). For example, under Mac OS X 10.4 and later the following command copies both the resource and data forks of the file pic.jpg: $ cp pic.jpg pic.bak.jpg The next command copies only the data fork of the file: $ cp < pic.jpg > pic.bak.jpg Appending Standard Output to a FileThe append output symbol (>>) causes the shell to add new information to the end of a file, leaving any existing information intact. This symbol provides a convenient way of catenating two files into one. The following commands demonstrate the action of the append output symbol. The second command accomplishes the catenation described in the preceding caution box: $ cat orange this is orange $ cat pear >> orange $ cat orange this is orange this is pear You first see the contents of the orange file. Next the contents of the pear file is added to the end of (catenated with) the orange file. The final cat shows the result. Caution: Do not trust noclobber Appending output is simpler than the two-step procedure described in the preceding caution box but you must be careful to include both greater than signs. If you accidentally use only one and the noclobber feature is not on, you will overwrite the orange file. Even if you have the noclobber feature turned on, it is a good idea to keep backup copies of files you are manipulating in these ways in case you make a mistake. Although it protects you from making an erroneous redirection, noclobber does not stop you from overwriting an existing file using cp or mv. These utilities include the -i (interactive) option that helps protect you from this type of mistake by verifying your intentions when you try to overwrite a file. For more information see the "cp can destroy a file" tip on page 44. The next example shows how to create a file that contains the date and time (the output from date), followed by a list of who is logged in (the output from who). The first line in Figure 5-11 redirects the output from date to the file named whoson. Then cat displays the file. Next the example appends the output from who to the whoson file. Finally cat displays the file containing the output of both utilities. Figure 5-11. Redirecting and appending output$ date > whoson $ cat whoson Wed May 4 13:46:33 CDT 2005 $ who >> whoson $ cat whoson Wed May 4 13:46:33 CDT 2005 zach console May 2 12:39 zach ttyp2 May 3 03:32 /dev/null: Making Data DisappearThe /dev/null device is a data sink, commonly referred to as a bit bucket. You can redirect output that you do not want to keep or see to /dev/null. The output disappears without a trace: $ echo "hi there" > /dev/null $ When you read from /dev/null, you get a null string. Give the following cat command to truncate a file named messages to zero length while preserving the ownership and permissions of the file: $ ls -l messages -rw-r--r-- 1 alex alex 25315 Oct 24 10:55 messages $ cat /dev/null > messages $ ls -l messages -rw-r--r-- 1 alex alex 0 Oct 24 11:02 messages PipesThe shell uses a pipe to connect standard output of one command directly to standard input of another command. A pipe (sometimes referred to as a pipeline) has the same effect as redirecting standard output of one command to a file and then using that file as standard input to another command. A pipe does away with separate commands and the intermediate file. The symbol for a pipe is a vertical bar (|). The syntax of a command line using a pipe is command_a [arguments] | command_b [arguments] The preceding command line uses a pipe to generate the same result as the following group of command lines: command_a [arguments] > temp command_b [arguments] < temp rm temp In the preceding sequence of commands, the first line redirects standard output from command_a to an intermediate file named temp. The second line redirects standard input for command_b to come from temp. The final line deletes temp. The command using a pipe is not only easier to type, but is generally more efficient because it does not create a temporary file. tr You can use a pipe with any of the Mac OS X utilities that accept input either from a file specified on the command line or from standard input. You can also use pipes with commands that accept input only from standard input. For example, the tr (TRanslate) utility (page 879) takes its input from standard input only. In its simplest usage TR has the following format: tr string1 string2 The tr utility accepts input from standard input and looks for characters that match one of the characters in string1. Upon finding a match, TR translates the matched character in string1 to the corresponding character in string2. (The first character in string1 translates into the first character in string2, and so forth.) The TR utility sends its output to standard output. In both of the following examples, tr displays the contents of the abstract file with the letters a, b, and c translated into A, B, and C, respectively: $ cat abstract | tr abc ABC $ tr abc ABC < abstract The tr utility does not change the contents of the original file; it cannot change the original file because it does not "know" the source of its input. lpr The lpr (line printer) utility also accepts input from either a file or standard input. When you type the name of a file following lpr on the command line, it places that file in the print queue. When you do not specify a filename on the command line, lpr takes input from standard input. This feature enables you to use a pipe to redirect input to lpr. The first set of commands in Figure 5-12 shows how you can use ls and lpr with an intermediate file (temp) to send a list of the files in the working directory to the printer. If the temp file exists, the first command overwrites its contents. The second set of commands sends the same list (with the exception of temp) to the printer using a pipe. Figure 5-12. A pipe$ ls > temp $ lpr temp $ rm temp or $ ls | lpr The commands in Figure 5-13 redirect the output from the who utility to temp and then display this file in sorted order. The sort utility (page 49) takes its input from the file specified on the command line or, when a file is not specified, from standard input and sends its output to standard output. The sort command line in Figure 5-13 takes its input from standard input, which is redirected (<) to come from temp. The output that sort sends to the screen lists the users in sorted (alphabetical) order. Figure 5-13. Using a temporary file to store intermediate results$ who > temp $ sort < temp max ttyp1 May 4 13:49 (localhost) sam ttyp3 May 4 13:49 (localhost) zach console May 2 12:39 zach ttyp2 May 3 03:32 $ rm temp Because sort can take its input from standard input or from a filename on the command line, omitting the < symbol from Figure 5-13 yields the same result. Figure 5-14 achieves the same result without creating the temp file. Using a pipe the shell redirects the output from who to the input of sort. The sort utility takes input from standard input because no filename follows it on the command line. Figure 5-14. A pipe doing the work of a temporary file$ who | sort max ttyp1 May 4 13:49 (localhost) sam ttyp3 May 4 13:49 (localhost) zach console May 2 12:39 zach ttyp2 May 3 03:32 When many people are using the system and you want information about only one of them, you can send the output from who to grep (page 46) using a pipe. The grep utility displays the line containing the string you specifyroot in the following example: $ who | grep 'root' root console Mar 24 05:00 Another way of handling output that is too long to fit on the screen, such as a list of files in a crowded directory, is to use a pipe to send the output through less (see page 42). $ ls | less The less utility displays text one screen at a time. To view another screen, press the SPACE bar. To view one more line, press RETURN. Press h for help and q to quit. FiltersA filter is a command that processes an input stream of data to produce an output stream of data. A command line that includes a filter uses a pipe to connect standard output of one command to the filter's standard input. Another pipe connects the filter's standard output to standard input of another command. Not all utilities can be used as filters. In the following example, sort is a filter, taking standard input from standard output of who and using a pipe to redirect standard output to standard input of lpr. This command line sends the sorted output of who to the printer: $ who | sort | lpr The preceding example demonstrates the power of the shell combined with the versatility of Mac OS X utilities. The three utilities who, sort, and lpr were not specifically designed to work with each other, but they all use standard input and standard output in the conventional way. By using the shell to handle input and output, you can piece standard utilities together on the command line to achieve the results you want. Caution: Filters do not process resource forks Filters work on a stream of data, so a utility that runs as a filter will not process resource forks (page 93). The following command creates a partial copy of file, without the resource fork: $ cat < file > copy_of_file tee: Sends Output in Two DirectionsThe tee utility copies its standard input both to a file and to standard output. The utility is aptly named: It takes a single input and sends the output in two directions. In Figure 5-15 the output of who is sent via a pipe to standard input of tee. The tee utility saves a copy of standard input in a file named who.out and also sends a copy to standard output. Standard output of tee goes via a pipe to standard input of grep, which displays lines containing the string sam. Figure 5-15. Using tee$ who | tee who.out | grep sam sam ttyp3 May 4 13:49 (localhost) $ cat who.out max ttyp1 May 4 13:49 (localhost) sam ttyp3 May 4 13:49 (localhost) zach console May 2 12:39 zach ttyp2 May 3 03:32 |
EAN: 2147483647
Pages: 234