Client-Side Code Examples
Now that you understand the framework and the details about the Microsoft CRM client-side SDK, we want to get into the fun of coding examples and real-world usage of these features. We have included a variety of script samples for reference and to provide a starting point for your own customization needs. The following examples are just a sampling of the many ways in which you can integrate custom logic by using the information in the client-side SDK:
-
Formatting and translating U.S. phone numbers
-
Referencing an external script file
-
Dynamically changing picklist values
-
Setting a default phone call subject
-
Allowing multi-select lists
-
Adding custom validation
-
Saving an IFrame form from Microsoft CRM
-
Automatically populating a phone number on the Phone Call activity
Formatting and Translating U.S. Phone Numbers
You can add the following script to the onChange event of any field used for a phone number. The script will automatically format any 7- or 10-digit number as 555–1212 or (312) 555–1212. In addition, it will translate a phone number entered as letters to its numeric equivalent; for example, if the user entered 866-555CODE the script would convert the letters in the phone number to (866) 555-2633.
Figure 10-14 shows an example phone number entered by a user.
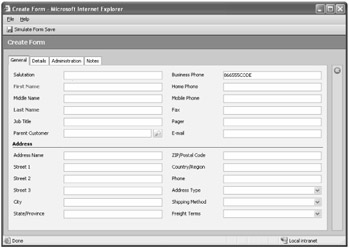
Figure 10-14: A phone number on the Contact form as entered by a user
Figure 10-15 shows how the script will translate the Business Phone entry as soon as the user changes focus on the phone number field.
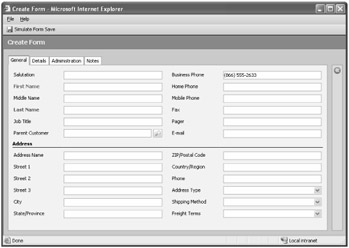
Figure 10-15: The translated and formatted phone number
The script fires as soon as the user enters a phone number and their cursor exits the field (either by clicking elsewhere on the form or by pressing the Tab key). This is referred to as losing focus, or changing focus. When fired, the script first takes the entered text and removes any special characters. It then passes the first 10 characters of the modified text through a translation function that exchanges any letters for their equivalent phone digits. Finally, it takes that result, formats it, and assigns it back to the field. To account for the possibility of people entering extensions, the script will just output any characters after the 10th digit as they were entered. Listing 10-2 shows the phone number formatting script.
Listing 10-2: Formatting and Translating U.S. Phone Numbers
/* Installation: Add this script to onChange event of any phone number field. Description: This method will auto-format basic 7 and 10 digit US phone numbers, while leaving any extensions. It will also translate any letters in the input to its equivalent phone digit. Example: (800) 555–1212 */ // Get the field that fired the event var oField = event.srcElement; // Verify that the field is valid if (typeof(oField) != "undefined" && oField != null) { if (oField.DataValue != null) { // Remove any special characters var sTmp = oField.DataValue.replace(/[^0-9,A-Z,a-z]/g, ""); // Translate any letters to the equivilant phone number, if method is included try { if (sTmp.length <= 10) { sTmp = TranslateMask(sTmp); } else { sTmp = TranslateMask(sTmp.substr(0,10)) + sTmp.substr(10,sTmp.length); } } catch(e) { } // If the number is a length we expect and support, // format the translated number switch (sTmp.length) { case 1: case 2: case 3: case 4: case 5: case 6: case 8: case 9: break; case 7: oField.DataValue = sTmp.substr(0, 3) + "-" + sTmp.substr(3, 4); break; case 10: oField.DataValue = "(" + sTmp.substr(0, 3) + ") " + sTmp.substr(3, 3) + "-" + sTmp.substr(6, 4); break; default: oField.DataValue = "(" + sTmp.substr(0, 3) + ") " + sTmp.substr(3, 3) + "-" + sTmp.substr(6, 4) + " " + sTmp.substr(10,sTmp.length); break; } } } /// <summary> /// TranslateMask() will step through each character of an /// input string and pass that character to the /// TranslatePhoneLetter() helper method /// </summary> /// <param name="s">Input string to translate</param> function TranslateMask(s) { var ret = ""; //loop through each char, and pass it to the translation method for (var i=0; i<s.length; i++) { ret += TranslatePhoneLetter(s.charAt(i)) } return ret; } /// <summary> /// TranslatePhoneLetter() takes a character and returns the /// equivalent phone number digit if it is alphanumeric /// </summary> /// <param name="s">Character to translate</param> function TranslatePhoneLetter(s) { var sTmp = s.toUpperCase(); var ret = s; switch(sTmp) { case "A": case "B": case "C": ret = 2; break; case "D": case "E": case "F": ret = 3; break; case "G": case "H": case "I": ret = 4; break; case "J": case "K": case "L": ret = 5; break; case "M": case "N": case "O": ret = 6; break; case "P": case "Q": case "R": case "S": ret = 7; break; case "T": case "U": case "V": ret = 8; break; case "W": case "X": case "Y": case "Z": ret = 9; break; default: ret = s; break; } return ret; }
Referencing an External Script File
As we discussed earlier, you can add code against the form's onLoad event that references an external script file. The main reason to do this would be for ease of script administration and code reuse. For example, if we added the phone number formatting script from the previous example to 20 or 30 different phone number fields in the Lead, Account, and Contact entities and then we needed to modify the script, we would have to manually update the script in all 20 to 30 locations. Referencing an external script will save you this headache because you would only need to make one update. However, we only recommend using this technique in your development environment. Microsoft doesn't support referencing an external script for the following reasons:
-
No offline capabilities If a user goes offline, the reference to the script file will be severed, breaking any routines that use the functions in the reference script.
-
Deployment difficultiesy Script code added directly to the events can be deployed with the built-in import/export mechanisms. By referencing an external file, you will be responsible for deployment and updating the references in the Microsoft CRM form events.
-
Access issues When referencing a file on an external Web site, if that site is not available or if there is a delay in loading the file, the required methods might not be available to your code and cause errors.
| Note | Adding files to the Microsoft CRM Web site file structure is prohibited and unsupported by Microsoft. Instead, you should create a virtual Web that accesses a file system directory outside the installation root of Microsoft CRM, as shown in the previous IFrame example. This allows you to add custom files to the Microsoft CRM Web server. |
The code shown in Listing 10-3 will allow you to use DHTML to add an external script reference. You will need to update the url variable with the proper path to your script file and then add the script to the form's onLoad event.
Listing 10-3: Referencing an External Script File
/* Installation: Update the url variable with the correct path to your script file. Add this script to the form's onLoad() event. Description: This will add the defined URL as an external script reference within the head tag of the page. */ // Define your script URL var url = "http://<crmserver>/custom/lib/script.js"; // Create the script element var obj = new Object(); obj = document.createElement("<script src='/books/3/159/1/html/2/" + url + "' language='javascript'>"); // Get the head node from the document stream var arr = new Array(); arr = document.getElementsByTagName("head"); // Insert our new script element into the node set arr[0].insertAdjacentElement("beforeEnd",obj); | Note | Adding the following snippet directly to the onLoad event will not work: <script language="JavaScript" src="/books/3/159/1/html/2/http://<crmserver>/custom/lib/script.js"></script> The manner by which Microsoft CRM injects the onLoad script code to the form's output prevents this line from executing. |
Dynamically Changing Picklist Values
The default behavior of picklist attributes in Microsoft CRM is that each field operates totally independent of other values on the form. In reality, you might want to dynamically alter the picklist values of a record based on other values selected in the record. For example, if the user selects that a Contact's shipping method is Will Call, it doesn't make sense to let the user select FOB (Freight on Board) as the Freight Terms for that Contact.
This example will show how you can dynamically change values of the Freight Terms picklist field based on the selection of the Shipping Method picklist. If the user selects Will Call as the shipping method, we will use the client-side SDK to programmatically remove the FOB (Freight on Board) option from the Freight Terms list and automatically set the option to Free of Charge. If the user then changes the Shipping Method to a new value, we must programmatically add the FOB (Freight on Board) option back to the Freight Terms list.
| Tip | You can use the code and concepts from this example to extend your company's Microsoft CRM deployment to dynamically update different sets of picklist values depending on the needs of your organization. |
As you saw earlier, Microsoft CRM provides two routines for managing picklist options: AddOption() and DeleteOption(). We will use DeleteOption() to remove the FOB option when Will Call is selected. When any other value is selected, we will add the FOB option (if it has been removed). This example will demonstrate how you would access and work with picklist fields. Figure 10-16 shows the results on the form.
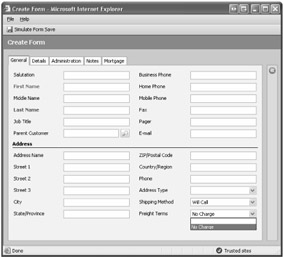
Figure 10-16: Form preview of Shipping Method picklist script
| Caution | You should not programmatically add options to a picklist that do not exist in Microsoft CRM. Technically, you can add any name/value option with the AddOption() method, but if the value has not been configured through the form customization, Microsoft CRM will not be able to display it correctly on the form. |
For this example, you will need to add code to the address1_shippingmethodcode field's onChange event. You must also add similar to code to the contact form's onLoad event for the form's update mode, to address update situations in which Will Call is already selected. The script for this example can be found in Listing 10-4.
Listing 10-4: Dynamically Changing Picklist Values
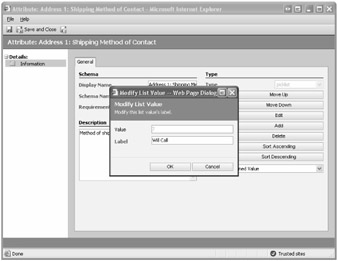
/* Installation: Add this script to the contact address1_shippingmethodcode field's onChange() event. Description: This script will remove the FOB option from the Freight Terms picklist if shipping method is Will Call. */ // Set up our picklist constants // Ensure that these match the codes in CRM var SHIPPINGMETHODCODE_WILLCALL = 7; var FREIGHTTERMSCODE_FOB = 1; var FREIGHTTERMSCODE_NOCHARGE = 2; // Gather our field references var oShipMethod = event.srcElement; var oFreightTerms = crmForm.all.address1_freighttermscode; var freightTerms = oFreightTerms.Options var fobExists = false; // Loop through existing options and determine whether the FOB option exists for (var i=0; i<freightTerms.length; i++) { if (freightTerms[i].DataValue == FREIGHTTERMSCODE_FOB) fobExists = true; } if (oShipMethod.DataValue == SHIPPINGMETHODCODE_WILLCALL) { // Default to No Charge oFreightTerms.DataValue = FREIGHTTERMSCODE_NOCHARGE; // Remove FOB as an option oFreightTerms.DeleteOption(FREIGHTTERMSCODE_FOB); } else { // Default to blank oFreightTerms.DataValue = null; // If the FOB option is missing, add it back if (! fobExists) oFreightTerms.AddOption("FOB",FREIGHTTERMSCODE_FOB); } /* ------------------------------------------------------- */ /* Installation: Add this script to the contact form's onLoad() event. Description: This script will remove the FOB option if shipping method is Will Call. */ // Set up our constants var CRM_FORM_TYPE_CREATE = "1"; var CRM_FORM_TYPE_UPDATE = "2"; // Set up our picklist constants // Ensure that these match the codes in CRM var SHIPPINGMETHODCODE_WILLCALL = 7; var FREIGHTTERMSCODE_FOB = 1; var FREIGHTTERMSCODE_NOCHARGE = 2; // Only check if form is in update mode if (crmForm.FormType == CRM_FORM_TYPE_UPDATE) { if (document.crmForm.all.address1_shippingmethodcode.DataValue == SHIPPINGMETHODCODE_WILLCALL) { // Remove FOB as an option document.crmForm.all.address1_freighttermscode.DeleteOption(FREIGHTTERMSCODE_FOB); } } | Tip | When you need to find the value of a picklist item, navigate to the entity's Attributes page. Double-click the picklist attribute. On the right, you will see the list of options. Double-click an option name, and a dialog box displays the corresponding value, as shown in Figure 10-17. |
Setting a Default Phone Call Subject
Another clever use of the client-side SDK and picklists allows users to select a picklist value that will automatically update another field (or fields) with predefined values. This type of customization would save sales people time if you applied it to the Phone Call activity form. When the sales person needs to make a large number of phone calls, they could just select a picklist value that will update the subject of the Phone Call activity, instead of having to manually type it for each call they make.
To implement this, we will create a new picklist attribute on the Phone Call entity called Call Type, and our client-side script will automatically populate the Subject and Category boxes with default values based on the Call Type value the user selects in the picklist. We will also use client-side script to set the Duration field to blank (instead of the default 30 minutes).
This script will also demonstrate how you can programmatically access lookup fields such as the Recipient field on the Phone Call activity form. In addition to populating the Phone Call subject with the Call Type text, the script will automatically append the name(s) of the call recipient(s) after the Call Type text (Figure 10-18). We will retrieve the call recipient values from the to (Recipient) field. Since a Phone Call can include multiple recipients, Microsoft CRM passes the data from the lookup DataValue property as an array of values.
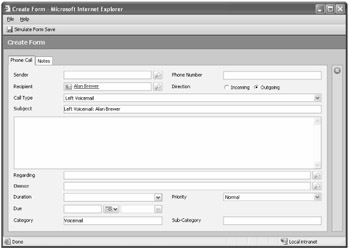
Figure 10-18: Phone Call form
As you have now done numerous times, you must first create the new Call Type picklist attribute.
Setup
-
Browse to the Customizations section of Microsoft CRM and double-click the Phone Call entity. Click Attributes in the navigation pane.
-
Create a picklist attribute called calltype (new_calltype).
-
Enter Call Type for the display name.
-
Add the following values in order:
-
Left Voicemail
-
No Answer
-
Requested Information
-
Wrong Number
-
Requested Call Back
-
Left Message with Operator
-
-
Leave the default value as Unassigned Value.
After you create the new attribute, you must add it to the form, as shown in Figure 10-18. Then you'll need to apply two scripts in Listing 10-5 to the Phone Call entity; the first will be applied to the new_calltype onChange event, and the second will be applied to the form's onLoad event.
Listing 10-5: Setting a Default Phone Call Subject
/* Installation: Add this script to the new_callresult field's onChange() event. Description: This script will populate the subject and category based on the selection of the new_callresult selection. */ // Set up our constants /* new_callresult picklist values: 1 Left Voicemail 2 No Answer 3 Requested Information 4 Wrong Number 5 Requested Call Back 6 Left Message with Operator */ var aCategory = ["","Voicemail","No Answer","Info Request","Wrong Number","Call Back", "Message"]; // Gather our field references var oCallResult = event.srcElement; var oRecipient = document.crmForm.all.to; var oCategory = document.crmForm.all.category; var oSubject = document.crmForm.all.subject; // Ensure that we have a valid, populated element if (typeof(oCallResult) != "undefined" && oCallResult != null) { var toName = ""; if (oRecipient.DataValue != null) { // The lookup field contains an array of values var aTo = new Array(); aTo = oRecipient.DataValue; // Loop through and create a user list for (var i=0; i<aTo.length; i++) { // Create a comma separated list of receipient names toName += (i==0) ? aTo[i].name : ", " + aTo[i].name; } } // Set defaults based on call result selection oCategory.DataValue = aCategory[oCallResult.DataValue]; oSubject.DataValue = oCallResult.SelectedText + ": " + toName; } /* -------------------------------------------------------*/ /* Installation: Add this script to the Phone Call form's onLoad() event. Description: This script will default the Duration field to blank. */ document.crmForm.all.actualdurationminutes.DataValue = null;
Allowing Multi-Select Lists
Microsoft CRM does not natively allow for multi-select lists. Picklist values allow you to select one value only. However, we can enhance the previous picklist example to create a simple workaround for this situation.
We will use the Case entity form for this example. We will create two new attributes called Problem Category (a read-only ntext field) and Problem Category List (a picklist containing different problem types). When a user selects a picklist value from the Problem Category List, we will append that value in the Problem Category box. This will allow our service representative to classify a case's problem under multiple pre-set categories. Because we want only our predefined categories to be selected, we will disable the Problem Category field on the form, preventing users from entering text. Figure 10-19 shows what the resulting form looks like when filled with multiple categories.
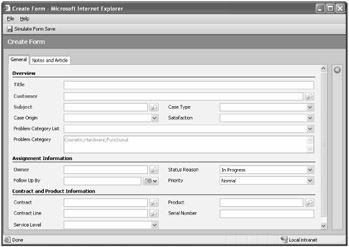
Figure 10-19: Multiple problem categories selected
Since this field is read-only, we will also create a custom picklist value called Clear Selections that removes any entries from the list. The prompt to clear selections is shown in Figure 10-20.
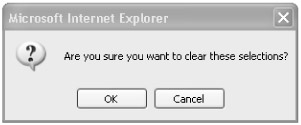
Figure 10-20: Prompt to clear selections
| Note | You might think adding problem categories to a Case is somewhat redundant because the default Case form requires you to choose a subject. However, Microsoft CRM doesn't allow you to select multiple subjects for a single Case so this solution is a decent workaround if you need to track multiple problem categories. Even if you don't need this particular feature, the request to select multiple values from a picklist is something we hear often from customers, so hopefully you can imagine how to extend it to other areas. You might also recognize that storing and reporting on string values is not a preferred programmatic method, because those values can change and then adversely affect your report groupings. However, while this solution isn't perfect, this workaround is clearly better for reporting than using a free-form text field. |
Setup
-
Browse to the Customizations section of Microsoft CRM and double-click the Case entity. Click Attributes in the navigation pane.
-
Create a picklist attribute called problemcategorylist (new_problemcategorylist) for the Case entity.
-
Enter Problem Category List for the display name.
-
Add the following values in order:
-
-- Clear Selections --
-
Cosmetic
-
Functional
-
Hardware
-
User Error
-
-
Leave the default value as Unassigned Value.
-
Create an ntext attribute called problemcategory (new_ problemcategory).
-
Enter Problem Category for the display name.
-
Add both fields to the form.
-
Add the code from Listing 10-6 to the new_problemcategorylist field's onChange event.
Listing 10-6: Allowing Multi-Select Lists

/* Installation: Add this script to the Case new_problemcategorylist field's onChange() event. Description: This script will concaten ate any values in the category list to the Category textarea. If "-- Clear Selections --" is chosen, it will blank out any existing selections. */ // Set up our constants var NEW_PROBLEMCATEGORYLIST_CLEAR = 1; // Gather our field references var oProblemCategoryList = event.srcElement; var oProblemCategory = crmForm.all.new_problemcategory; // If the "-- Clear Selections --" option is selected if (oProblemCategoryList.DataValue == NEW_PROBLEMCATEGORYLIST_CLEAR) { // Ask the user if they want to clear their selections var bConfirm = false; bConfirm = confirm("Are you sure you want to clear these selections?"); if (bConfirm) { // Set the category field to blank, and null out the picklist oProblemCategory.DataValue = ""; oProblemCategoryList.DataValue = null; // Since the field is disabled, force a new submission on updates oProblemCategory.ForceSubmit = true; } } else { // If valid if (typeof(oProblemCategory) != "undefined" && oProblemCategory != null) { // Get the current category text var categoryText = (oProblemCategory.DataValue == null) ? "" : oProblemCategory.DataValue; // Get the current picklist option and determine whether it already exists in the selected text var selectedCategory = oProblemCategoryList.SelectedText; var testStr = new RegExp(selectedCategory, "g"); var isIncluded = categoryText.match(testStr); // If not, append it to the value if (! isIncluded) categoryText += (categoryText.length == 0) ? selectedCategory : ";" + selectedCategory; // Reset the category list, add string back to the category field oProblemCategoryList.DataValue = null; oProblemCategory.DataValue = categoryText; // Since the field is disabled, force a new submission on updates oProblemCategory.ForceSubmit = true; } }
-
Select the Disabled on form check box on the Problem Category field after you add it to the form. This prevents users from entering their own categories so that the field can be used for reporting.
-
Save the form, and then publish the Case entity.
Adding Custom Validation
For each attribute in Microsoft CRM, you specify a data type and a requirement level of No Constraint, Business Recommended, or Business Required. Microsoft CRM will automatically validate required fields and make sure that the user input matches the data type for each field (for example, it ensures that numbers are entered in an integer field). However, you will probably run across scenarios where you want to include additional input validation such as conditionally requiring a field based on the selection of another field, or you might want to validate the formatting of an e-mail address. Let's examine these scenarios.
Conditionally Setting Required Fields
We will use our updated Case form for this example. If a user selects Problem for the Case Type, we want to make the Case Origin field and our new Problem Category required. But since we don't always want these fields required, we could not just modify the Requirement Level of those two attributes. The easiest way to accomplish our business goal is to programmatically set the requirement level of the fields to Business Required by using the CRM form's SetFieldReqLevel method. This method will change the field label to red and provide automatic validation on enabled fields (see Figure 10-21).
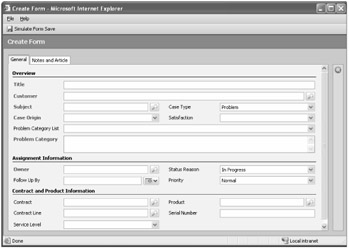
Figure 10-21: Required fields set from code
However, the Microsoft CRM Requirement Level validation does not apply to disabled fields. So even though we set the Problem Category field to a Requirement Level of Business Required, Microsoft CRM won't check this field on save since it's disabled. Therefore, we must implement our own field validation. Figure 10-22 displays the custom error prompt that users will see if they attempt to save without selecting a problem category.
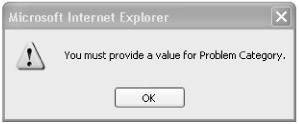
Figure 10-22: Custom error prompt
This example requires the custom code in Listing 10-7 to be applied appropriately to all of the available events (onLoad, onSave, and onChange) to properly accomplish this task. Note the following key points from this sample:
-
Use crmForm.SetFieldReqLevel to programmatically set the requirement level of a field.
-
crmForm.SetFieldReqLevel is not currently supported and may not be available in future releases.
-
Microsoft CRM does not validate disabled fields. You must do this manually in the onSave event.
-
If you want to cancel a save in the onSave event, use the following: event.returnValue = false;
Listing 10-7: Conditionally Setting Required Fields
/* Installation: Add this script to the Case casetypecode field's onChange() event. Description: This script will determine whether "Problem" is selected as the case type, and if so, force the Problem Category and Case Origin fields to be required. */ // Set up our constants var CASETYPECODE_PROBLEM = "2"; // Gather our field references var oCaseTypeCode = event.srcElement; // Set up a switch statement to allow for additional options to be added switch (oCaseTypeCode.DataValue) { case CASETYPECODE_PROBLEM: crmForm.SetFieldReqLevel("new_problemcategory", true); crmForm.SetFieldReqLevel("caseorigincode", true); break; default: crmForm.SetFieldReqLevel("new_problemcategory", false); crmForm.SetFieldReqLevel("caseorigincode", false); break; } /* ------------------------------------------------------- */ /* Installation: Add this script to the Case form's onLoad() event. Description: This script will determine whether "Problem" is selected as the case type, and if so, force the Problem Category and Case Origin fields to be required. */ // Set up our constants var CASETYPECODE_PROBLEM = 2; // Gather our field references var oCaseTypeCode = document.crmForm.all.casetypecode; // Set up a switch statement to allow for additional options to be added switch (oCaseTypeCode.DataValue) { case CASETYPECODE_PROBLEM: crmForm.SetFieldReqLevel("new_problemcategory", true); crmForm.SetFieldReqLevel("caseorigincode", true); break; default: crmForm.SetFieldReqLevel("new_problemcategory", false); crmForm.SetFieldReqLevel("caseorigincode", false); break; } /* ------------------------------------------------------- */ /* Installation: Add this script to the Case form's onSave() event. Description: This script will determine whether "Problem" is selected as the case type, and if so, force the Problem Category and Case Origin fields to be required. Since the Problem Category field is a disabled field, we need to manually validate the field. */ // Set up our constants var CRM_REQUIRED_LEVEL_REQUIRED = 2; // Gather our field references var oProblemCategory = document.crmForm.all.new_problemcategory; // Catch if Problem Category is null and required if ((oProblemCategory.RequiredLevel == CRM_REQUIRED_LEVEL_REQUIRED) && (oProblemCategory .DataValue == null)) { // Display error message to user alert("You must provide a value for Problem Category."); // Return false, preventing the form from saving event.returnValue = false; }
Validating an E-Mail Address Format
The custom validation script in this sample ensures that an e-mail address is entered in the proper format. (It will not check to determine whether it is a valid e-mail address, although that could be done, too.) We will pass the text entered into the e-mail address field through a simple regular expression, alerting the user that the entry does not appear to be valid. We will also add a check to the onSave routine to prevent the form from being saved if the user does not correct the e-mail address. For this sample, we will use the Account form, checking the emailaddress1 field with the routine shown in Listing 10-8.
Listing 10-8: Validating an E-Mail Address Format
/* Installation: Add this script to the onChange event of any e-mail address field. Description: This script will ensure that an e-mail address is in a proper format. */ // Gather our field references var oEmailAddress1 = document.crmForm.all.emailaddress1; // Remove any non-e-mail address characters var sCleanedEmailAddress = oEmailAddress1.DataValue.replace(/[^0-9,A-Z,a-z,\@,\.]/g, ""); var regexEmail = /^.+@.+\..{2,3}$/; // Test the cleaned email string against the email regular expression if ((regexEmail.test(sCleanedEmailAddress))) { oEmailAddress1.DataValue = sCleanedEmailAddress; } else { // Display error message to user alert("The Email Address appears to be invalid. Please correct."); } /* ------------------------------------------------------- */ /* Installation: Add this script to the onSave event of any form containing an e-mail address field. Description: This script will ensure that an e-mail address is in a proper format. */ // Gather our field references var oEmailAddress1 = document.crmForm.all.emailaddress1; // Ensure that we have a value if (oEmailAddress1.DataValue != null) { // Remove any non-e-mail address characters var sCleanedEmailAddress = oEmailAddress1.DataValue.replace(/[^0–9,A–Z,a–z,\@,\.]/g, ""); var regexEmail = /^.+@.+\..{2,3}$/; // Test the cleaned email string against the email regular expression if (! (regexEmail.test(sCleanedEmailAddress))) { // Display error message to user alert("The Email Address appears to be invalid. Please correct."); // Return false, preventing the form from saving event.returnValue = false; } }
Saving an IFrame Form from Microsoft CRM
Earlier in this chapter, you saw how to add a custom Web page to the Microsoft CRM form though the IFrame element. This sample will show you how to initiate (or submit) a postback on your custom page inside the IFrame with the save buttons of the Microsoft CRM form by using the new onSave event.
In earlier versions of Microsoft CRM, which lacked the onSave event, developers were forced to create separate navigation pages. This resulted in a less-than-ideal user interface experience for end users. The technique demonstrated in this example allows for your custom pages to write data to different systems (or even Microsoft CRM through the provided Web services, if needed) from within the main Microsoft CRM form. This simplified user experience allows the user to just click Save once, and then the code will automatically transmit the appropriate submissions to the various Web pages.
In this example, we will take a basic .NET Web Form and reference it from the Case form by using an IFrame, as shown in Figure 10-23.
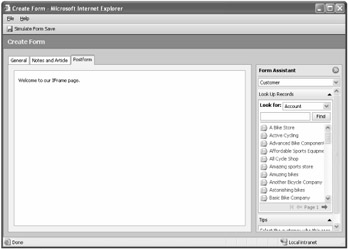
Figure 10-23: Custom .NET page referenced from Microsoft CRM
Then we will use the onSave event to initiate a postback to the .NET form when the user clicks one of the native CRM save buttons. For the purposes of this example, we will simply display text stating that the custom page was submitted, as shown in Figure 10-24.
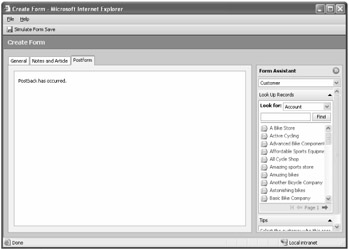
Figure 10-24: Successful postback of custom .NET page from Microsoft CRM
| Important | For this to work, you must enable cross-frame scripting and have the target page on the same domain and referenced with the same protocol as the user accessing Microsoft CRM. For more information, see the discussion earlier in this chapter regarding IFrame security. |
Server-Side Setup
-
Create the postform.aspx page, shown in the following code:
<%@ Page Language="C#" %> <!doctype html public "-//w3c//dtd xhtml 1.0 transitional//en" "http://www.w3.org/tr/ xhtml1/dtd/xhtml1-transitional.dtd"> <script runat="server"> protected void Page_Load(object sender, EventArgs e) { if (Page.IsPostBack) { lblDisplay.Text = "Postback has occurred."; } else { lblDisplay.Text = "Welcome to our IFrame page."; } } </script> <html> <head runat="server" > <title>Postback Page</title> <style>body { font-family:Tahoma;font-size:8pt; }</style> </head> <body> <form runat="server"> <asp:Label runat="server" /> </form> </body> </html> -
Copy this page to your workingwithcrm virtual directory on the Microsoft CRM Web server. Note that we are reusing the workingwithcrm virtual Web explained in the book's Introduction.
Client-Side Setup
-
Add a new tab and section to the case form called Postform.
-
Using the same steps from the IFrame section, add an IFrame called postform and, for the Url field, enter the Web path to your postform.aspx page. Don't forget to uncheck the Restrict cross-frame scripting check box.
-
Add the following code to the form's onSave event:
document.frames("IFRAME_postform").document.crmForm.submit();
Automatically Populating a Phone Number on the Phone Call Activity
When you are creating a new Phone Call activity from scratch, it would be helpful to have the phone number of the sender or recipient, depending on the call direction, automatically populated in the phone number field; this would save you the effort of having to click the record to retrieve it. Microsoft CRM does not provide this feature natively, but it can easily be added by clever use of code from both the client and server APIs. This example will use both the client-side scripting techniques demonstrated in the previous samples and a C# Web service using the Microsoft CRM CrmService Web service. Our Web service will interact with Microsoft CRM to retrieve the phone number of the first person selected (recipient for outgoing calls and sender for incoming calls) and pass the result back to our client script for display, as shown in Figure 10-25. Please refer to Chapter 9 for detailed information regarding the use of server-side code with Microsoft CRM.
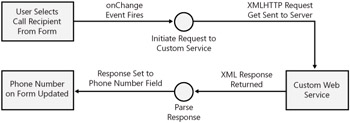
Figure 10-25: Diagram of a Web service call
This example also introduces the XMLHTTP commands, which will call the Web service and parse its results. This technique provides an excellent mechanism for allowing your client scripts to communicate with outside services and systems. To allow these commands, we need to allow the virtual Web to accept the Get and Post protocols for a Web service. This can be done by updating the Web.config file's <system.web> node located in your workingwithcrm virtual Web with the following:
<webServices> <protocols> <add name="HttpGet"/> <add name="HttpPost"/> </protocols> </webServices>
Similar to the IFrame, this example will not work off-line. The user will need to be online when accessing the phone call activity page in order for the auto-populating phone number to work. The next code sample (Listing 10-9) shows the client side script you will apply to the onChange event of the Recipient and Sender attributes on the phone call activity form.
Listing 10-9: Automatically Populating a Phone Number on the Phone Call Activity
/* Installation: Update the url variable with the appropriate path to the web service. Add this script to the onChange() event for the phone call Recipient and Sender fields. Description: This script will use the first recipient selected and auto-populate the phone number. */ // Update with the path to your web service var url = "http://<crmserver>/workingwithcrm/phonenumber.asmx/RetrieveContact"; // Set up our bit constants // Ensure that these match the codes in CRM var DIRECTIONCODE_INCOMING = 0; // Gather our field references var oSender = document.crmForm.all.from; var oRecipient = document.crmForm.all.to; var oPhoneNumber = document.crmForm.all.phonenumber; var oDirection = document.crmForm.all.directioncode; // Determine whether the phone call is incoming or outgoing // Incoming (0): use sender; Outgoing (1): use recipient; var oField = (oDirection == DIRECTIONCODE_INCOMING) ? oSender : oRecipient; if (oField.DataValue != null) { // The lookup field contains an array of values var aPerson = new Array(); aPerson = oField.DataValue; // Get the values from the first record var sId = aPerson[0].id; var sObjectTypeCode = aPerson[0].type; // Remove the braces from the GUID sId = sId.replace(/[{,}]/g, ""); } // Leave the phone number blank if there are any errors from our service call try { // Use XMLHTTP connection to Web server containing SDK code to retrieve the phone number var oXmlHTTP = new ActiveXObject("Msxml2.XMLHTTP"); // Open connection to Web service oXmlHTTP.Open("POST", url, false); // Set a header to tell the browser we are sending posted data oXmlHTTP.setRequestHeader("Content-Type", "application/x-www-form-urlencoded") // Send request, passing in the GUID and object type code oXmlHTTP.Send("&ObjectTypeCode=" + sObjectTypeCode); // Parse the response to the phoneNumber variable var phoneNumber = ""; // Check to see if we have a valid response if ((oXmlHTTP.responseXML.xml) != null && (oXmlHTTP.responseXML.xml.toString().length > 0)) { // The service will return the phone number back in a string node phoneNumber = oXmlHTTP.responseXML.selectSingleNode("string").text; } // Assign response back to Phone Number field oPhoneNumber.DataValue = phoneNumber; } catch(e) { } Listing 10-10 shows our Web service for returning a Contact record. We added this service to our WorkingWithCrm Web application project. We will deploy the service to the workingwithcrm virtual Web on the Microsoft CRM Web server and update the Web.config to allow the Web service protocols, as previously mentioned.
Listing 10-10: Phonenumber.asmx/RetrieveContact
using System; using System.Collections; using System.ComponentModel; using System.Data; using System.Diagnostics; using System.Web; using System.Web.Services; using WorkingWithCrm.CrmSdk; namespace WorkingWithCrm { public class phonenumber : System.Web.Services.WebService { public phonenumber () {} [WebMethod] public string RetrieveContact(string Id, int EntityTypeCode) { // Standard CRM service setup CrmService service = new CrmService(); service.Credentials = System.Net.CredentialCache.DefaultCredentials; // Create the Column Set object indicating the fields to be retrieved ColumnSet cols = new ColumnSet(); string ret = string.Empty; // Ensure that we have a string that can be converted to a GUID if (ValidGuid(Id)) { // oGuid is the GUID of the record being retrieved Guid oGuid = new Guid(Id); try { // The EntityName indicates the EntityType of the object being retrieved switch (EntityTypeCode) { case 1: cols.Attributes = new string[] { "telephone1" }; account account = (account)service.Retrieve(EntityName.account.ToString(), oGuid, cols); ret = account.telephone1; break; case 2: cols.Attributes = new string[] { "telephone1" }; contact contact = (contact)service.Retrieve(EntityName.contact.ToString(), oGuid, cols); ret = contact.telephone1; break; case 4: cols.Attributes = new string[] { "telephone1" }; lead lead = (lead)service.Retrieve(EntityName.lead.ToString(), oGuid, cols); ret = lead.telephone1; break; case 8: cols.Attributes = new string[] { "address1_telephone1" }; systemuser systemuser = (systemuser)service.Retrieve(EntityName.systemuser. ToString(), oGuid, cols); ret = systemuser.address1_telephone1; break; default: ret = string.Empty; break; } } catch(System.Web.Services.Protocols.SoapException ex) { ret = "Error: " + ex.Detail.InnerXml; } } else { ret = "no phone"; } return ret; } /// <summary> /// Determines whether the given string is a valid GUID (enclosed brackets are optional). /// </summary> /// <remarks> /// This method will return true if the string is in a 8-4-4-4-12 format, optionally /// enclosed in brackets; otherwise it will return false. /// </remarks> /// <param name="guid"></param> /// <returns></returns> public static bool ValidGuid(string Guid) { return ((System.Text.RegularExpressions.Regex) new System.Text.RegularExpressions.Rege x(@"^\{?[a–fA–F\d]{8}-([a–fA–F\d]{4}-){3}[a-fA-F\d]{12}\}?$", System.Text.RegularExpressions .RegexOptions.Singleline | System.Text.RegularExpressions.RegexOptions.Compiled)).IsMatch(Guid); } } } EAN: 2147483647
Pages: 120
