Workflow Examples
Now that you understand the concepts and details related to Microsoft CRM workflow, let's look at a few examples that will show you how to pull everything together in real-world workflow scenarios.
Creating a Business Process for Each New Lead
Let's assume that your company would like to use a standardized process to handle each lead that is entered into the system. However, your business process varies depending on the lead source and the location of the prospective client. In this example, we will demonstrate:
-
Using conditions to create different sets of activities.
-
Using the send e-mail action to send a template response for leads generated from the Web.
-
Using the create activity action to generate activity records for the lead owner.
-
Using the Wait for timer command to automatically close any stale leads.
Creating the Rule
-
Log on to the Microsoft CRM Web server, and then open Workflow Manager.
-
Select Lead from the Entity Type list, and leave Rule selected in the View list.
-
On the File menu, click New.
-
In the Create Workflow Rule wizard, enter New Lead Process in the Name box, and leave Create selected in the Event list. Click Next.
Sending the Response for Web Site Leads
-
Click Insert Condition, and then click Check conditions.
-
Click << add conditions here >> in the statement window, click Insert Condition, and then click Check entity condition.
-
In the Check Entity Condition dialog box, select the options shown in the following image.
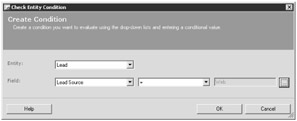
-
Click << add actions here >>, click Insert Action, and then click Send e-mail.
-
To use one of the default templates provided by Microsoft CRM, select Lead Reply-Web Site Visit in the Template list, and then click Create E-mail.
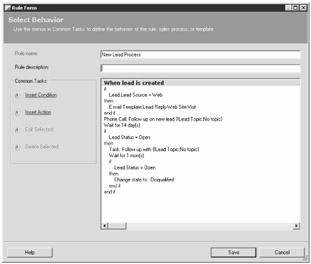
Your rule should now look like Figure 8-33.
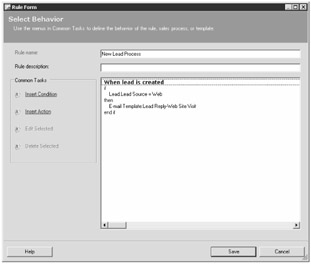
Figure 8-33: Workflow rule after Web lead condition and actions are entered
Our next step is to add the common actions that our new lead process expects. We want to create a Phone Call activity so that someone from our company will contact and attempt to qualify the lead.
Creating Phone Call Actions
-
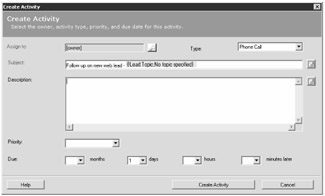
To add a Phone Call activity, click the end if statement, click Insert Action, and then click Create activity.
-
In the Type list, select Phone Call. In the Subject box, type Follow up on new web lead - . Then click the Insert Fields button to the right of the Subject box. When the Data Field Values dialog box appears, click New.
-
For Dynamic Value , select Lead in the Entity list and Topic in the Field list. Click OK.
-
Type No topic in the Default Value box, and then click Insert Field.
-
Select 1 days for the due date, and then click Create Activity.
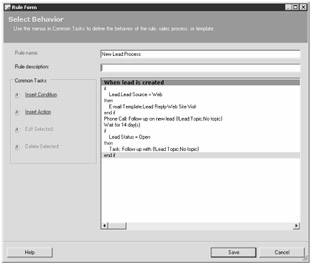
In our last sequence of steps, we will add some follow-up and clean-up steps. We will add a Wait for timer step to pause the rule for 14 days. Then we'll check to see whether it is still an open lead and log a task to the owner to try to reconnect with the lead. We'll add a final Wait for Timer command for one month. If the lead is still open after one month, we will send an e-mail message to the manager and close the lead.
Adding the Follow-Up Steps
-
Click the Phone Call activity.
-
Click Insert Condition, and then click Wait for timer.
-
In the Time-Based Wait dialog window, set the Wait for selection boxes to 14 days. Select From now on, and then click Ok.
-
Click Insert Condition back in the Common Tasks section, and then click Check Conditions. Click << add conditions here>>, click Insert Condition, and then click Check entity condition. Select Entity: Lead, Field: Status, =, and Static Value: Open.
-
Click << add actions here>>, and then create a final Task activity to determine whether the lead still has any interest in our products. For the Subject, enter Follow up with, and enter dynamic text to choose the topic. Choose 1 day for the due date.
-
For the clean-up step, make sure that you click the Follow Up task because we want to execute it only if the lead is still open. Add another Wait for timer condition for 1 month from now.
Note If we added our timer outside of the if-then-end if statement, the last Wait for Timer statement will execute regardless of whether the lead was closed in the first 14 days. Although this doesn't necessarily harm anything, it forces the process instance to stay in a running state longer than necessary.
-
Click Insert Condition, and then click Check Conditions. Click << add conditions here>>, click Insert Condition, and then click Check entity condition. Select Entity: Lead, Field: Status, =, and Static Value: Open.
-
Click << add actions here>>, and then create a change status action. Change the state to Disqualified, click Save, and then activate your new rule.
Escalating Overdue Cases
A common goal for customer service organizations is to have a quick turnaround time when responding to and resolving support cases. Our example organization would like to ensure that they react to all cases within one day. After one day, we will check to see whether the case is still open. If it is, we will e-mail the owner's manager. We will then wait another day to see whether the status has changed. If not, we will send another e-mail message to the manager and route the case to the Level 2 support. We will then create a loop until the case is resolved. Figure 8-34 shows the process graphically.
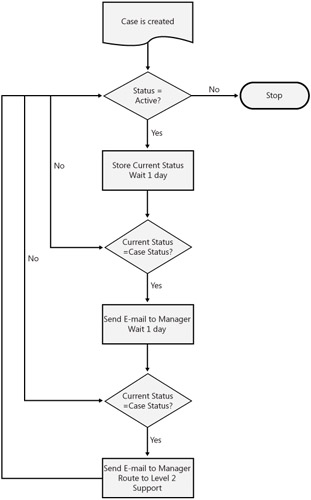
Figure 8-34: Case escalation logic
In addition to creating conditionals and actions that you are already familiar with, we will cover the following key points:
-
Using the stop action
-
Using the run subprocess action
-
Creating a looping process
-
Simulating an update event
-
Using the call assembly to return a value to your rule
| Note | We will only show the code for the assembly and how to use it within the Rule Form editor. For more details on how to implement your own custom assemblies, see Chapter 9. |
By now you are familiar with Workflow Manager, so we will focus only on the new actions used for this example. We will be creating three workflow rules for the case entity, in the following order:
-
E-mail rule A manual rule that will simply e-mail the owner's manager.
-
Escalating logic rule A manual rule that will contain the logic for the case escalation. This rule will be calling itself, creating a looping situation.
-
Create rule A rule that will be triggered from the Create event and will simply call our escalating logic process.
An E-mail template won't allow us to specify the owner's manager in the To line, so we will manually create the e-mail message in workflow. We chose to create a separate rule for the e-mail message that we will reference as a subprocess so that we will be able to use this e-mail message in our parent rule without having to configure it multiple times; a separate rule also allows us to make changes to the message in one centralized place.
Creating the E-Mail Rule
-
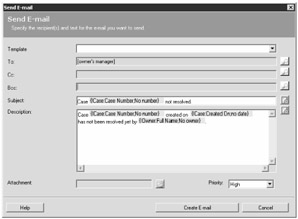
In Workflow Manager for the Case entity, create a Manual rule called Send Escalation Email that looks like the following image.
-
Save and activate the rule.
The next step is to create the main escalating logic. We will use the flowchart from Figure 8-34 as our blueprint. This rule will highlight a few key points when working with workflow. The first is the notion of an update event. As you saw, an update doesn't exist when you create a new rule. However, because the workflow engine is constantly evaluating active rules, you can simulate an update event by doing the following:
-
Storing the value of the field you want to check for updates on in a dynamic value by using a custom assembly
-
Creating a recursive loop (or having the process call itself) with a subprocess and wait command to evaluate the stored value with the existing value from the entity
Use extreme care when creating a loop, especially one that calls additional subprocesses. You always have the potential to create a situation that causes an infinite loop. Such a situation will create a performance bottleneck and will have to be manually terminated in Workflow Monitor. If you find yourself in an infinite loop, immediately terminate the step, deactivate the rule, and correct the problem.
| More Info | The workflow update technique we are about to show has many useful advantages. However, if you truly need to respond to an update event, you should consider using a callout. See Chapter 9 for more information and a discussion of when to use workflow versus callouts. |
Finally, we have included the custom assembly code at the end of this example for reference. For the purpose of this exercise, we will assume that it is already installed and available to Workflow Manager. See Chapter 9 for more details on developing and deploying custom workflow assemblies.
The final rule should look like Figure 8-35.
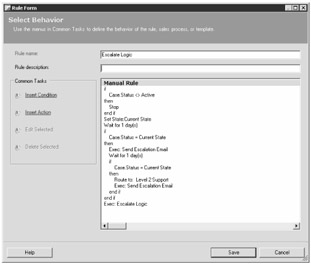
Figure 8-35: Escalating logic rule final steps
Creating the Escalate Logic Rule
-
In Workflow Manager for the Case entity, create a Manual rule called Escalate Logic.
-
Add your initial condition, checking the status of case. If it is not active (meaning that it has been resolved or canceled), we want to immediately exit with a stop command, marking the process as Complete.
-
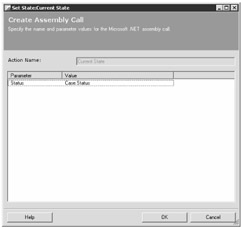
Use a custom assembly function to store the current status (state) of our case. To do this, click Insert Action, point to Call assembly, point to Custom Assemblies, and then click Set State. A custom dialog box appears that is based on the configuration settings of the custom assembly. Type Current State in the Action Name box. Double-click the Status parameter, and then choose Status from the Field list for the Dynamic Value.
-
Add your Wait for timer condition, setting it for 1 day, and a Check Conditions condition immediately after. For the conditions, compare the Case.Status field against a Dynamic Value, and then select Current State in the Entity list.
-
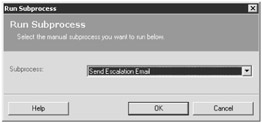
For the actions of this condition, we will add our subprocess. Click Insert Action, and then click Run subprocess. Choose Send Escalation Email in the Subprocess list.
-
Continue to add the logic as shown back in Figure 8-35.
-
At the end, we want to create a recursive loop, so we will add one more subprocess action. This time, though, we will call the Escalate Logic rule.
-
Save and activate your rule.
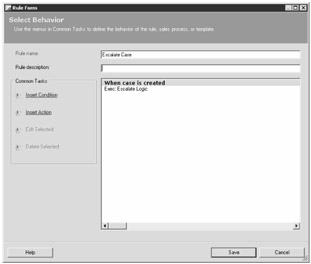
The last step is to initiate the Escalate Logic rule each time a new case is created. We will build a rule based on the case's Create event that simply calls the Escalate Logic rule through the subprocess action.
Creating the Create Rule
-
In Workflow Manager for the Case entity, add a create rule called Escalate Case that looks like the following.
-
Save and activate the rule.
For reference, Listing 8-1 shows the code for our simple routine used to return the value of our status code. If you download the sample code, we have already compiled this code into a .dll, so you just need to copy WorkingWithCrm.Workflow.dll from <Code Installation Directory>\ WorkingWithCrm.Workflow\Utils to C:\Program Files\Microsoft CRM\Server\ bin\assembly on the CRM server.
Listing 8-1: Custom Assembly Code
using System; using System.Reflection; using System.Runtime.CompilerServices; namespace WorkingWithCrm.Workflow { public class CustomAssembly { public int SetInteger(int Value) { return Value; } } } To register your custom assembly with Workflow Manager, you must add the code from Listing 8-2 to your workflow.config file. The default location for the workflow.config file is C:\Program Files\Microsoft CRM\Server\bin\assembly. You will need to add the allowunsignedassemblies="true" attribute to the <workflow.config> node and then add Set Status <method> node, as shown below.
Listing 8-2: Custom Assembly Configuration Settings
<workflow.config xmlns="http://microsoft.com/mscrm/workflow/" allowunsignedassemblies="true"> <methods> <method name="Set Status" assembly="WorkingWithCrm.dll" typename="WorkingWithCrm.CustomAssembly" methodname="SetInteger" group="Custom Assemblies" isvisible="1" timeout="7200"> <parameter name="Status" datatype="picklist" entityname="incident" attribute="statecode" /> <result datatype="picklist" entityname="incident" attribute="statecode" /> </method> ... existing method nodes ... </methods> </workflow.config>
EAN: 2147483647
Pages: 120