Managing Reports with Microsoft CRM
As you learned earlier, the term reports in Microsoft CRM can refer to different types of files, including:
-
Any type of report files (such as Excel, Word, or Microsoft Office Access) that you upload to the server
-
Reporting Services reports
-
Third-party report files
-
Links to Web pages (categorized as reports)
Regardless of the report type, Microsoft CRM stores all uploaded reports in the SQL Server Reporting Services database. Consequently, you might have to perform some report management tasks in Microsoft CRM and some in the Reporting Services Report Manager. Table 7-4 summarizes some common report administration tasks and the tools that you should use to perform them.
| Administrative task | Microsoft CRM Reports list | Reporting Services Report Manager | Microsoft CRM Organization Settings |
|---|---|---|---|
| Upload a new report | Yes | Not recommended (won't support prefilters) | No |
| Download a report for editing | Yes | Not recommended | No |
| Delete a report | Yes | Not recommended | No |
| Edit a report name or description | Yes | No | No |
| Specify where a report appears in the user interface | Yes | No | No |
| Schedule reports (configure caching) | No | Yes | No |
| Schedule reports (configure snapshots) | No (Yes — with Report Scheduling Wizard utility installed) | Yes | No |
| Manage report subscriptions (delivery by e-mail) | No | Yes | No |
| Specify which users can view specific reports | No | Yes | No |
| Edit the report categories | No | No | Yes |
You can access the Microsoft CRM Reports list by navigating to the Reports subarea of the Workplace area.
Report Security
To add, edit, or download a report, users must have the Manage Reports privilege assigned to at least one of their user roles. The System Administrator and System Customizer roles include this privilege by default.
| Tip | If you need to allow a specific user to manage reports but you don't want to assign him or her a System Administrator or System Customizer role, you can create a special security role that includes just the Manage Reports privilege. Because security permissions are additive, adding this Manage Reports role will allow the user to edit reports. This tactic allows you to assign the Manage Reports privilege to users without modifying the default security roles. |
When you upload a report to Microsoft CRM, all users can access the report by default. However, this isn't a security concern because when users run the report, the Microsoft CRM security settings will display only the data that each user should see. However, if you do need to restrict access to certain reports, you can configure unique security settings for each report in the Reporting Service Report Manager. The Microsoft CRM Implementation Guide explains this process in detail. In addition you can also download and use the Report Scheduling Wizard to define which users can view specific report snapshots.
Report Categories
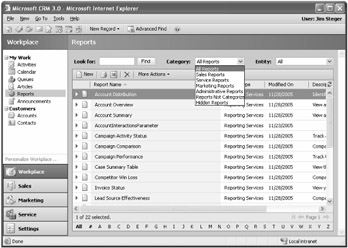
Reporting categories allow you to group similar reports together so that users can filter the Reports list based on these categories, as shown in Figure 7-16.

Figure 7-16: Filtering reports by report categories
You can assign a report to a single category, or you can assign a report to multiple categories if necessary. Microsoft CRM includes four report categories in the default installation:
-
Sales reports
-
Service reports
-
Marketing reports
-
Administrative reports
Of course, you can add, modify, or delete these report categories to fit your business needs. Let's review how to manage report categories.
Managing Report Categories
-
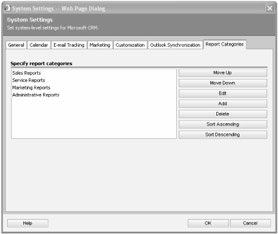
Browse to the Settings area of Microsoft CRM, and then click Settings and Organization Settings.
-
Now click System Settings, and Microsoft CRM will launch the System Settings dialog box.
-
On the Report Categories tab, you will see the familiar list for editing the categories. From here you can add, modify, delete, sort, and move the various report categories.

Remember the following when you edit report categories:
-
Your changes will appear immediately in the user interface; you don't need to publish your changes.
-
If a report belongs to just one category and you delete that category, you can still access the report by using the All Reports and Reports Not Categorized filters.
-
The order you set in the list is the order in which Microsoft CRM will display the report categories in the category filter.
Reports List Management
In this section, we will discuss the following management tasks that you can perform from the Reports list:
-
Downloading a report
-
Editing report properties
-
Editing the default filter
-
Remember that you can access the Reports list by browsing to the Workplace area and clicking on Reports.
Downloading a Report
To edit a report, first download the report file from Microsoft CRM. You can download individual report files from the Report list in the Microsoft CRM user interface.
Downloading a Report File
-
Navigate to the Reports subarea in the Workplace area to view the Reports list.
-
Select the report that you would like to download.
-
On the More Actions menu, click Download Report.
-
When the File Download dialog box appears, click Save and save the file to a location on your computer.
| Tip | When you download a Reporting Services report, you should change the selection in the Save As Type list from XML Document to All Files before you save. If you don't change this selection, the file will be saved as <reportname>.rdl.xml, and you'll have to manually remove the .xml file extension later. |
Editing Report Properties
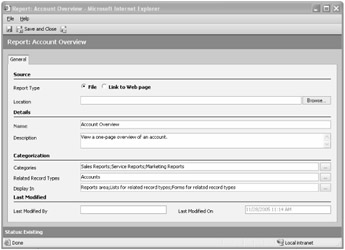
For every report in Microsoft CRM, you can configure the report properties to set up how you want the report to appear in the user interface. To access a report's properties, select a report name in the Reports list, and then click Edit Report on the More Actions menu. Figure 7-17 shows the properties editor.

Figure 7-17: Report properties editor
| More Info | The Reports list grid behaves differently than the other grids in Microsoft CRM. Normally, if you double-click a record, you open the form to edit. With reports, double-clicking a record opens the Report Viewer and allows you to run the report. You must click Edit Report on the More Actions menu to edit the properties of any report. |
You may alter the following properties when adding or editing a report:
-
Report Type Microsoft CRM includes two report types: File and Link to Web page. The file option uploads the report to Microsoft CRM. The Link to Web page option stores a link pointing to a Web address. The Web page address can be either an internal or external URL.
-
Location This is an upload dialog box or a simple text box, depending on the report type that you specify.
-
Name This is your report name. The report name appears in the navigation and the Reports lists, so try to be as descriptive as possible. If you enter the name of an existing report, Microsoft CRM will ask if you want to overwrite the existing report file.
-
Description This optional field allows you to enter more information about what the report does. The description information appears in the Reports list.
-
Categories Select one or more report categories that the report will belong to.
-
Related Record Types This attribute allows you to associate the report with system and custom entities. For example, the Account Overview displays information about an Account record, so you would select Account in the Related Record Types field. You must configure this property in conjunction with the Display In property. Adding related record types to a report also determines which entities you can use to edit a report's prefilter for Reporting Services reports.
-
Display In After you specify the related record types for a report, you can choose how you want the report to display for those entities. You can select any combination of Reports Area, Lists For Related Record Types, and Forms For Related Record Types. Reports Area displays the report on the general reporting tab list for access. Lists For Related Record Types allows the report to be run against the entity list (grid). Forms For Related Record Types displays the report as an option from an individual entity's form page.
| Note | The Display In settings apply to all of a report's related record types. For example, you can't specify to display a report on entity A's form and list but only display the report on entity B's list. The Display In settings apply to all of the related record types. |
In addition to the editable report properties, Microsoft CRM displays information about the last time a user modified the report. You cannot edit these fields because Microsoft CRM automatically populates them for you.
Editing the Default Filter
You learned that Microsoft CRM allows users to pre-filter their results when they run Reporting Services reports. If you upload a new Reporting Services report, Microsoft CRM creates a default pre-filter of "Modified in the last 30 days" for that report. You can edit the default pre-filter to include additional default parameters that will automatically display to your users. Of course, users can still edit the pre-filter on the fly when they run the report, but you can save them clicks by editing a report's default filter to include the parameters that users will likely want.
Editing the Default Filter
-
Navigate to the Reports subarea in the Workplace area to view the Reports list.
-
Select the report that you would like to edit.
-
On the More Actions menu, click Edit Default Filter.
-
The Report Viewer page appears with the current pre-filter settings in Detail mode. Simply edit the filter values to fit your needs.
-
Click Save Default Filter.
The next time a user runs this report, he or she will see the report pre-filter that you just configured.
| Note | Report pre-filters apply only to Reporting Services reports, so you can edit the default filter only for reports of this type. |
Batch Transferring Reports
If you have a large number of reports that you want to transfer from one server to another, Microsoft CRM provides two tools to download and publish reports in a batch.
-
DownloadReports.exe Downloads all of the reports from a server running Microsoft CRM to a specific folder
-
PublishReports.exe Allows you to upload multiple reports from a folder at one time
Typically, you would use these tools to develop your reports in a development environment and then easily deploy them to a production server.
| Note | The download and publish batch tools don't have a Web-based user interface; you must run them from a command prompt on the CRM server. |
The batch tools are installed on the Web server running Microsoft CRM during the installation process. You must have the following permissions to run these commands:
-
Report Manager System Administrator security role
-
Content Manager role on the root folder of Reporting Services Report Manager
| Caution | You should use extreme caution when you run the PublishReports.exe tool. After you start the process, Microsoft CRM will not provide you with additional prompts or warnings if reports with conflicting names exist in the system. The batch tool will simply replace any existing report with the same name, so you might accidentally replace a report that you did not plan on updating. The best use for the PublishReports.exe tool is to update all of the reports on the server running Microsoft CRM. We do not recommend using PublishReports.exe to insert a handful of reports; you should use the Reports list interface for this type of task. |
For detailed instructions on how to use these batch report tools, please refer to the Microsoft CRM Implementation Guide.
EAN: 2147483647
Pages: 120