|  Starting a New Web Site with a Wizard 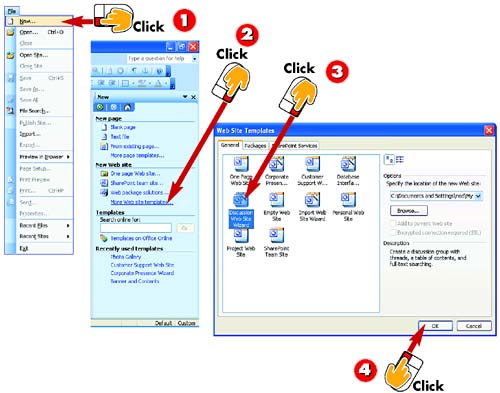 -
 | Open the File menu and choose New . | -
 | The New task pane opens. In the Other templates section, click the More Web site templates link. | -
 | The Web Site Templates dialog box opens. Click each wizard icon (the ones with magic wands) in the General tab, and read the description that appears on the right. | -
 | When the description shown is the best available match for the site you want to create, click OK . | INTRODUCTION The quickest and easiest way to kick off a new site is to use a wizard. The wizard builds a rough site (built on a template) that shows the general organization and feel you're going for; you can then edit that site in any way you want to make it your own. |
TIP Choosing Where to Save Your Site Between steps 3 and 4, you can enter a disk location in the Options box to choose where the new Web site will be saved. That'll save you time when you save the site later. |
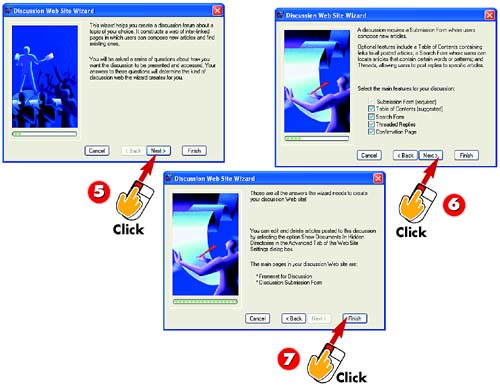 -
 | FrontPage launches the selected wizard. Read the wizard's Welcome message, and then click Next . | -
 | Work through the wizard screens presented to you, making any changes you want and clicking Next to proceed to the next screen. | -
 | On the wizard's final screen (where the Next button is no longer an option), click Finish to create the Web site. | TIP You Don't Have to Change What the Wizard Offers You needn't make changes to every page the wizard shows you. On any one, you can simply click Next to accept the default choices shown and move on. |
TIP Choose a Theme While Wizarding If you don't choose a theme in the wizard, you can always choose one later by opening the Format menu and choosing Theme . |
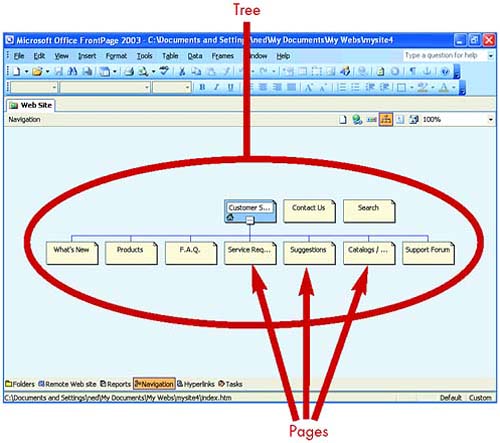
Navigating Your Web Site  -
| | In the Views bar, click the Navigation button. | -
| | The Web site is displayed in Navigation view. To show or hide page icons in branches of the tree, click the plus or minus icons. | -
| | To view and edit any page in the Web site in Design view, double-click the page's icon in Navigation view. | INTRODUCTION Right after you create a Web site with a wizard, you might find yourself in Tasks view. Tasks are really only important for dividing work among multiple authors creating a site together. For now, you need to switch to Navigation view, which displays the pages in the Web site in a tree diagram. |
HINT The Tree Does Not Show All The apparent relationships among pages in the tree do not necessarily reflect the way pages are linked together. However, these relationships are important, because they can determine which pages the link bar on a given page points to. (See the tasks "Changing the Link Bar," "Adding a Link Bar," and "Testing a Link Bar" later in this part for more information.) |
Seeing All of the Tree 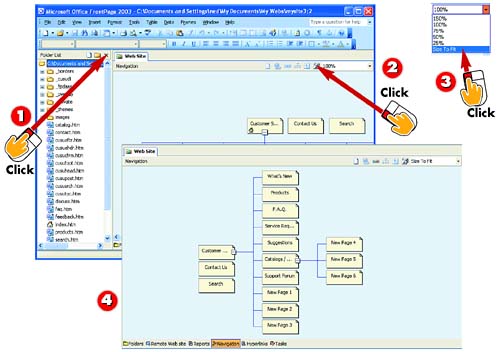 -
| | If the folder list or the task pane are open, hide them by clicking the Close (x) button in the upper-right corner of each. | -
| | On the Navigation toolbar, click the Portrait/Landscape button to change the presentation of the tree from horizontal to vertical, or vice versa. | -
| | If steps 1 and 2 don't do the job, click the down arrow next to the Zoom field on the Navigation toolbar and choose Size to Fit . | -
| | The icons representing the pages in the Web site are resized to fit in the window. | INTRODUCTION With larger, more complex Web sites, you might not be able to see the whole tree diagram at once without scrolling. That's a problem, because you can't really assess the structure of your site unless you can view the whole tree. Here are ways to see more. |
TIP Focusing on One Branch of the Tree Sometimes you need to focus your attention on just one branch, or subtree , of the site. To display only one subtree in Navigation view, click the page icon of the subtree you want to view, and then click the View Subtree Only button on the Navigation toolbar. |
Closing and Opening a Web Site 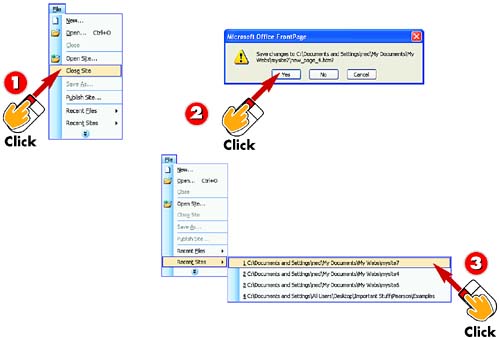 -
| | To close a Web site, open the File menu and choose Close Site or simply exit FrontPage. | -
| | If any pages in the site have been changed but not saved, a message appears, asking whether you want to save changes. Click Yes to save. | -
| | To open a Web site, open the File menu, choose Recent Sites , and then choose the site you want. | INTRODUCTION It's not necessary to save Web sites ”changes to a Web site are saved automatically as you create and edit it. However, pages you change within the site must be saved. You can save pages as you work on them or just save when you close or exit, as shown in the following steps. |
TIP Opening a Web Site You Haven't Seen in a While To open a Web site you haven't edited lately, open the File menu and choose Open Site to open the Open dialog box. Open the folder containing the site you want to open, click the desired site to select it, and click the Open button. |
Adding a Page to a Web Site 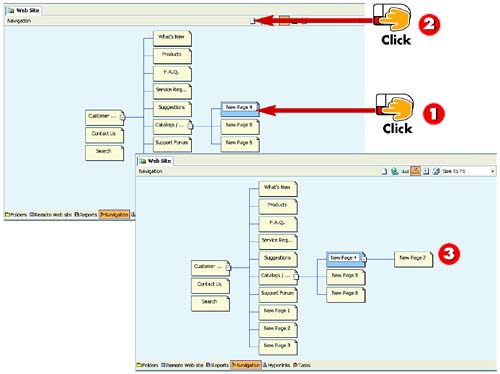 -
| | In Navigation view, click the page in the tree that is directly above where you want the new one to appear in the site. | -
| | Click the New Page button on the Navigation toolbar. | -
| | A new page is added as a subtree of the selected page. | INTRODUCTION After your site is built, you might find you are short a page or two. Before you start editing individual pages, it's best to go ahead and add the remaining pages you need to complete the site. |
HINT Site Theme Is Added Automatically to New Pages If your Web site has a theme applied to it, the theme is automatically applied to any new page you add. |
Deleting a Page from a Web Site 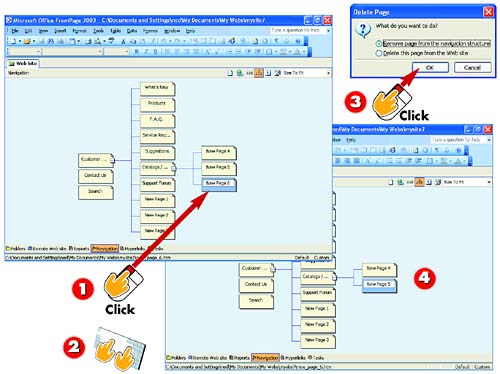 -
| | In Navigation view, click the page you want to delete. | -
| | Press the Delete key on your keyboard. | -
| | Choose whether to remove the page from the link bars of other pages in the site (but leave the page file in place) or to delete the page file altogether, and then click OK . | -
| | The page is deleted from the site. | INTRODUCTION Did the wizard give you a more complex, expansive Web site than you need? Cut it down to what you want by deleting extraneous pages. |
HINT FrontPage Helps You Avoid Deleting Pages You Might Want to Keep If the page you delete has other pages under it, FrontPage asks in step 2 whether you want the page and all pages below it deleted, or simply removed from all link bars. |
Moving a Page 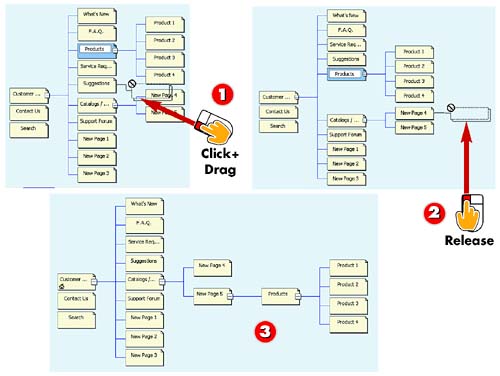 -
| | Click and drag the page to where you want it to go, watching carefully for the line that appears to show how the page would relate to those around it. | -
| | When the line shows the relationship you want, release the mouse button. | -
| | The page ”and all pages directly below it in the tree ”are moved. | INTRODUCTION Suppose that your site has all the right pages, but they're not organized in quite the way you want. Here's how to reorganize pages in a Web site. |
TIP Use Undo to Undo Page Additions, Deletions Anytime you add, delete, or move a page in a site, you can click the Undo button to reverse that action prior to saving. After you save the site, the changes remain . |
Changing the Link Bar 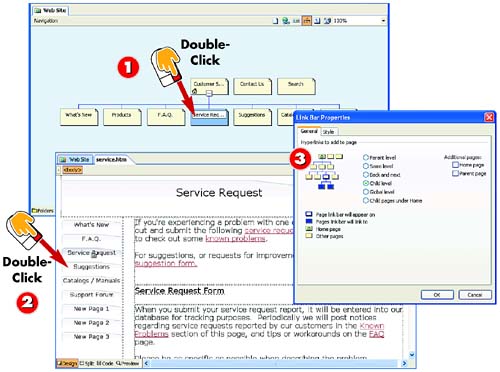 -
| | In Navigation view, double-click the page whose link bar you want to modify. | -
| | The page you selected opens in Design view. Double-click the link bar. | -
| | The Link Bar Properties dialog box opens. Examine the diagram of the Web site and the key beneath it. As you make changes in the dialog box, the diagram shows the results. | INTRODUCTION Most Web site templates add a link bar to each page automatically. Although you might want to keep the bar, you might prefer that any given page include a different set of buttons or show different formatting than what the template gives it. Here's how to change the bar on any page. |
TIP Deleting a Link Bar To delete a link bar, click it once to highlight it and then press the Delete key on your keyboard. Note that you must remove the bars one page at a time; you cannot remove it from a whole Web site at once. |
HINT To Change the Link Bar, Change the Theme If your site uses a theme (see Part 2), you can change the appearance of the link bar buttons by changing the theme. |
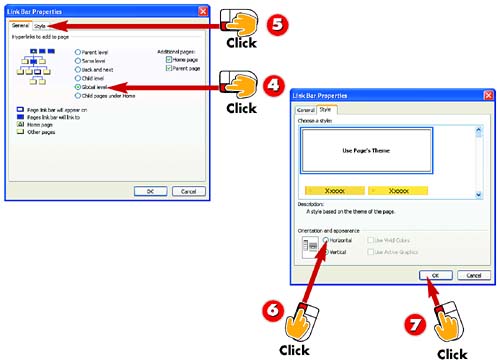 -
| | Choose which set of pages the bar should have links for, such as Parent level (the row directly above, in the same branch), Child level (the row below), and so on. | -
| | Click the Style tab. | -
| | Choose the bar's orientation and appearance: as a Horizontal row or Vertical column, and as Buttons or simple Text links. | -
| | Click OK and the link bar is altered according to the selections you made. | HINT Adding a Home or Parent Page to a Link Bar In a link bar, you can optionally add the Web site's home page or the page's parent page (the page directly above it in its subtree) by checking the check boxes provided. |
TIP Back and Next Gives You Link Buttons Forward and Ahead The Back and next option does not link the link bar to specific pages. Instead, it creates a bar with two buttons, which ”when clicked by a person who visits your site ”have exactly the same effect as clicking the browser's Back and Forward buttons. |
Adding a Link Bar 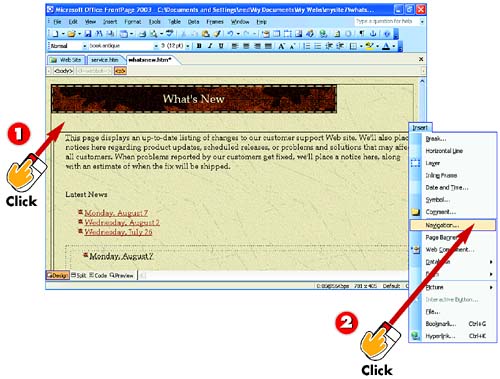 -
| | Viewing the page in Design view, click where you want to insert the bar. | -
| | Open the Insert menu and choose Navigation . | INTRODUCTION Most, but not all, Web site templates add a link bar automatically. If you don't have one for your site and you want one, this task shows you how to add it. |
HINT Moving a Link Bar You can move a link bar by clicking it and dragging, just as you would move a picture. |
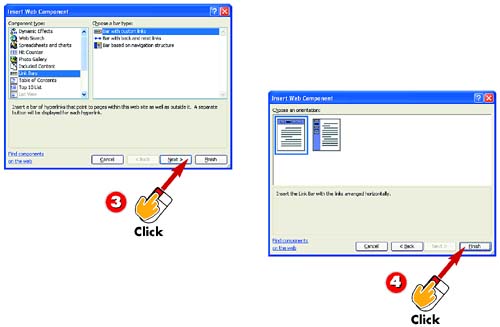 -
| | The Insert Web Component dialog box opens. Click Link Bars in the Component type list, click a link bar in the Choose a bar type list, and click Next . | -
| | FrontPage leads you through the remaining steps for formatting and creating the type of bar you've chosen . Click Next after each step, and then click Finish on the final screen. | HINT Link Bars Work Only in Web Sites You can add link bars only to pages within a site. Individual pages created outside a Web site cannot use this feature ”although you can, of course, create a bar of links on your own, using the steps in Parts 5 and 6. |
 |