|  Using a Template to Create a New Web Page 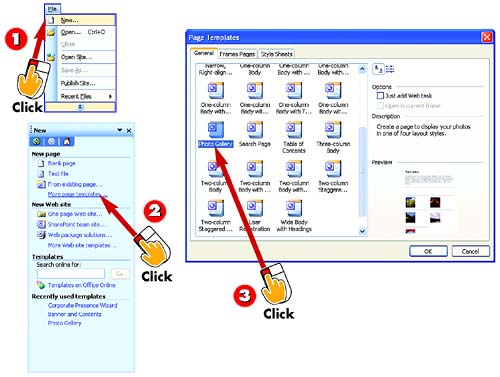 -
 | Open the File menu and choose New . | -
 | The New task pane opens. Click the More page templates link in the New Page section of the task pane to start a new, single Web page. | -
 | The Page Templates dialog box opens. Click each of the template icons in the General tab, and watch the Preview area. | INTRODUCTION The fastest way to build a great-looking page is to start off with a page in which the design work has already been done for you ”a template . All you'll need to do is to replace the words (and sometimes the pictures) in the template-based page with your own content. |
TIP Starting Quick with the Blank Page If you feel like creating a page from scratch, start off by working with the empty page that appears automatically whenever you open FrontPage ”click the Create a New Normal Page button. |
TIP Getting Templates from the Net Notice the Search online for search box above the Other templates area on the task pane. If your computer has an active Internet connection, you can use this search box to search for and use many more templates. |
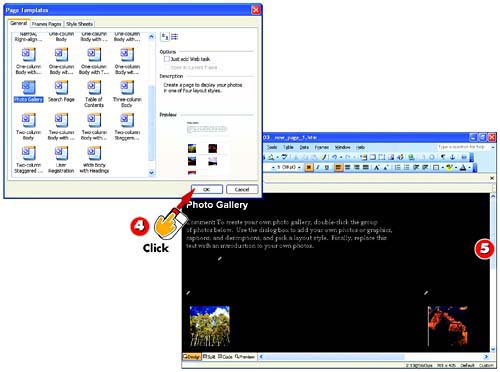 -
 | When the page you see in the Preview area is a good match for the style and layout of the page you want to create, click OK . | -
 | A page based on the template you selected is created and displayed onscreen. To save the page and give it a title, see "Saving (and Titling) Your Page." | TIP You Can Change Anything in a Template After creating a page, you can edit and enhance its content and design any way you want by following the steps shown throughout the rest of this book. You can even change or remove any of the objects or formatting the template put there ”the file is all yours now. |
Using a Template to Create a New Web Site 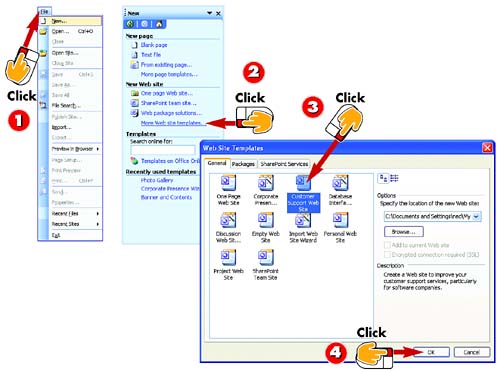 -
| | Open the File menu and choose New . | -
| | The New task pane opens. Click the More Web site templates link in the Other templates section of the task pane to start a new Web site. | -
| | The Web Site Templates dialog box opens. One by one, click each of the Web site icons in the General tab, and read a description of the template in the Template area. | -
| | When the description shown is the best available match for the type of site you want to create, click OK . | INTRODUCTION In FrontPage-speak, a Web site is a family of related , interconnected Web pages. For now, you'll most likely find it easier to create one page at a time, and leave creating whole Web sites until later (until Part 9, "Building a Site," to be exact). But just so that Web sites don't remain a complete mystery until then, note that you can start a new Web site as easily as a new page. |
TIP Using "Wizards" If the name of the icon you select in step 3 ends in "Wizard," you will be asked a simple series of questions that FrontPage uses to tailor the new Web site to your needs. After you answer (or skip) the questions, view the Web site as described in step 5. |
 -
| | A Web site based on the template is created. In the Views bar, click the Navigation button to switch to Navigation view, which displays a map of the pages. | -
 | To open a page in your Web site in Page view (so that you can edit it), double-click that page in the Navigation map. | TIP Changing the Pages a Web Site Contains A Web site starts out with a default organization and number of pages, but you can reorganize a site and add, delete, and move the pages within it. For details, see Part 9. |
Saving (and Titling) Your Page 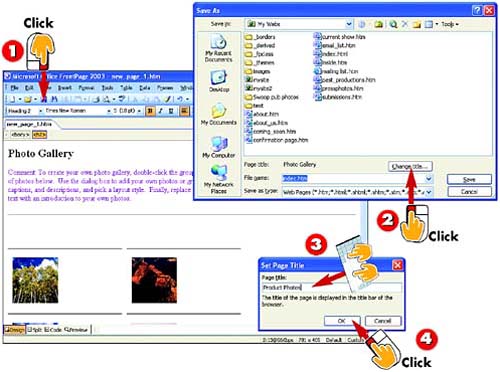 -
| | With the page you want to save displayed onscreen, click the Save button on the Standard toolbar. | -
| | The Save As dialog box opens. Click the Change title button. | -
| | The Set Page Title dialog box opens. Type a title for the page in the Page title field. | -
| | Click OK . | INTRODUCTION When you save a new page, you choose not only its filename but also its title . The title of a Web page does not appear within the layout of the page itself, but in the title bar of the browser window. The title also helps identify your page to Web search tools. |
TIP Template-Based Pages Already Have Names Pages in a Web site created from a template already have titles and filenames, so step 1 alone saves them. See Part 9 to learn how to change the title or filename of a page in a Web site. |
TIP Keep Titles Short Make your title short but also clear and descriptive. Avoid meaningless, overused titles such as "My Home Page," and try to work the most important, identifying keywords into the title ”for example, "Harry Smith's Beer Recipes." |
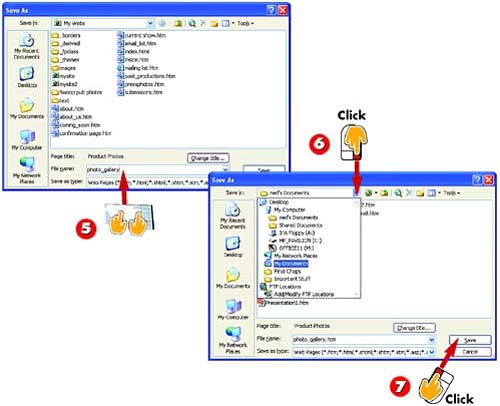 -
| | Back in the Save As dialog box, click in the File name text box, and type a short, descriptive filename. | -
| | Click the down arrow next to the Save in field and choose a folder in which to save this page from the list that appears. | -
 | Click the Save button to save the page and close the Save As dialog box. | HINT Saving Guidelines When typing a filename in step 5, do not type a filename extension (FrontPage adds .htm for you). Keep the name short and simple, and do not use any spaces or punctuation in the filename except dashes (-) or underscores (_). |
TIP Subsequent Saves After the first time you save a page, you'll no longer need to perform steps 2 “7 when you save again. Step 1 alone saves the file with the title, filename, and folder you've previously selected. |
Closing and Reopening Pages 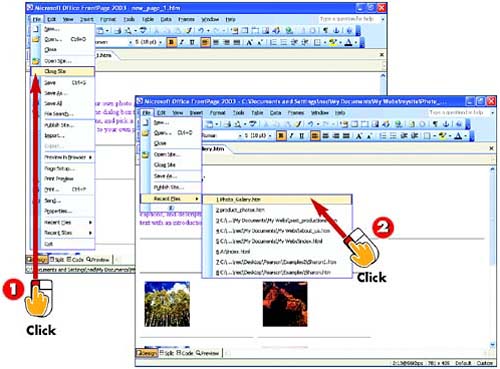 -
| | To close a page file (without closing FrontPage), open the File menu and choose Close Site . | -
| | To open one of the page files you've used recently, open the File menu, choose Recent Files , and then choose the page's filename from the submenu that appears. | INTRODUCTION As you work on Web pages, you'll probably create them over a series of editing sessions. You'll need to open existing pages and close them when you're finished. |
TIP Keeping Multiple Pages Open If you open or create a page without first closing another page that's already open, you'll have both pages open at once. That's okay ”you can keep two, three, or even more pages open and switch from working on one to any other by choosing a page's name from the Window menu. |
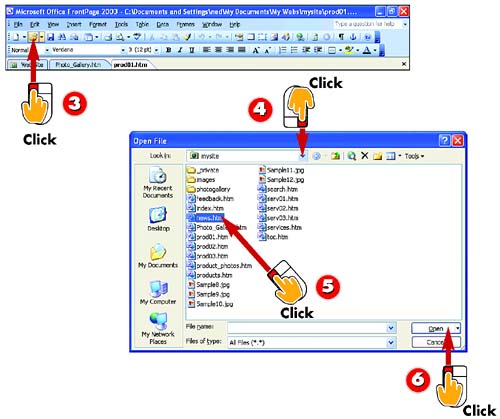 -
| | If a file you want is not among the files you've edited, it won't appear on the Recent Files submenu. In that case, click the Open button on the Standard toolbar. | -
| | In the Open File dialog box, click the down arrow next to the Look in field and choose the folder in which the page was saved. | -
| | When you see the page's filename listed among the files and folders shown in the dialog box, click the name to select it. | -
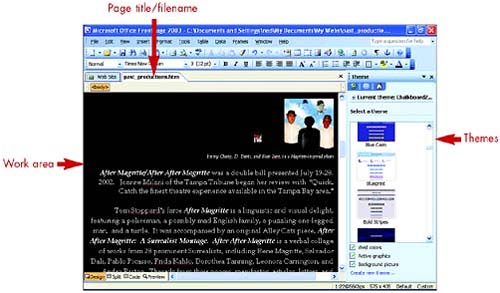
| | Click the Open button to open the page file. | Choosing a Theme for a Web Page 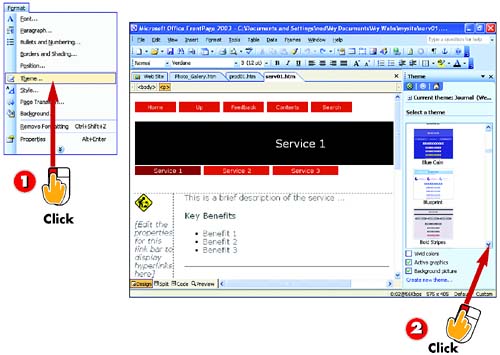 -
| | While viewing your page in Design or Preview view, open the Format menu and choose Theme . | -
| | The Theme task pane opens. Use the scroll arrows to scroll through the themes that are thumbnailed in the task pane to see what a sample page using that theme looks like. | INTRODUCTION The visual style of a Web page is determined by a variety of things: text fonts ( typefaces ) and colors, accent graphics, the background, and so on. A FrontPage theme is a way to choose all these page features at once. Choosing a theme not only saves time but also helps ensure that all these visual element choices work well together. |
TIP Ignore Layout When Using Themes When previewing a theme, ignore the layout of the page shown in the sample. What the theme controls is not the organization of objects on the page, but rather the style of fonts, colors, buttons , and so on. |
TIP Themes Are Best for Sites Themes are handy for single pages, but even handier for sites (see Part 9) because they let you change the style of some or all pages in a site at once. The steps are the same as adding a theme to a page. |
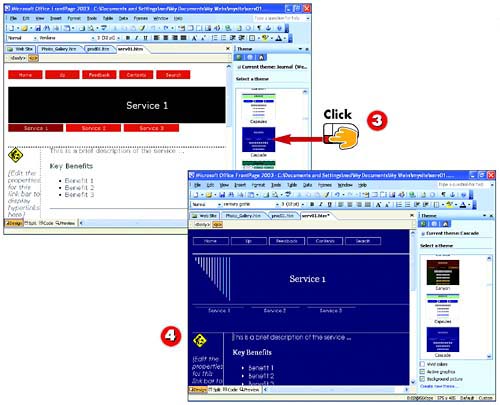 -
| | Click on the theme that shows the fonts, colors, and other stylistic elements that you want to use. | -
| | The theme you selected is applied to your page. Add to, edit, and develop your page as needed, saving often. | TIP You Can Change Themes Anytime At any point in the evolution of your page, you can repeat this task and choose a different theme. |
TIP Enhancing Themes When themes are displayed in the Theme task pane, three check boxes are active at the bottom of the pane: Vivid colors, Active graphics , and Background picture . Checking these boxes adds optional formatting to the theme. This formatting is optional because it's so advanced that it can be seen only when the page is viewed through the most up-to-date browsers. |
Previewing Your Page 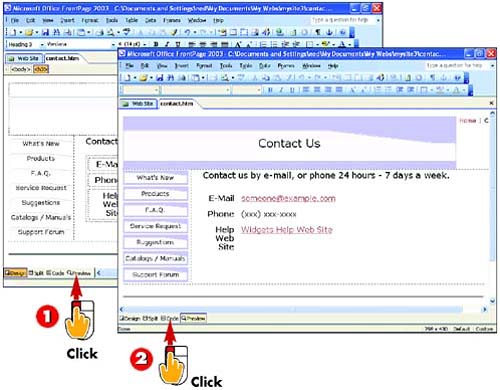 -
| | While viewing the page you want to preview, click the Preview button in the views bar. | -
| | The page is displayed as it will appear in your default Web browser. To return to normal working mode, click the Design button in the views bar. | INTRODUCTION FrontPage shows your page to you as it will appear online ”but not exactly. Some kinds of objects don't do their thing in Design view; for example, animations sit still. However, FrontPage offers two "preview options" to help you evaluate how your page will really look to visitors . |
TIP Different Browsers Show Different Results It's impossible to create a page that looks exactly the same no matter which browser it's viewed through. Differences among browsers affect the look of even simple Web pages. Your FrontPage work will look just as you expect in Internet Explorer 6, but might look a little different in other browsers. Always test your work in multiple browsers (see Part 11, "Adding Fill-in-the-Blanks Forms") before publishing. |
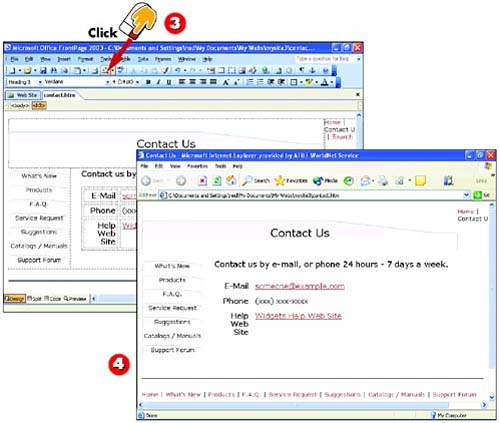 -
| | To view the page in the default Web browser on your PC, click the Preview button on the Standard toolbar. | -
| | A separate browser window opens, displaying the Web page. To return to working in FrontPage, click the browser window's Close or Minimize button. | TIP You Can Choose Your Preview Browser If you have multiple browsers set up on your PC, you can choose which browser to preview the page in by clicking the down arrow next to the Preview button and choosing a browser from the list that appears. Doing this can help you make sure that your page looks good in any popular browser. |
TIP Save Before Previewing You must already have saved any new changes to the page before previewing it in your browser. If you forget to do so, FrontPage reminds you when you click the Preview button. |
|