Section 12.4. Linux as a Thin Client
|
12.4. Linux as a Thin ClientBecause of its low cost and flexibility, Linux can make an excellent thin client OS. You can load Linux on computers that aren't powerful enough to run the latest software, configure Linux to run appropriate thin client software, and the computer can then access more powerful Linux, Windows, or other computers. In many respects, the simplest thin client configuration is to use a traditional Linux distribution or a dedicated thin client package to run Linux as a thin client, using a basically traditional hardware configuration, including a local hard disk or at least a CD-ROM drive. Perhaps the most appealing way of doing the job is to use a dedicated thin client distribution, which provides you with precisely the tools you needno more and no lessto use Linux as a thin client. However you do it, you can run Linux without a hard disk using a bootable Ethernet card and configuring a system to deliver Linux OS files to computers that boot with such a card. 12.4.1. Distribution Selection and InstallationYour first choice is what distribution to use on the thin client computers. The needs of a thin client are such that a good desktop or server distribution may not be the best choice for a thin client. Many popular distributions, such as Fedora, Mandrake, and SuSE, install many unnecessary desktop or server applications that, in fact, may be undesirable on a dedicated thin client. These distributions also often require a lot of disk space or memoryfeatures that may be lacking on the older computers you want to convert to thin client status. Among mainstream Linux distributions, those that install small standard package sets by default are likely to be the best choices for thin client use. For instance, Debian, Gentoo, and Slackware can all be installed in well under 1 GB of disk space, omitting such large packages as GNOME, KDE, Mozilla, and OpenOffice.org. Even if users will ultimately run these packages, they'll probably be run from the server, not on the thin client. Slimmer Linux installations are likely to lack a few components you need, at least in their minimal installations. Most notably, you'll probably have to install an X server (XFree86 or X.org-X11). Depending on the protocols used by your server, you may also need to install a thin client package, such as a VNC client. Another option, and one that's arguably superior even to the slimmed-down mainstream distribution option, is to use a distribution that's dedicated to thin client use. Notable in this regard are the PXES (http://pxes.sourceforge.net), LTSP (http://www.ltsp.org), and ThinStation (http://thinstation.sourceforge.net) distributions. These are distributions that support the PXE system, which is a way for computers to boot over a network from a remote server. These distributions are useful tools if you want to divest yourself of a local hard disk, as described in Section 12.4.4, but you can also install these thin client distributions directly on a local hard disk or on a CD-ROM to use on computers with network cards that don't support direct network boots. 12.4.2. Configuring PXESBecause PXES is designed explicitly for thin client use, this section describes it in more detail. You can download PXES in several forms from its web site. The CD-R image (.iso) file is a quick way to get started, particularly for testing its operation. This image file, though, is very generic; it runs in 800 600 mode by default and may not take proper advantage of your network's resources. To best use PXES, you should download the pxes-base and pxesconfig packages, both of which are available in RPM and tarball forms. You can then create a PXES image that's customized for your needs and can be booted from a hard disk, from a CD-R, or from the network. This section uses PXES Version 0.8-9 as an example; if you use another version, it may differ slightly from what's described here.
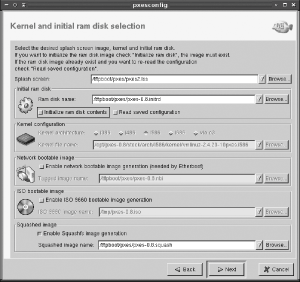
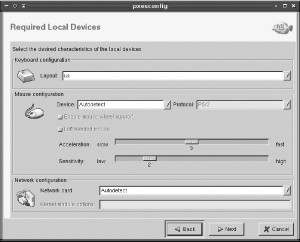
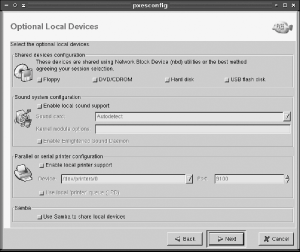
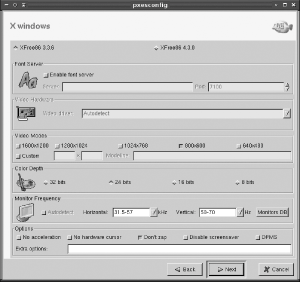
Once you've downloaded the base and configuration packages, install them on an existing Linux distribution. (This system doesn't need to be the same as your ultimate login server; it's just a platform for customizing the PXES client files.) You can then use the configuration utility to enter details of your network's configuration and create a custom PXES image, which you can then burn to a CD-R, place on a hard disk, or deliver to thin clients via TFTP. The configuration tool uses a wizard to guide you through the configuration steps:
The result of all this processing is one or more files you can use to boot a Linux-based thin client:
12.4.3. Testing Your PXES ImageNow that you've created a PXES system, it's time to use it. One good way to test it is to use the CD-R image file. Using a Linux program such as cdrecord or a GUI front-end such as X-CD-Roast, burn the image file to a CD-R disc. (Alternatively, you can transfer the image file to a Windows, Mac OS, or other computer and use its CD-R drive.) You can then place the CD-R you've created in the CD-ROM drive of a computer that's configured to boot from its CD-ROM drive and boot the computer. Testing in this way eliminates the possibility of errors in certain network-specific servers and configurations, such as TFTP. If the CD-R boot works, you can move on to a network configuration and be sure that any problems you encounter there are network-related, rather than problems with the basic PXES configuration. When booting a PXES image, you're greeted by a boot prompt that asks you what protocol you want to use. Type the number associated with the protocol (such as 2 for XDMCP), followed by the Enter key. If you just press the Enter key, PXES boots and runs the default protocol you selected when configuring the system. Once you select the protocol, you'll see typical Linux kernel boot messages scroll by. After a few seconds of kernel messages, the system will be booted. Depending on your configuration options for the protocol you selected, you may now be asked for certain details, such as the hostname of the remote system you want to use. After you enter this information, or if you entered this information in the configuration phase, the screen will clear and you'll see either a system-selection screen (similar to the XDMCP chooser shown earlier in Figure 11-6) or a GUI login screen for the computer you've contacted. You should now be able to log in and use the computer as if you were sitting at its console. If you pick the screen option when booting PXES or if you chose Local X Windows Session as your default option and run this default, PXES boots into a simple Linux desktop with a handful of icons along the left edge of the screen for initiating various types of connections. When launched, these tools can open connections to other computers in their own windows, as shown in Figure 12-5. This figure shows an indirect XDMCP login session and, in front of that, a VNC session open to a Linux system that's configured to interface to its own local XDMCP server. Figure 12-5. PXES can display separate windows on different remote systems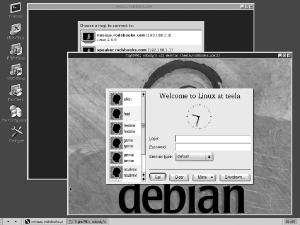 When you're done with a PXES session, log out of the remote system as you normally would. Usually, PXES will then redisplay your login or system-selection menu, enabling you to begin again. If you want to shut off the computer, simply flip its power switch. Unlike normal disk-based Linux systems, a PXES thin client doesn't need to be shut down with a special command. Although it's got a local filesystem, it's a temporary one in a RAM disk, and it will be recreated from the boot medium the next time PXES boots. Thus, you needn't be concerned about corrupting the local PXES computer's filesystem. 12.4.4. Booting a Thin Client from the NetworkPXES is a great tool; however, using it by booting off of a CD-R isn't optimal. After all, much of the appeal of PXES is being able to use it with diskless workstations that can boot automatically from the network, and relying on CD-Rswhich can be lost or damaged, as well as the CD-ROM drives to read themreduces the appeal of PXES. As already noted, the PXE part of the PXES name refers to a network boot protocol. This protocol is promoted by Intel as a way to boot diskless workstations; however, PXES uses it to enable network boots of a Linux-based thin client. You should consult the documentation for your thin client's motherboard to determine if it's PXE-enabled. If it is, enable the PXE boot option in the BIOS to boot the system from the network. This option also requires a supported Ethernet card; consult your motherboard's documentation to learn what works.
If your computer isn't PXE-enabled, you may still be able to boot from the network, but you'll need a network card that supports network boots in its own BIOS. Many low-cost cards sold today lack this support, so you may need to replace the card. Sometimes you can add an EPROM chip to the card to add this support; check the EtherBoot project (http://www.etherboot.org) for information on doing this. If your system supports EtherBoot, you need to enable that support when you configure PXES, as described earlier, and specify the EtherBoot files when you configure your DHCP server, as described in the earlier Section 12.3.3. As a last resort, you may be able to boot partially from the network, by employing a boot floppy that contains the minimal code necessary to have the network card continue the boot process from the network. One way to accomplish this goal is to use the universal boot floppy that's distributed as part of Thinstation (http://thinstation.sourceforge.net). This floppy disk includes boot code that's compatible with EtherBoot; when you boot from the floppy, it continues the boot process as if your network had an EtherBoot-compatible network card. However it's done on the client side, the client relies on two servers to obtain information and an OS: a DHCP server and a TFTP server. These servers may be your remote login server, but they need not be; you can use some other computer to fill these roles. |
|
EAN: 2147483647
Pages: 152

