The AccessObject Object
| |
This shows the complete AccessObject object that we can program against; in one way or another almost all code is programmed against one of these object containers.
The AccessObject object refers to one of the following:
-
AllForms
-
AllReports
-
AllMacros
-
AllModules
-
AllTables
-
AllDataAccessPages
-
AllQueries
-
AllViews
-
AllStoredProcedures
-
AllFunctions
-
AllDatabaseDiagrams
You can probably guess what these are. AllForms , for example, refers to all of the forms in a database or project. This allows us to easily get access to all of the objects stored. In previous versions of Access, you would have had to use the Data Access Objects, and the Containers and Documents collections. This method is much easier. Let's have a look at a quick example:
Try It Out-Viewing the Access Objects
-
Open IceCream.mdb and select Modules . If you are using the complete database open Chapter 05 - Module and Module2 modules.
-
Insert a new module, and add the following procedure:
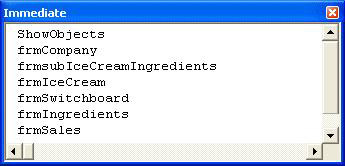
Public Sub ShowObjects() Dim objAO As AccessObject Dim objCP As Object Set objCP = Application.CurrentProject For Each objAO In objCP.AllForms Debug.Print objAO.Name Next End Sub
-
Switch to the Immediate window and run the procedure:
-
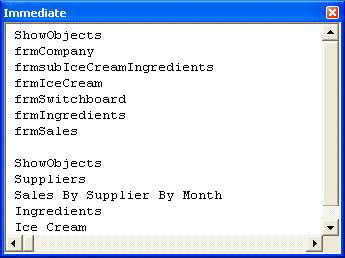
Now change AllForms to AllReports and run the procedure again:
How It Works
This code is quite simple, but there are a few things that need explaining. Let's start with the variable declarations.
Dim objAO As AccessObject Dim objCP As Object
The first declares a variable to hold an Access object - this will be one of the All objects shown earlier. The second variable will hold the current project - this is the current database. We have to use a generic object type here, because, oddly enough, there isn't a specific type for an Access project.
Next we set this object to point to the current project. This will allow us access to all of the objects in the current database:
Set objCP = Application.CurrentProject
Once the current project is set, we can loop through the AllForms collection, printing out the name:
For Each objAO In objCP.AllForms Debug.Print objAO.Name Next
You'll be familiar with loops by now, but you might not have seen this particular version. The For Each statement is used with collections, allowing us to loop through the collection. The way this works is that you declare a variable that matches the type of the elements in the collection - in this case it's AccessObject , because we are looping through the AllForms collection. The general rule is:
Dim objObject As ObjectType For Each objObject In Collection.Objects
This has the effect of running the loop for each object in the collection, and each time around, the loop variable ( objObject , or objAO in the example above) is set to point to the individual collection member.
If this sounds confusing, just have a look at the diagram below:
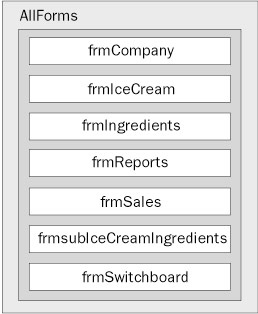
Each time around the loop objAO points to the next form. If you think of a collection as similar to an array then you'll get the general idea (that is, each form is an item in the array or collection).
Dynamic Listboxes
So what we have is an easy way to find out what objects are within our database. Why is this useful? Given the way applications change, it's a good idea to build in some form of future proofing, to allow you to perform less maintenance as the application inevitably changes. Refer to the earlier section Using Object Models in VBA where we discussed the benefits of not having to hard-code form names : note that the same principle applies here. We loop through the Reports collection with no maintenance required to our code and we automatically get the changes that have been made to the report names or additions/deletions of reports that currently reside in the Reports collection.
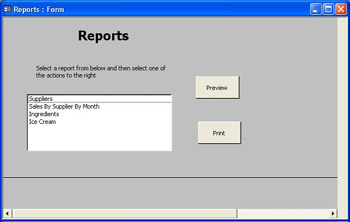
Consider you have a form listing all of your reports. You've built this using a single form and hard-coded the hyperlinks , one hyperlink for each form. Something similar to this:
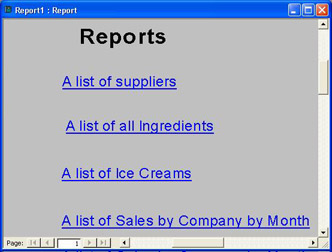
But what happens if you need to add another report? Or even two? You have to edit the form, squash things up so it fits on, and so on. Wouldn't it be simpler to provide a dynamic list of reports? Maybe something like this:
Now when you add a new report to the database it will automatically be added to the list box. Let's have a look and see how we can do this:
Try It Out-Using the AccessObject
-
Create a new form and add a listbox onto it, calling the listbox lstReports (note that the name of the listbox starts with lowercase letter l and not the number one).
-
Press the Code button on the toolbar to create a code module, and add the following code to the Load event for the Form:
Private Sub Form_Load() Dim objAO As AccessObject Dim objCP As Object Dim strValues As String Set objCP = Application.CurrentProject For Each objAO In objCP.AllReports strValues = strValues & objAO.Name & ";" Next objAO lstReports.RowSourceType = "Value List" lstReports.RowSource = strValues End Sub
-
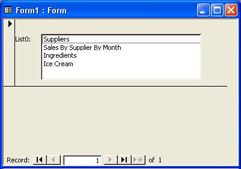
Switch the form into Form mode to see the results:
-
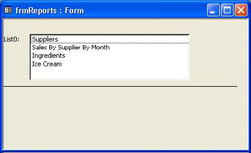
Switch the form back into design view; right-click outside the form and select Properties . Set the Record Selectors and Navigation Buttons properties to No .
-
Save the form as frmReports .
How It Works
This method of filling a listbox is really simple, and relies on you supplying a list of values for a listbox, just by separating the values by a semi- colon . So let's look at how this is done.
Firstly we have the variables , the first two of which you've seen before. This will be used to help us loop through the Report objects. The last variable, strValues , is a string that we will use to build up a list of report names.
Dim objAO As AccessObject Dim objCP As Object Dim strValues As String
Next we set a variable to point to the current project.
Set objCP = Application.CurrentProject
Then, we loop through the AllReports collection, adding the name of each report to a string. Notice how we add a semi-colon after the name of each report, as this is our list separator.
For Each objAO In objCP.AllReports strValues = strValues & objAO.Name & ";" Next objAO
Finally we set the properties for the listbox. The first is the RowSourceType property, which when set to Value List means that what's shown in the listbox comes from a list of values. The second line actually sets those values, by setting the RowSource property to the contents of the string containing the report names.
lstReports.RowSourceType = "Value List" lstReports.RowSource = strValues
That's it - a really simple way to use VBA to fill a listbox. However, this isn't the only way to fill a listbox using code; we can use the AddItem method of the listbox.
As we saw in the above example, to get all the names of the reports into the listbox ( lstReports ), we moved through the AllReports collection and progressively built a string ( strValues ) to hold all the names of the reports. We then assigned the strValues string to the row source property of lstReports , which then listed the names of the reports on separate rows.
Rather than add the report names to a string ( strValues ) and then assign the string to a property of the listbox ( lstReports ), we can added them directly from the AllReports collection to the listbox and remove the need to use a string to build the list of names.
So let's modify the above example and see how the AddItem method works.
Try It Out-Using the AddItem method of the Listbox control
-
Reopen the form code module and make the following changes to the Load event of the form:
Private Sub Form_Load() Dim objAO As AccessObject Dim objCP As Object Dim strValues As String Set objCP = Application.CurrentProject lstReports.RowSourceType = "Value List" For Each objAO In objCP.AllReports 'strValues = strValues & objAO.Name & ";" Me.lstReports.AddItem (objAO.Name) Next objAO 'lstReports.RowSource = strValues End Sub
-
Switch the form into Form view to see the results:
-
You can save the form with the changes or reverse the changes that we made to demonstrate the AddItem method (we have elected not to save the changes).
How It Works
We moved the line of code that sets the RowSourceType property to Value List , to precede the AddItem method; we do this to set the RowSourceType to Value List before we add the items.
lstReports.RowSourceType = "Value List"
We then commented out the lines of code that build the string strValues and assign that value to the row source - we don't need to use them in this example. (Commenting out code is a cool way to effect changes and it helps you if you need to restore the changes at a later date).
'strValues = strValues & objAO.Name & ";" 'lstReports.RowSource = strValues
Next we insert the line of code that will call the AddItem method of the listbox to add the names of the reports to the listbox. Note the object referencing: Me (the Me property is discussed shortly) refers to the form, lstReports is the name of the listbox that is contained by the form, AddItem is a method of the listbox and we pass to this method the name of the report. Because we have this code nested inside a For EachNext loop we move through the AllReports collection progressively adding items (report names) to the list until each one has been added.
Me.lstReports.AddItem (objAO.Name)
As the above example shows, using the AddItem method of the listbox is quite intuitive. Both of the above examples underscore the value of thinking in terms of objects and their properties and methods when you want to perform a task or a set of tasks .
Now that we have a working listbox, let's add those buttons so we can view or print the reports.
Try It Out-Adding the Print buttons
-
Switch the form back into Design mode.
-
Add two command buttons. If you have the wizards enabled you can just cancel out of the screen it shows - we want to code these ourselves .
-
Name the buttons cmdPreview and cmdPrint , and set their captions accordingly .
-
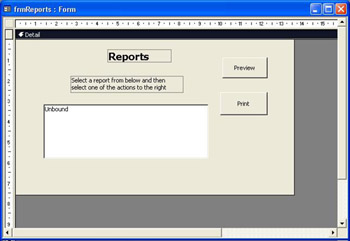
Add a label at the top of the report, for a title, and change the label for the listbox. Your form should now look something like this:
-
From the View menu, select Code , to create a code module for the form. This will switch us to the Visual Basic Editor (VBE).
-
Add the following subroutine:
Private Sub ProcessReport(intAction As Integer) If Not IsNull(lstReports) Then DoCmd.OpenReport lstReports, intAction End If End Sub
-
Select cmdPreview from the object combo box (that's the one at the top left of the code window), and then select Click from the event combo box (the one on the right).
-
Enter the following line of code:
ProcessReport acViewPreview -
Select cmdPrint from the object combo box, and Click from the event combo box.
-
Add the following line of code:
ProcessReport acNormal -
Save the module and switch back to Access.
-
Switch the form from design view into form view and try out the buttons. Selecting Preview will open (in preview mode) whichever report is highlighted in the listbox, and selecting Print will print it straight to the printer.
With just a few lines of code you have a couple of command buttons to preview and print any report.
How It Works
Previewing and Printing Reports
The ProcessReport procedure first checks to see whether a report has been selected in the listbox. The listbox value will be Null if no report has been selected. So, if a report has been selected, we call the OpenReport method of the DoCmd object, passing in the report name (this name comes straight from the listbox - if you refer to a listbox in code, the value you get is whatever is selected). The second argument to OpenReport is the action - what we want to do. This is passed into ProcessReport as an argument.
If Not IsNull(lstReports) Then DoCmd.OpenReport lstReports, intAction End If
Each of the command buttons calls ProcessReport passing in a different constant (predefined by Access). We either want to preview the report ( acViewPreview ) or we want to open the report normally ( acNormal ).
ProcessReport acViewPreview ProcessReport acNormal
That's all there is to it.
Changing the Switchboard
Since we've just looked at opening reports, let's have a quick diversion into the switchboard, just to point out a couple of facts. If you've tried to use the switchboard to open other forms you'll notice that only two of the buttons are working - those for the Ice Cream Details and the Ingredients. You might also have noticed the method used to open these forms - using hyperlink addresses. Now we'll be covering these in more detail later in the book, but basically they give you a simple way to jump from form to form without any code.
We have a minor issue with using hyperlinks:
-
The Web toolbar may appear when we click the switchboard's Ice Cream Details or Ingredients buttons, which tends to be a bit confusing: after all, we're not dealing with a web page in this circumstance.
A thing to do under these circumstances is to remove the hyperlinks and use VBA to open the forms.
Try It Out-Opening Forms
-
Open the switchboard in Design view.
-
Select the Ice Cream Details button, and delete the contents of the Hyperlink SubAddress property.
-
Now move to the On Click event and add an event procedure. You can do this by pressing the builder button to the right of the property (and selecting Code Builder from the next dialog if you don't default to always using event procedures).
-
Add the following code:
DoCmd.OpenForm "frmIceCream" -
Now do the same (repeat Steps 2-4) for the Ingredients button, this time using frmIngredients as the form name.
-
Now do the same (repeat Steps 2-4: however, the Hyperlink Sub Address should be empty) for the Suppliers Lists button, with frmCompany as the form name.
-
Do the same (repeat Steps 2-4: however, the Hyperlink Sub Address should be empty) for the Reports button, using frmReports as the form name.
-
Switch back to Access, and view the respective forms in form view to see the results. Notice that the forms open after clicking the respective button, but that the Web toolbar doesn't appear (if you don't get this result check to see that you haven't got Web selected in the main menu: View Toolbars Web ). There's still a problem with the Suppliers button, though, because it shows all the companies, and not just suppliers.
-
Switch back to the VBE and modify the code in the Suppliers Lists event procedure ( cmdSuppliers_Click ) so that it looks like this:
DoCmd.OpenForm "frmCompany", , , "Supplier = True" -
Now switch back to Access and try again. Notice that only suppliers are shown.
We are utilizing the Where argument of the OpenForm command, which allows us to specify a SQL WHERE clause as part of the open. This means that instead of frmCompany showing all the records, it will only show records where the Supplier field is set to True .
| |
EAN: 2147483647
Pages: 256