Creating a C Add-in
|
| < Free Open Study > |
|
Comparing Visual Basic to C#
To see how similar C# is to Visual Basic, you're going to develop a simple Windows application in both of the languages and compare the code. This example is somewhat of an oversimplification, and it certainly does not represent the overall C# language model, but it illustrates the point. The application that you'll develop is a digital clock application. You'll develop and run the application first in C# and then in Visual Basic.
C# Clock Application
You are familiar with the creation of projects by now, but I will step you through this one because you are using a C# project for the first time in this book.
| Note | If you are experienced with C# development, you can ignore this section of the chapter. |
There isn't a lot of difference between the clock application written in C# and the clock application written in Visual Basic. For this reason, I will lead you through the creation of the C# application and then you can simply follow the same steps for creating the Visual Basic application and make a few minor changes to the code.
-
To create a new project in C#, select New Project → Visual C# Projects → Windows Application. Name the project Ch10ClockCS and click OK to create the project. Your project will be created and Form1.cs will be added to your project.
-
In the Forms Designer, add two Label controls to the form. Also, doubleclick the Timer control in the Toolbox to place a timer on the form. Size the form and position and size the Label controls as shown in Figure 10-3.
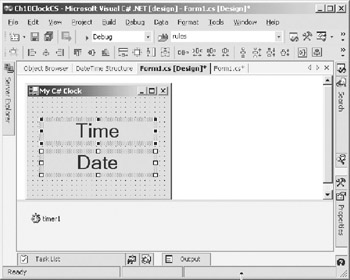
Figure 10-3: C# Form1 -
Select both Label controls on the form. In the Properties window, set the font size of the Label controls to 24.
-
Double-click the Timer control in the form designer to open the event handler for the timer. Place the call to the ResetClock function, as shown at the bottom of Listing 10-1.
Listing 10-1: C# Code for Form1

using System; using System.Drawing; using System.Collections; using System.ComponentModel; using System.Windows.Forms; using System.Data; namespace Ch10ClockCS { /// <summary> /// Summary description for Form1. /// </summary> public class Form1 : System.Windows.Forms.Form { private System.Windows.Forms.Timer timer1; private System.Windows.Forms.Label lblTime; private System.Windows.Forms.Label lblDate; private System.ComponentModel.IContainer components; public Form1() { // // Required for Windows Form Designer support // InitializeComponent(); // // TODO: Add any constructor code after // InitializeComponent call // timer1.Start(); ResetClock(); } /// <summary> /// Clean up any resources being used. /// </summary> protected override void Dispose( bool disposing ) { if( disposing ) { if (components != null) { components.Dispose(); } } base.Dispose( disposing ); } #region Windows Form Designer generated code /// <summary> /// Required method for Designer support do not modify /// the contents of this method with the code editor. /// </summary> private void InitializeComponent() { this.components = new System.ComponentModel.Container(); this.lblTime = new System.Windows.Forms.Label(); this.lblDate = new System.Windows.Forms.Label(); this.timer1 = new System.Windows.Forms.Timer(this.components); this.SuspendLayout(); // // lblTime // this.lblTime.Font = new System.Drawing.Font("Microsoft Sans Serif", 24F, System.Drawing.FontStyle.Regular, System.Drawing.GraphicsUnit.Point, ((System.Byte)(0))); this.lblTime.Location = new System.Drawing.Point(26, 40); this.lblTime.Name = "lblTime"; this.lblTime.Size = new System.Drawing.Size(180, 32); this.lblTime.TabIndex = 0; this.lblTime.Text = "label1"; this.lblTime.TextAlign =
  System.Drawing.ContentAlignment.MiddleCenter; // // lblDate // this.lblDate.Font = new System.Drawing.Font
  ("Microsoft Sans
  Serif", 24F, System.Drawing.FontStyle.Regular,
  System.Drawing.GraphicsUnit.Point,
  ((System.Byte)(0))); this.lblDate.Location = new System.Drawing.Point(26, 92); this.lblDate.Name = "lblDate"; this.lblDate.Size = new System.Drawing.Size(180, 32); this.lblDate.TabIndex = 1; this.lblDate.Text = "label2"; this.lblDate.TextAlign =
  System.Drawing.ContentAlignment.MiddleCenter; // // timer1 // this.timer1.Interval = 1000; this.timer1.Tick += new System.EventHandler
  (this.timer1_Tick); // // Form1 // this.AutoScaleBaseSize = new System.Drawing.Size(5, 13); this.ClientSize = new System.Drawing.Size(232, 165); this.Controls.AddRange(new System.Windows.Forms.
  Control[] { this.lblDate, this.lblTime}); this.Name = "Form1"; this.Text = "My C# Clock"; this.ResumeLayout(false); } #endregion /// <summary> /// The main entry point for the application. /// </summary> [STAThread] static void Main() { Application.Run(new Form1()); } private void timer1_Tick(object sender, System.EventArgs e) { ResetClock(); } protected void ResetClock() { string s = DateTime.Now.ToString(); int i = s.IndexOf(" "); this.lblTime.Text=s.Substring(i+1); this.lblDate.Text=s.Substring(0,i); } } }
 -
Duplicate the code for the ResetClock function into the code for the form just after the code for the Timer1 tick event.
-
In the Form1 function, add the code to start the timer and reset the clock labels.
Build and run the application by clicking the Debug Start tool button. If you have no compile errors, your application should run and the digital clock should appear as shown in Figure 10-4. You will soon learn that C# does not do some of the things that Visual Basic programmers take for granted. In some respects, it is not as "user-friendly". The following list presents just a few of the things that you will encounter immediately if you are a Visual Basic programmer just learning C#:
-
C# is very case sensitive. Among other things, this means that IntelliSense does not work unless you use the proper case when typing object names. For example, if you type system., IntelliSense will not pop up the properties for the System object. You must enter System. to get it to work.
-
C# will not automatically insert parentheses () after a method or function call as Visual Basic does. If you do not enter (), the compiler will bark at you.
-
In order to have IntelliSense list controls on a form for you, you must use the keyword "this" instead of "Me". Note that "this" is lowercase.
-
Indenting by the C# editor is automatic as you enter new code, but if you disturb the spacing of the indenting, C# does not automatically correct the indenting for you as Visual Basic does.
-
The C# editor does not immediately list errors in the Task List when you code a line that will produce a compiler error. Visual Basic does this dynamically when you enter a line of code with an error in it. In C#, you must compile before the error lines will be placed into the Task List.
-
The C# editor does not dynamically remove the "underline" from a line of code that is in error when you correct the error. Again, you must compile to ensure that the line of code has been corrected and that it will now compile without error.
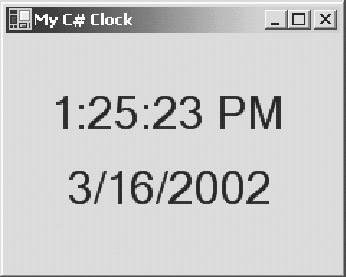
Figure 10-4: Running the C# digital clock
Visual Basic Clock Application
To create the Visual Basic clock application, follow the same steps that I outlined for the C# project. The only things that change are shown in Listing 10-2. The changes are only in the Timer1 tick event and the code for the ResetClock procedure. On the form, change the Text property of the form to "My VB Clock". You will notice that the code is almost identical except for the following five things:
-
The semicolons have been removed.
-
The braces have been removed.
-
"this". was changed to "Me"..
-
C# does not use or allow continuation marks. On the other hand, C# does not need the continuation marks in order to continue a line to one or more lines. You can simply press the Enter key at a reasonable line length. This will allow you to control the length of long lines and make your code more readable.
-
The use of Dim has replaced the C# typing method.
Listing 10-2: Visual Basic Code Changes
Private Sub Timer1_Tick(ByVal sender As System.Object, _ ByVal e As System.EventArgs) _ Handles Timer1.Tick ResetClock() End Sub Protected Sub ResetClock() Dim s As String = Now.ToString Dim i As Short = s.IndexOf(" ") Me.lblTime.Text = s.Substring(i + 1) Me.lblDate.Text = s.Substring(0, i) End Sub If you now compile and run the Visual Basic application, you will see no difference in the appearance of the forms. The WinForms model is the same, regardless of the base language behind it.
|
| < Free Open Study > |
|
EAN: 2147483647
Pages: 172