Adding a Menu to the Form
|
| < Free Open Study > |
|
Manipulating Controls on the Form
First, you'll resize one of the buttons. In order to do this, you'll use a couple of the objects that were created in Listing 6-5 but are reproduced here for ease of reference.
Lines 01 through 04 of Listing 6-6 represent the objects that were previously created. A relatively simple object is created in line 05. Here, you create an instance of the System.Drawing.Size object. Line 06 sets the Size object to a new height and width. Line 07 does the actual changing of the size of the button by using the SetValue method of the PropertyDescriptor (pd).
Listing 6-6: Resizing a Control
01 Dim pdc As PropertyDescriptorCollection 02 pdc = TypeDescriptor.GetProperties(btn1) 03 Dim pd As PropertyDescriptor 04 pd = pdc("Size") 05 Dim sz As System.Drawing.Size 06 sz = New Size(100, 60) 07 pd.SetValue(btn1, sz) 08 MsgBox("custom Button size = " + pd.GetValue(btn1).ToString()) For now, you will not show the execution of the MsgBox(), which would simply display the new size of the button. You will do that after you reposition the button, which is accomplished by the code in Listing 6-7.
Listing 6-7: Repositioning the Button
01 pd = pdc("Location") 02 Dim loc As System.Drawing.Point 03 loc = New Point(30, 30) 04 pd.SetValue(btn1, loc) 05 MsgBox("New button location = " & _ 06 pd.GetValue(btn1).ToString()) Line 01 sets the PropertyDescriptor object (pd) to the Location property. Line 02 dimensions a System.Drawing.Point object named loc. Line 03 sets the Point object to a new top and left, or x and y in .NET context. Again, line 04 simply sets the new location of the button.
In Figure 6-5, notice that the button (btn2) has been resized and repositioned. You can now see that there was a second button hidden behind the first. Because you are stopping the execution of the add-in while the message boxes are displayed, and because you cannot click the client IDE while the add-in is still executing, you cannot see the values of the property page (shown with blank properties). Once the automation add-in has completed its processing, you will be able to examine all of the properties that have been automatically set by the automation process.
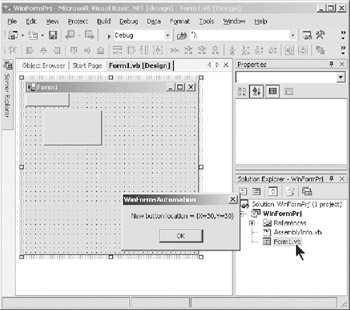
Figure 6-5: Button resized and repositioned
Next, you will change the Name and Text (Caption in VB 6.0) properties of the button. The code for doing this is shown in Listing 6-8.
Listing 6-8: Changing the Button's Name and Text Properties
01 " add text property 02 Dim s2 As String 03 s = "&Test Button" 04 pd = pdc("Text") 05 s2 = pd.GetValue(btn1).ToString() 06 pd.SetValue(btn1, s) 07 MsgBox("Default Text = " & s2 & Chr(10) & _ 08 "New Text = " & pd.GetValue(btn1).ToString()) 09 10 " change Name property 11 s = "txtTestButton" 12 pd = pdc("Name") 13 s2 = pd.GetValue(btn1).ToString() 14 pd.SetValue(btn1, s) 15 MsgBox("Default Name = " & s2 & Chr(10) & _ 16 "New Name = " & pd.GetValue(btn1).ToString()) Lines 02 and 03 simply set the value to be placed into the Text property in a string variable. Line 04 sets the PropertyDescriptor object to point to the Text property. Line 05 picks up the default Text property, which is always blank, in order to display it along with the new property value. Line 06 sets the new value in the Text property, using the SetValue method of the PropertyDescriptor object.
Line 11 sets a new value for the Name property into a string variable. Line 12 sets the PropertyDescriptor object to the Name property. Line 13 gets the default Name property assigned to the button at the time it was created. In this case it is "button1". Line 14 sets the new value of the Name property in the button.
Figure 6-6 shows the button just after the message box in line 15 is executed.
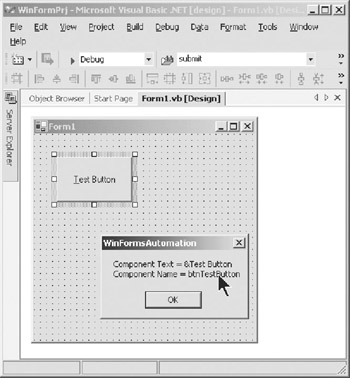
Figure 6-6: Showing the button's new text and name
Now you will remove the second button to show that it is much simpler to destroy a component than it is to create it. (It seems like there is a lesson to be learned about life in that statement!) Actually, it is very simple to remove a component once you have a handle to the Forms Designer. The following snippet removes btn2 from the form:
fdHost.DestroyComponent(btn2) ListComponents("form after removing one button...", fdHost.Container.Components) Figure 6-7 shows the form after the second button has been removed from the form. The message box lists the form and its remaining components.
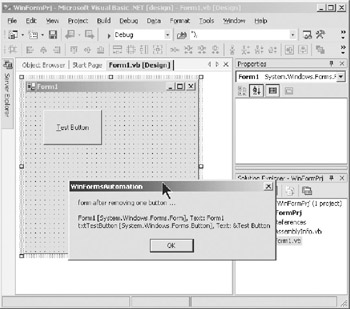
Figure 6-7: Btn2 removed
Looping Through a Collection of Selected Components
In an add-in, you will probably want to perform some operation on one or more selected components on a form. The code in Listing 6-9 shows how to select a component from the add-in. It then shows how to access the properties of each selected component.
Listing 6-9: Selecting a Component
01 ' Select a component on a form 02 MsgBox("Selecting button component...") 03 Dim sel As ISelectionService 04 sel = CType(fdHost.GetService(Type.GetType  05 ("System.ComponentModel.Design.ISelectionService,System")),
  06 System.ComponentModel.Design.ISelectionService) 07 sel.SetSelectedComponents(New Object() {btn1}) 08 09 ' get the count of selected components 10 Dim i As Integer = sel.SelectionCount 11 MsgBox("Selected Component Count = " & CStr(i))
 Line 03 dimensions an object of type ISelectionService. The ISelectionService object provides an interface for a designer to select components. This allows you to select a specific component, such as the code is doing in this code snippet. Lines 04 and 07 select the one remaining button on the form. Line 10 gets the count of selected components. Obviously, there is only one component selected, because you just selected it. Figure 6-8 shows that the button has been selected and displays the count of selected components.
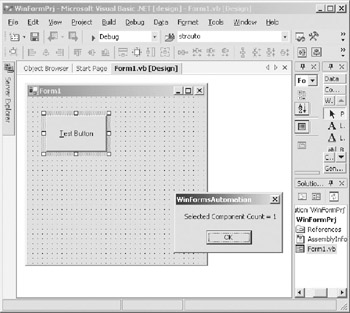
Figure 6-8: Selected component and the count of selected components
Next, you will loop through the collection of selected components. Although there is only one component selected, this code would display the specified properties, regardless of the number of components a user may have selected. It is common practice to select one or more components, usually of the same type, prior to invoking some functionality in an add-in that would perform operations on the properties of all selected components.
Listing 6-10 shows the code for listing two properties of each component in the collection of selected components. Although this code is only displaying the value of the specified properties, Name and Text, you have already seen how to use the SetValue method of the PropertyDescriptor object to change the value of properties.
Listing 6-10: Looping Through the Collection of Selected Components
12 ' loop through the selected component collection 13 ' listing properties 14 Dim ic As IComponent 15 Dim c As Component 16 For Each c In sel.GetSelectedComponents 17 ic = CType(c, IComponent) 18 pdc = TypeDescriptor.GetProperties(ic) 19 pd = pdc("Text") 20 s = pd.GetValue(ic).ToString 21 pd = pdc("Name") 22 s2 = pd.GetValue(ic).ToString 23 MsgBox("Component Text = " & s & Chr(10) & _ 24 "Component Name = " & s2) 25 Next Lines 14 and 15 simply dimension two objects, which you will use in the loop to access the components in the collection. Line 16 begins the loop through the collection of selected components. Using the GetSelectedComponents method of the ISelectionService object (sel, created in Listing 6-9), you create a collection of the components that you have selected. Line 17 casts the Component to type IComponent, which will be used to access the specific properties.
You have previously seen the use of IComponent, PropertyDescriptor, and PropertyDescriptorCollection. Here you are using them again to display the Name and Text properties of each component that you have selected. In a real add-in scenario, the user may well have selected multiple components on which the add-in is to perform changes to properties. Normally, the selected components would be of the same type, such as text boxes. Again, you could just as easily be setting properties instead of simply displaying them.
You can let your imagination and creativity run wild thinking of applications for this type of code.
Figure 6-9 shows the display of the properties from the selected component. If there were multiple components in the collection, the message box would be displayed multiple times.
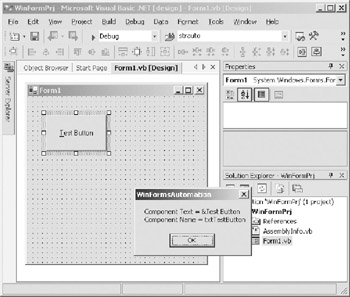
Figure 6-9: Displaying properties of selected component
Accessing Designer Options
Although this topic has nothing to do with the creation of the form, let's take a short side trip in order to show the lengths to which you can go with the objects included in the automation model. The code snippet in Listing 6-11 illustrates how to programmatically access the Window Forms Designer options. These options are exposed to the developer in the IDE by selecting Tools → Options. When the Options dialog box appears, click the Windows Forms Designer folder, and then click the General arrow. Finally, click the plus sign (+) to the left of the GridSize option to expose the separate Height and Width (GridSize) properties. You will see the properties as displayed in Figure 6-10.
Listing 6-11: Accessing Windows Designer Properties
01 Try 02 'Access designer properties 03 MsgBox("Accessing designer grid size...") 04 Dim opt As IDesignerOptionService 05 opt = CType(fdHost.GetService(Type.GetType  06 ("System.ComponentModel.Design.
  07 IDesignerOptionService,System")), _ 08 System.ComponentModel.Design.
  09 IDesignerOptionService) 10 Dim siz As Size = CType(opt.GetOptionValue
  11 ("WindowsFormsDesigner\General",
  12 "GridSize"), Size) 13 MsgBox(siz.ToString()) 14 Catch e As System.Exception 15 MsgBox("failed accessing designer props") 16 MsgBox(e.tostring()) 17 End Try
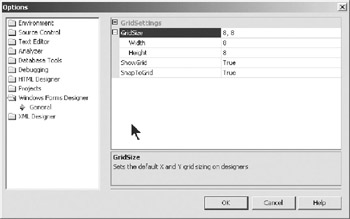
Figure 6-10: Accessing Designer properties in the Options dialog box
Now, in Listing 6-11 you will do programmatically from the add-in what you have just done manually in the IDE.
Line 04 dimensions an object of the IDesignerOptionService type. The IDesignerOptionService class gets the service object of the specified type. Line 04 uses the GetService method to create an object (opt) of the IDesignerOptionService type. The GetService method returns an object that represents a service provided by the Component or by its Container. Simply stated, opt is an object representing the Options dialog box. It is a Container for system options. Line 10 dimensions a System.Drawing.Size object and points it to the Windows Forms Designer, General folder in the Options dialog box.
Line 13 displays the Size object settings, which are the Height and Width settings for the grid on a form designer. The object, opt, also has a SetOption method, which you could use to change the GridSize settings programmatically.
Admittedly, this is probably not a feature for which you would find a practical use, but it again illustrates the depth of object exposure in the automation model.
Adding an Event Handler
Not only can you add a component (button) to a form programmatically, but you can also add an event handler to a form programmatically. The code in Listing 6-12 adds an event handler to the form for the button component.
Listing 6-12: Adding an Event Handler
01 Dim click As EventDescriptor 02 click = TypeDescriptor.GetEvents(btn1)("Click") 03 Dim eventSvc As IEventBindingService 04 eventSvc = CType(fdHost.GetService  05 (Type.GetType("System.ComponentModel.Design.
  06 IEventBindingService,System")),
  07 System.ComponentModel.Design.IEventBindingService) 08 Dim clickProp As PropertyDescriptor 09 clickProp = eventSvc.GetEventProperty(click) 10 clickProp.SetValue(btn1, "btnTestButton_OnClick") 11 Dim addSvc As IcomponentChangeService
  12 addSvc = CType(fdHost.GetService(Type.GetType 13 ("System.ComponentModel.Design.
  14 IComponentChangeService,System")),
  15 System.ComponentModel.Design.IComponentChangeService)
 Line 01 dimensions an object as EventDescriptor. An EventDescriptor provides information about an event. Line 02 references the TypeDescriptor class. The TypeDescriptor object is used to get information about the properties and events for a component. The GetEvents method gets information about the "Click" event.
Line 03 dimensions an object of the IEventBindingService type. The event-binding service provides a way to expose events as properties. This service can expose events for a particular component as an array of PropertyDescriptor objects with a data type of string. Line 04 casts the dimensioned object, eventSvc, to System Component Designer. Line 08 simply dimensions a PropertyDescriptor object, which you have used several times before in this chapter.
Line 09 sets the PropertyDescriptor, clickProp, to the object that was created in lines 02 through 04. The PropertyDescriptor object, clickProp, now has the information needed to create the Click event for a button component. Line 10 uses the SetValue method of the PropertyDescriptor object in preparation for setting the event on the form.
Lines 11 and 12 hook the event to the control and place the event on the form. The IComponentChangeService class provides an interface to add and remove the event handlers for events that add, change, remove, or rename components. If you look at the code in the form after the automation process is complete, you will see that the event code appears as follows:
Private Sub btnTestButton_OnClick(ByVal sender As System.Object, _ ByVal e As System.EventArgs) Handles btnTestButton.Click End Sub
|
| < Free Open Study > |
|
EAN: 2147483647
Pages: 172