Manipulating Controls on the Form
|
| < Free Open Study > |
|
Adding Controls to the Form
Now that the project has been created and Form1 has been added to the project, the add-in proceeds to add two buttons to the form. The code snippet in Listing 6-4 contains the code for adding the two buttons to the form.
| Note | Owing to the number of topics related to the IDesignerHost and IComponent objects in the MSDN help file, it is beyond the scope of this book to describe all of the numerous objects, methods, properties, and events associated with them. Only the objects and methods being used are described. |
Listing 6-4: Adding Buttons to the Form
01 oVB.Windows.Item("Form1.vb [Design]").Activate() 02 " uncomment the next line and comment the previous line 03 " to work with a VC# form instead of vb 04 'oVB.Windows.Item("Form1.cs [Design]").Activate() 05 " Get IDesignerHost, the root of the forms designer object model 06 Dim fdHost As IDesignerHost 07 fdHost = CType(oVB.ActiveWindow.Object, IDesignerHost) 08 " Add two buttons, enumerate and print components. 09 Dim btn1 As IComponent 10 s = fdHost.RootComponent.Site.Name 11 btn1 = fdHost.CreateComponent(fdHost.GetType  12 ("System.Windows.Forms.Button,System.Windows.Forms")) 13 Dim btn2 As IComponent 14 btn2 = fdHost.CreateComponent(fdHost.GetType
  15 ("System.Windows.Forms.Button,System.Windows.Forms")) 16 Dim parent As PropertyDescriptor =
  17 TypeDescriptor.GetProperties(btn1)("Parent") 18 parent.SetValue(btn1, fdHost.RootComponent) 19 parent.SetValue(btn2, fdHost.RootComponent) 20 ListComponents("form with two buttons...", fdHost.Container.Components)
 Line 01 activates the window containing Form1.vb. Although it would be the active window because it was just added to the project, this line demonstrates how to make any window the active window.
Line 06 creates a pointer object to the WinForms Designer object. This object is an instance of the IDesignerHost interface. IDesignerHost provides an interface for managing designer transactions and components. It is used here for adding components or, in this case, controls to the form.
Lines 09 and 13 dimension two command buttons for placement on the form. They are dimensioned as IComponent objects. IComponent provides functionality required by all components and facilitates the creation of the components that you are placing on the form. Line 10 demonstrates how to display the name of the form currently pointed to by the IDesignerHost object, fdHost. It is not used in the automation process and is provided simply for demonstration purposes.
Lines 11 and 14 actually create the two buttons and place them on the form, using the CreateComponent method of the IDesignerHost object. CreateComponent creates a component of the specified type and adds it to the design document. In this case, calling the fdHost.GetType method specifies the type of Windows Forms button. At this point, the buttons are created but not yet placed on the form. Line 16 creates a parent object as PropertyDescriptor for placement of the buttons on the form. This line uses the TypeDescriptor.GetProperties overloaded method. In this case, the method gets the collection of properties for a specified type of component (Button) using a specified array of attributes as a filter.
Lines 18 and 19 place the created buttons on the form. Next, the ListComponents function is called to display the components in a message box.
While the message box is displayed, you can view the buttons on the form, as shown in Figure 6-3. There is only one problem here: Visual Studio initially loads all controls at the same place on a form. Therefore, you will see that only one of the buttons is visible. This is due to the fact that one button is overlaying the other button.
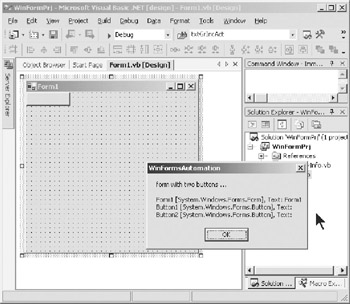
Figure 6-3: Buttons placed on the form
The code snippet in Listing 6-5 simply displays the properties of the components just after they have been placed on the form. Line 03 dimensions pdc as a PropertyDescriptorCollection. This represents a collection of PropertyDescriptor objects. A PropertyDescriptor object provides an abstraction of a property on a class.
Listing 6-5: Printing the Component Properties
01 " Get the properties of the remaining component, 02 " then print their names 03 Dim pdc As PropertyDescriptorCollection 04 pdc = TypeDescriptor.GetProperties(btn1) 05 " Get and set the value of the size property, showing values 06 " before and after. 07 Dim pd As PropertyDescriptor 08 pd = pdc("Size") 09 MsgBox("Default Button size = " + pd.GetValue(btn1).ToString()) You can query the PropertyDescriptorCollection collection about its contents by using the properties available in the PropertyDescriptorCollection class. You can use the Count property to determine the number of elements in the collection. Use the Item property to get a specific property by index number or by name. The Item property is the default property and therefore is assumed in the code in Listing 6-5.
Line 04 sets up the PropertyDescriptorCollection for btn1. Line 07 dimensions the PropertyDescriptor object and Line 08 sets the object pd to the "Size" property of the btn1 component. The "Size" property is of type System.Drawing.Size, which denotes (x,y) values.
Executing the MsgBox will display the default size of the btn1 component as it was sized when placed on the form.
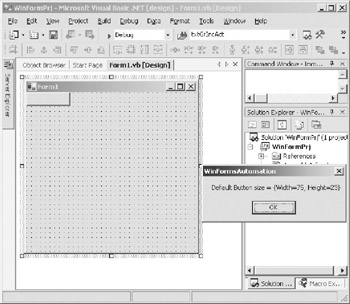
Figure 6-4: Default size of btn1
Now that you've placed two controls on the form, you'll now resize and reposition the controls.
|
| < Free Open Study > |
|
EAN: 2147483647
Pages: 172
- Chapter Six Defining Pain or Critical Business Issue
- Chapter Eight Creating Visions Biased to Your Solution
- Chapter Eleven Gaining Access to People with Power
- Chapter Fifteen Sales Management System: Managers Managing Pipelines and Salespeople
- Chapter Sixteen Creating and Sustaining High-Performance Sales Cultures