Enhancing the Add-in
|
| < Free Open Study > |
|
In Chapter 2, you placed some code in several places in the Connect class to trace the flow of the add-in connect and disconnect processes and to cause the add-in to make a simple response to clicking the user interface menu option. To enhance the add-in, you will remove all of the temporary demonstration code and replace it with the code that will allow you to communicate with the new functionality that you will be adding.
Modifying the Connect Class
The first thing I have done in Listing 3-1 is removed the message boxes to clean up the interface. Here is the OnConnection method from your add-in, as I left it in Chapter 2. You will note that I have changed the object variable applicationObject to oVB. This was done simply to shorten the length of the variable, which will make the code more readable because it is used constantly. Next, I have changed the text of the add-in's menu from "MyAddinTest1" to "Smart Desktop". This will make my add-in look a little more professional. Finally, I have added a variable for the specification of the Office icon button. I have done this so that the variable can be changed at runtime without recompiling, thus allowing me to try different icons in the menu. There are numerous icons in Office.DLL, and you can experiment with the one that you want to use. All of these changes appear in boldface.
Listing 3-1: Modifying the OnConnection Method
Public Sub OnConnection(ByVal application As Object, _ ByVal connectMode As ext_ConnectMode, _ ByVal addInInst As Object, _ ByRef custom() As Object) _ Implements IDTExtensibility2.OnConnection Dim iBitMap As Integer oVB = CType(application, EnvDTE.DTE) addInInstance = CType(addInInst, EnvDTE.AddIn) ' changed test of connectmode from ' ext_ConnectMode.ext_cm_UISetup If connectMode = ext_ConnectMode.ext_cm_Startup Then Dim objAddIn As AddIn = CType(addInInst, AddIn) ' moved to module level so OnDisconnect can see it ' Dim CommandObj As Command 'IMPORTANT! 'If your command no longer appears on the appropriate ' command bar, you add a new or modify an existing ' command, or if you would like ' to re-create the command, close all instances of Visual ' Studio .NET and double-click the file ' ReCreateCommands.reg' ' in the folder holding the source code to your add-in. ' IMPORTANT! ' Remove the MsgBox at Connect Time ' MsgBox("On Connection") Try IBitMap = 59 CommandObj = _ oVB.Commands.AddNamedCommand(objAddIn, _ "MyCommand1", _ "Smart Desktop", _ "Executes the command for MyAddinTest1", _ True, iBitMap, Nothing, 1 + 2) _ '1+2 == vsCommandStatusSupported+vsCommandStatusEnabled CommandObj.AddControl( _ oVB.CommandBars.Item("Tools")) Catch e As System.Exception MsgBox("Can't place toolbutton, error:" & _ e.Message, MsgBoxStyle.Critical, _ "MyAddinTest1") End Try End If End Sub Now I need to make a minor change to the OnDisconnection method. I remove the MsgBox that tells you that you are in the OnDisconnection method, as shown in Listing 3-2. Because you have already seen how and when the OnDisconnection method is called, you no longer need this MsgBox. The code that I removed appears in boldface.
Listing 3-2: Modifying the OnDisconnection Method
Public Sub OnDisconnection( _ ByVal RemoveMode As ext_DisconnectMode, _ ByRef custom() As Object) _ Implements IDTExtensibility2.OnDisconnection Try ' display a message to tell what we are about to do ' MsgBox("Disconnect, remove Tool Button", _ MsgBoxStyle.Information, "MyAddinTest1") ' remove the add-in command button CommandObj.Delete() Catch e As System.Exception ' if we should fail to remove the button, display the error MsgBox("Error in Disconnect: " & _ e.Message, _ MsgBoxStyle.Critical, _ "MyAddinTest1") End Try End Sub Next, I make a change to the event handler for the Add-in menu Click event. Instead of putting up a MsgBox, which is not really impressive, I display the UI for the new functionality that the add-in is now going to have. Although I have not designed the UI (form) yet, I name it frmTreeView so that I can go ahead and change the event handler to load it. The code for the event handler has been modified, as shown in Listing 3-3.
Listing 3-3: Modifying the Event Handler
Public Sub Exec(ByVal cmdName As String, _ ByVal executeOption As vsCommandExecOption, _ ByRef varIn As Object, _ ByRef varOut As Object, _ ByRef handled As Boolean) _ Implements IDTCommandTarget.Exec Dim oFrm As New frmTreeView () handled = False If (executeOption = _ vsCommandExecOption.vsCommandExecOptionDoDefault) _ Then If cmdName = "MyAddinTest1.Connect.MyCommand1" Then handled = True 'MsgBox("You Rang?", MsgBoxStyle.Question, "MyAddinTest1") oFrm.Show() Exit Sub End If End If End Sub I have done several things to the event handler. First, I commented out the MsgBox, which was the original response to the user clicking the menu item. Second, I added a dimension of the form to be loaded. In VB 6.0, I could have simply written the following instruction to load the form:
frmTreeView.Show
In Visual Basic .NET, you first have to dimension the object and then show the form, as shown in the following code and in the previous code:
Dim oFrm As New frmTreeView() oFrm.Show()
Once the UI (frmTreeView) is loaded, it will act as the vehicle of communication with the features of your add-in.
Designing the UI Form (frmTreeView)
First, open up the MyAddinTest1 project in .NET. Next, add a form to the project. You can do this by clicking the down arrow next to the Add New Item tool button (the second button from the left on the main toolbar). A drop-down list will appear, as shown in Figure 3-1.
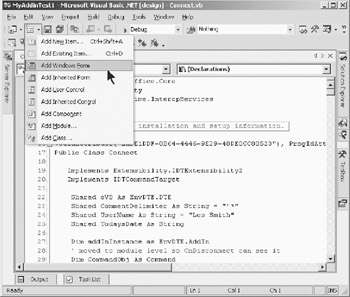
Figure 3-1: Adding a Windows Form
Select Add Windows Form. A form appears in the Forms Designer, as shown in Figure 3-2.
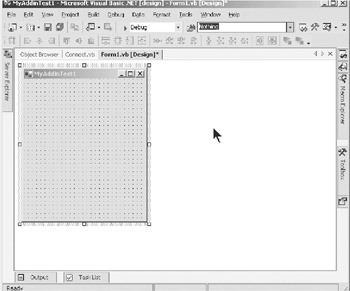
Figure 3-2: Configuring the Windows Form
Size the form as shown in Figure 3-2. Press F4 to bring up the property page for the form. The property page should appear as shown in Figure 3-3, after you make the following changes. In the property page, change the Text property (formerly the Caption in previous versions of VB) to MyAddinTest1. Also, change the Name property to frmTreeView. Next, change the TopMost property to True. This will cause the form, which will be the UI for the add-in, to remain on top of the IDE, even if you click somewhere else on the IDE. I do not want the UI of the add-in to go behind the IDE, leaving you to wonder what happened to it. The TopMost property is a neat new property in VB .NET. In earlier versions of Visual Basic, I would have had to use the API SetWindowPos to cause the form to stay on top.
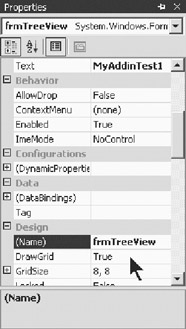
Figure 3-3: Form property page
Next, I add a TreeView control to the form. In the past, I have always used a number of tool buttons that had drop-down menus as the UI for my add-ins. I have had suggestions for making a "dockable tool window", with a TreeView for the hierarchical menu. This saves a lot of space in the IDE, especially when the add-in is not currently in use. Although I will not take the time here to create a dockable window, I am implementing the same concept here, just in a simpler form for demonstration purposes.
To add the TreeView control to the form, click the Toolbox tab on the right of the Forms Designer window. The Toolbox will appear, as shown in Figure 3-4.

Figure 3-4: Placing a TreeView control
Move the mouse to the TreeView option and click it. The mouse pointer becomes a TreeView image. Move the mouse over the form, click it, and the TreeView control drops onto the form. Move and resize the TreeView control to cover the form, as shown in Figure 3-5.
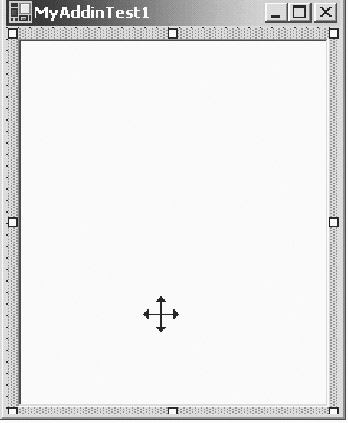
Figure 3-5: The resized TreeView control
Press F4 to bring up the property page for the TreeView control. Change the name of the TreeView control to tvMenu. In the property page, scroll down to the Nodes property. You will see that it is a Collection property. Click in the right-hand box marked Collection, and an ellipsis will appear. Click the ellipsis and the TreeNode Editor dialog box (see Figure 3-6) displays.
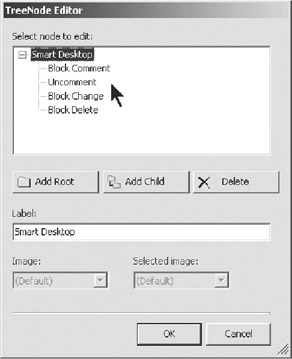
Figure 3-6: Configuring the TreeView
To begin building the TreeView menu, click the Add Root button. Enter Smart Desktop into the Label box. Next, click the Add Child button and enter Block Comment into the Label box. Then click the top node (Smart Desktop), so you can add another child node to it. Next, click Add Child and enter Uncomment into the Label box. After you've made these changes, the dialog box shown in Figure 3-6 should appear.
To finish configuring the TreeView control, click the OK button on the TreeNode Editor dialog box. This causes the TreeView to be configured. In the TreeView, click the + box, and the TreeView opens, as shown in Figure 3-7.
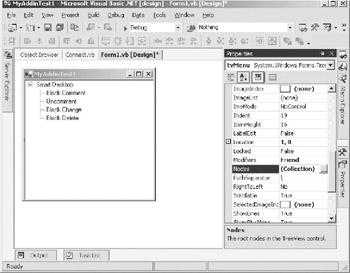
Figure 3-7: The completed TreeView
Code Generated by the Forms Generator
Listing 3-4 is the code I generated for the add-in's UI. I don't explain all of the code in the listing, as this isn't a book on WinForms. You'll see that the code for this form is totally unlike the code for VB 6.0 forms. Hopefully, this isn't the first time you've noted this.
Listing 3-4: Code for frmTreeView
Public Class frmTreeView Inherits System.Windows.Forms.Form #Region " Windows Form Designer generated code " Public Sub New() MyBase.New() 'This call is required by the Windows Form Designer. InitializeComponent() 'Add any initialization after the InitializeComponent() call End Sub 'Form overrides dispose to clean up the component list. Protected Overloads Overrides Sub Dispose(ByVal disposing As Boolean) If disposing Then If Not (components Is Nothing) Then components.Dispose() End If End If MyBase.Dispose(disposing) End Sub Friend WithEvents tvMenu As System.Windows.Forms.TreeView 'Required by the Windows Form Designer Private components As System.ComponentModel.IContainer 'NOTE: The following procedure is required by the Windows Form Designer 'It can be modified using the Windows Form Designer. 'Do not modify it using the code editor. <System.Diagnostics.DebuggerStepThrough()> Private Sub InitializeComponent() Me.tvMenu = New System.Windows.Forms.TreeView() Me.SuspendLayout() ' 'tvMenu ' Me.tvMenu.ImageIndex = -1 Me.tvMenu.Name = "tvMenu" Me.tvMenu.Nodes.AddRange(New System.Windows.Forms.TreeNode() _ {New System.Windows.Forms.TreeNode("Smart Desktop", _ New System.Windows.Forms.TreeNode() _ {New System.Windows.Forms.TreeNode("Block Comment"), _ New System.Windows.Forms.TreeNode("Uncomment"), _ New System.Windows.Forms.TreeNode("Block Change"), _ New System.Windows.Forms.TreeNode("Block Delete")})}) Me.tvMenu.SelectedImageIndex = -1 Me.tvMenu.Size = New System.Drawing.Size(248, 232) Me.tvMenu.TabIndex = 0 ' 'frmTreeView ' Me.AutoScaleBaseSize = New System.Drawing.Size(5, 13) Me.ClientSize = New System.Drawing.Size(232, 213) Me.Controls.AddRange(New System.Windows.Forms.Control() _ {Me.tvMenu}) Me.Name = "frmTreeView" Me.Text = "MyAddinTest1" Me.TopMost = True Me.ResumeLayout(False) End Sub #End Region End Class
Adding Code to Handle TreeView Click Events
When the user clicks the TreeView, which is your menu for the add-in, you must have code to handle the Click event. Actually, you will key off of the AfterSelect event. The code for the AfterSelect event is shown in Listing 3-5.
Listing 3-5: TreeView AfterSelect Event
Private Sub tvMenu_AfterSelect(ByVal sender As Object, _ ByVal e As System.Windows.Forms.TreeViewEventArgs) _ Handles tvMenu.AfterSelect Select Case UCase$(e.Node.Text) Case "SMART DESKTOP" 'ignore root clicks Case "BLOCK COMMENT" Call Connect.BlockComment() Case "UNCOMMENT" Call Connect.BlockUnComment() Case "BLOCK CHANGE" Call Connect.BlockChange() Case "BLOCK DELETE" Call Connect.BlockDelete() Case Else MsgBox("Please click on a Child Node.", _ MsgBoxStyle.Information, "Unknown Request") End Select End Sub Because it is never good practice to place non-event handler code in the form, I have placed it in the Connect class for simplicity. Obviously, as you create a large add-in, you would probably want to create different classes for ease of maintainability. Note that the event handler calls Connect.BlockComment. Because the form itself does not have a pointer to an instance of the Connect class, you will use a Shared method, which is a new feature of VB .NET.
BlockComment Method
In VB 6.0, you would have to create an instance of a class to reference a method of that class from outside the class. Even a Friend method could not be referenced without instantiating an object of the class.
In VB .NET, Shared methods are introduced. They are somewhat analogous to a Public or Global method in a .BAS module in VB 6.0. The BlockComment function shown in Listing 3-6 is an example of such a method. This feature allows you to place a Shared method in a class, and then reference it from anywhere within the project without having to create an instance of the class in which the Shared method resides.
Listing 3-6: The BlockComment Method
Shared Sub BlockComment() Dim selCodeBlock As TextSelection '= oVB.ActiveDocument.Selection() Dim sp As EditPoint '= selCodeBlock.TopPoint.CreateEditPoint() Dim ep As TextPoint '= selCodeBlock.BottomPoint Dim comntChr As String = "'" ' Option Strict does not allow implied conversion of an object Try oVB.UndoContext.Open("Block Comment") selCodeBlock = CType(oVB.ActiveDocument.Selection(), _ EnvDTE.TextSelection) sp = CType(selCodeBlock.TopPoint.CreateEditPoint(), envdte.EditPoint) ep = CType(selCodeBlock.BottomPoint, EnvDTE.TextPoint) 'ep = selCodeBlock.BottomPoint Catch MsgBox("Failed to set up text objects.", MsgBoxStyle.Critical) 'set up an undo context for the whole commented block End Try Try sp.Insert("'* Block Commented by Les Smith on " & _ Format(DateValue(CType(Today, String)), "mm/dd/yyyy") & vbCrLf) Do While (sp.Line < ep.Line) sp.Insert(comntChr) sp.LineDown() sp.StartOfLine() Loop sp.Insert("'* End of Block Commented by Les Smith " & vbCrLf) Catch ' if error, clean up the undo context ' otherwise the editor can be left in perpetual undo context oVB.UndoContext.Close() End Try End Sub
Making BlockComment Simpler
At this point, I need to digress for just a bit. Compared to .NET, the VB 6.0 extensibility model was simpler, much smaller, and relatively easier to use. In my humble opinion, the .NET developers went off the deep end with complexity- too many objects, methods, properties, and so forth. This is not to say that you could never find a use for all of the new objects. However, if you examine the BlockComment method in Listing 3-6, you will quickly see that most of the code is taken up with manipulating the TextSelection object and with creating and using such objects as EditPoint, TextPoint, and their associated methods. This is only one of many processing methods that you would normally create to get the work of my add-ins done. Consequently, in the method shown in Listing 3-6, I spend more time trying to figure out which objects and methods to use than I do in doing the actual work that I want the BlockComment method to perform.
Now, don't get me wrong, there will come a time when I will want to use some of the objects illustrated previously. My point here is that I would like to retrieve the block of text that the user selected, perform the operation of commenting the block, and put it back in the code window. And I would like to do that without spending my life analyzing the numerous objects, methods, and properties available to me in the extensibility model.
What I'm saying is that you can use all of the new objects, spending many, many hours trying to debug their use in a debugger, which doesn't allow you to make changes and execute the changed code without rebuilding your application.
Optionally, you can use a few methods I'm going to give you that will allow you to use the following methodology. You'll use these methods over and over again as you build new functionality in your add-ins.
-
GetCodeFromWindow
-
Perform the desired work on the code block
-
PutCodeBack
I compare the VB 6.0 objects to the .NET objects in later chapters, but for now, I am going to use some simple shortcut methods, a few of which I provide to you in the code supplied with this book.
Compare the code in Listing 3-6 with the code in the alternate BlockComment in Listing 3-7. Don't be concerned with the functions that it calls. They are supplied with the code in this book also, and you will find that they simply do the grunt work for you, leaving you to work out the processing logic without having to worry about what I call "housekeeping".
Listing 3-7: Alternate BlockComment Method
Shared Sub BlockComment() Dim iNL As Integer ' number of lines in block Dim sIN As String ' input selection Dim sOUT As String ' commented output Dim i As Integer ' Nbr chars before first non blank in first line Dim n As Short ' Nbr chars before first nb char subsequent lines Dim s As String Try ' Get selected text from active window sIN = GetCodeFromWindow() ' ensure the user selected something If sIN.Length < 1 Then MsgBox("Please select block to be commented.", _ vbExclamation, "BlockComment") Exit Sub End If ' Get the number of lines in the selected text iNL = MLCount(sIN, 0) ' Comment the block by looping thru the text For i = 1 To iNL ' get the next line from the block s = MemoLine(sIN, 0, i) ' Put a block comment line in front of the block If i = 1 Then sOUT = "'* Block Commented by Les Smith on " & _ Format(DateValue(CType(DateTime.Today, String)), _ "mm/dd/yyyy") & vbCrLf End If sOUT = sOUT & "'* " & s & vbcrlf Next i ' The block is commented, now end the block with ' a block delimiter sOUT = sOUT & "'* End of Block Commented by Les Smith" & vbCrLf ' Now put the code back in the window PutCodeBack(sOUT) Catch e As System.Exception MsgBox("Error: " & e.Message, vbCritical, "BlockComment") End Try End Sub Although I have a few more lines of code, and I will have to add several more methods to the class to support this new BlockComment method, the code is more straightforward and easier to follow than the code in Listing 3-6. You have no extensibility objects to worry about. You establish a set of common methods, which you can use every time you want to retrieve and put back a selected code block, without having to concern yourself with the extensibility objects. Using a few standard methods I have coded for you, you are only left to deal with the task of putting the comment headers and footers and the comment characters around the selected code. Later in this chapter, I show you the library methods provided with the book's code.
Making BlockComment Smarter
As I discussed earlier in this chapter, the block comment feature of the IDE is great, considering that VB 3.0 had no such feature. However, it sure would be better if the commenting characters just preceded the block being commented. You can do this by counting the number of spaces that precede the first nonblank character of the first line of the selection. In the improved BlockComment method shown in Listing 3-8, you call a method that will help you put the comments immediately in front of the selected code, where they should be.
Listing 3-8: Improved BlockComment Method
Shared Sub BlockComment() Dim iNL As Integer ' number of lines in block Dim sIN As String ' input selection Dim sOUT As String ' commented output Dim i As Integer Dim n As Short ' number of chars before first non blank in first line Dim s As String Try ' Get selected text from active window sIN = GetCodeFromWindow() ' ensure the user selected something If sIN.Length < 1 Then MsgBox("Please select block to be commented.", _ vbExclamation, "BlockComment") Exit Sub End If ' get the number of lines in the text iNL = MLCount(sIN, 0) ' comment the block For i = 1 To iNL s = MemoLine(sIN, 0, i) If i = 1 Then n = CountSpacesBeforeFirstChar(s) sOUT = CType(IIf(n = 0, "", Space(n)), String) & _ "'* Block Commented by Les Smith on " & _ Format(DateValue(CType(DateTime.Today, String)), _ "mm/dd/yyyy") & vbCrLf End If sOut =sOut & Space(n) & CommentDelimiter & s & vbCrlf Next i ' now end the block sOUT = sOUT & CType(IIf(n = 0, "", Space(n)), String) & _ "'* End of Block Commented by Les Smith" & vbCrLf ' now put the code back PutCodeBack(sOUT) Catch e As System.Exception MsgBox("Error: " & e.Message, vbCritical, "BlockComment") End Try End Sub You will notice that I have added a call to a method called CountSpacesBeforeFirstChar. Also, you will see where I use the return values from the method. I have highlighted this new functionality in bold. By determining the number of blank characters before the first selected line and each subsequent line, I can position the comment characters immediately preceding the commented text lines without a lot of white space between the comment character and the text. I call this "smart commenting". Figure 3-8 shows the selected code prior to commenting it.
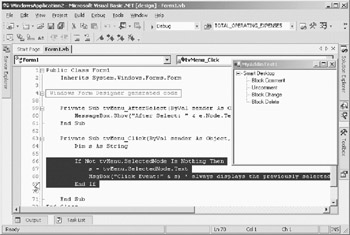
Figure 3-8: Select the code for commenting.
Once you have selected the code, if you have not already loaded the UI for the add-in, click the Smart Desktop menu option on the Tools menu. That will cause the UI form to be loaded as shown in Figure 3-8. Next, open the TreeView by clicking the plus sign (+) to the left of the Smart Desktop root node. Now, click the Block Comment node in the TreeView. Figure 3-9 shows the commented code.
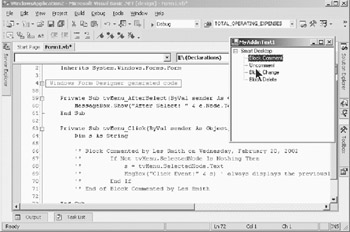
Figure 3-9: The commented code
BlockUnComment Method
The function shown in Listing 3-9 is activated by a click on the Uncomment node of the TreeView. Its purpose is to uncomment a selected block of code that was previously commented by the BlockComment function.
Listing 3-9: The BlockUnComment Method
Shared Sub BlockUnComment() Dim iNL As Integer ' number of lines in block Dim sIN As String ' input selection Dim sOUT As String ' commented output Dim i As Integer Dim n As Short ' number of chars before first non blank in first line Dim s As String Dim lsCD As String = "'* " Try ' Get selected text from active window sIN = GetCodeFromWindow() ' ensure the user selected something If sIN.Length < 1 Then MsgBox("Please select block to be commented.", _ vbExclamation, "BlockComment") Exit Sub End If ' get the number of lines in the text iNL = MLCount(sIN, 0) ' comment the block For i = 1 To iNL s = MemoLine(sIN, 0, i) ' check the uncommented code, it is leaving it to the left margin ' look for commented lines Select Case True Case Left(Trim(s), 8) = "'* Block" ' comment header, dont write to output Case Left(Trim(s), 15) = "'* End of Block" ' comment footer, dont write to output Case Left(Trim(s), 3) = lsCD sOUT = sOUT & Replace(s, lsCD, "", , 1) & vbCrLf Case Left(Trim(s), 1) = "'" sOUT = sOUT & Replace(s, lsCD, "", , 1) & vbCrLf End Select Next i ' now put the code back PutCodeBack(sOUT) Catch e As System.Exception MsgBox("Error: " & e.Message, vbCritical, "BlockUnComment") End Try End Sub
BlockChange Method
Sometimes you will want to mark a block of code with a special header that denotes the code has been changed. The BlockChange method shown in Listing 3-10 performs that functionality. This code is called by clicking the Block Change node of the TreeView control.
Listing 3-10: The BlockChange Method
Shared Sub BlockChange() Dim sText As String Dim sCC As String Dim liCnt As Integer Dim lsLine As String Try sText = GetCodeFromWindow() If Trim$(sText) = "" Then MsgBox("No change text selected!") Exit Sub End If liCnt = MLCount(sText, 0) If liCnt > 0 Then lsLine = MemoLine(sText, 0, 1) liCnt = CountSpacesBeforeFirstChar(lsLine) Else liCnt = 0 End If sCC = vbCrLf & IIf(liCnt > 0, Space(liCnt), "") & CommentDelimiter & _ " Block Changed by " & UserName & " on " & TodaysDate & vbCrLf sCC = sCC & sText & vbCrLf sCC = sCC & IIf(liCnt > 0, Space(liCnt), "") & CommentDelimiter & _ " End of Block Changed by " & UserName & " on " & _ TodaysDate & vbCrLf & vbCrLf PutCodeBack(sCC) Exit Sub Catch e As System.Exception MsgBox("Error in Block Change: " & e.Message) End Try End Sub | Note | In the BlockChange method shown in Listing 3-10 and the BlockDelete method shown in Listing 3-11, you begin to see the logic of using the common methods GetCodeFromWindow, PutCodeBack, and so forth.You can now implement many new "business functionalities" without having to be concerned with the extensibility objects. |
Figure 3-10 shows the selected block of code after it has been marked with the Block Change option.
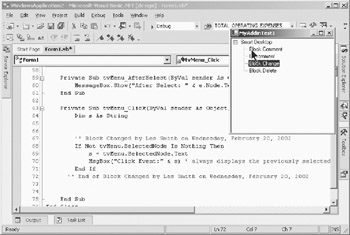
Figure 3-10: Code block marked as changed
BlockDelete Method
I add one final feature to the add-in in this chapter: the BlockDelete method. This method will mark a block of code as deleted. You might ask, "Why so many ways of marking blocks of code?" The obvious answer is that later I could implement asearch functionality that could find code that has been deleted, added, or changed by programmer and date (range). To facilitate this, I should mark the code respectively so that I can find categories of code that was commented in a specific way. In other words, show me all of the code that was deleted by Les Smith in the last two months, for example. Listing 3-11 shows the code for the BlockDelete method. You can invoke it by clicking the Block Delete node of the TreeView.
Listing 3-11: The BlockDelete Method
Shared Sub BlockDelete() ' Insert a deletion comment block around a block ' that is about to be deleted Dim sCC As String Dim sText As String Dim sLine As String Dim i As Long Dim nL As Integer Dim sTmpText As String Dim liCnt As Integer ' get the selected code from the code window Try sText = GetCodeFromWindow() If Trim$(sText) = "" Then MsgBox("No deletion text selected!") Exit Sub End If ' we have the text that is to be deleted ' comment it to delete it sTmpText = "" nL = MLCount(sText, 0) For i = 1 To nL sLine = MemoLine(sText, 0, i) If i = 1 Then liCnt = CountSpacesBeforeFirstChar(sLine) End If sTmpText = sTmpText & IIf(liCnt > 0, Space(liCnt), "") _ & "'* " & sLine & vbCrLf Next i sCC = IIf(liCnt > 0, Space(liCnt), "") & CommentDelimiter & _ " Block Deleted by " & UserName & " on " & _ TodaysDate & vbCrLf sCC = sCC & sTmpText sCC = sCC & IIf(liCnt > 0, Space(liCnt), "") & CommentDelimiter & _ " End of Block Deleted by " & UserName & " on " & _ TodaysDate & vbCrLf PutCodeBack(sCC) Catch e As System.Exception MsgBox("Error in Block Delete: " & e.Message) End Try Exit Sub End Sub Figure 3-11 shows the selected code block after being marked by the Block Delete option.
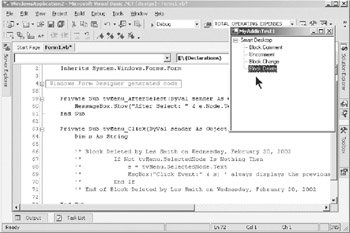
Figure 3-11: Code block marked by Block Delete
Library Functions
Here I list the several functions that I have previously called from the BlockComment method. This is only a sampling of code that is provided in the Utility class of this book's code.
GetCodeFromWindow
You will want to use this simple function anytime you need to retrieve the selected block of code from the active code window. It uses the TextSelection object to retrieve the whole selected block of code, so you may perform any operation on it without having to be concerned with extensibility. This is one of the functions that separates the housekeeping complexity of extensibility from your add-in business processing.
Listing 3-12: GetCodeFromWindow
Shared Function GetCodeFromWindow() As String Dim s As String Dim selCodeBlock As TextSelection '= oVB.ActiveDocument.Selection() Try selCodeBlock = CType(oVB.ActiveDocument.Selection(), _ EnvDTE.TextSelection) GetCodeFromWindow = selCodeBlock.Text Catch e As System.Exception MsgBox("Error: " & e.Message, MsgBoxStyle.Critical, _ "GetCodeFromWindow") End Try End Function | Note | Option Strict does not allow the direct use of ActiveDocument.Selection.You must cast it to Type TextSelection by the use of the Ctype function. |
PutCodeBack
This simple function, shown in Listing 3-13, will place the code on which you have completed your work in the active code window. Again, this function separates the extensibility objects from the business rules.
Listing 3-13: PutCodeBack
Shared Sub PutCodeBack(ByVal s As String) Dim selCodeBlock As TextSelection Dim datobj As New System.Windows.Forms.DataObject() Try ' set an object = to the selected text in the client window selCodeBlock = CType(oVB.ActiveDocument.Selection(), _ EnvDTE.TextSelection) ' put the formatted text on the clipboard datobj.SetData(System.Windows.Forms.DataFormats.Text, s) System.Windows.Forms.Clipboard.SetDataObject(datobj) ' paste the code back into the window selCodeBlock.Paste() Catch e As System.Exception MsgBox("Could not put code back in window.", _ MsgBoxStyle.Critical, _ "PutCodeBackInWindow") End Try End Sub | Note | The use of the clipboard has changed in .NET. The Clipboard object is part of the System.Windows.Forms name-space, and it has two methods: GetDataObject() and SetDataObject(). |
CountSpacesBeforeFirstChar
This function, shown in Listing 3-14, simply returns the number of space characters before the first nonblank character in the passed line.
Listing 3-14: CountSpacesBeforeFirstChar
Shared Function CountSpacesBeforeFirstChar(ByVal sIN As String) As Short ' Return the number of spaces before the first non blank character Dim iSpCnt As Short = 0 Try For iSpCnt = 0 To CType(sIN.Length - 1, Short) If Mid$(sIN, iSpCnt + 1, 1) <> " " Then Return iSpCnt End If Next iSpCnt Catch CountSpacesBeforeFirstChar = iSpCnt End Try End Function
| Note | Notice the use of the Return keyword. This is new to VB .NET and is used to exit a function early while returning the function return value in one line. |
Reading Through the Selected Code Block
In Clipper, there were a couple of powerful functions that when used together provided the functionality of reading one line at a time from the selected code block. I have rewritten these functions in VB and provided them for your use. As you work with blocks of code or memo fields, two of the most useful functions in the library of functions are MLCount and MemoLine. MLCount scans through the selected code, counting the number of lines delimited by carriage return and line feed combinations. It returns the number of lines in the block. MemoLine will return the requested line from the string. You use MLCount to determine the number of lines. You subsequently use MemoLine to retrieve the individual lines, usually in sequence.
MLCount
MLCount requires two parameters. The first is the code block as String. The second is either zero (0) or n, where n is the number of characters to terminate the scan for an end of line (EOL). Both MLCount and MemoLine (described in the next section) can handle word wrap. If you pass 0 as the second parameter, MLCount will look for CrLf to terminate a line. If you pass a positive number, MLCount will terminate a line at the end of the last word that will fit under the length (n), thus providing for word wrap to any length desired.
You call MLCount first to get the number of lines within the block that the user has selected. Listing 3-15 contains the code for MLCount.
Listing 3-15: Complete Connect Class
Imports Microsoft.Office.Core imports Extensibility imports System.Runtime.InteropServices Imports EnvDTE #Region " Read me for Add-in installation and setup information. " ' When run, the Add-in wizard prepared the registry for the Add-in. ' At a later time, if the Add-in becomes unavailable for reasons such as: ' 1) You moved this project to a computer other than the one ' it was originally created on. ' 2) You chose 'Yes' when presented with a message asking if you ' wish to remove the Add-in. ' 3) Registry corruption. ' you will need to re-register the Add-in by building the MyAddin ' Test1Setup project ' by right-clicking the project in the Solution Explorer, then choosing install. #End Region <GuidAttribute("EA9E1DDF-0B64-4446-9E29-48DE0CC80523"), ProgIdAttribute("MyAddinTest1.Connect")> _ Public Class Connect Implements Extensibility.IDTExtensibility2 Implements IDTCommandTarget Shared oVB As EnvDTE.DTE Shared CommentDelimiter As String = "'*" Shared UserName As String = "Les Smith" Shared TodaysDate As String Dim addInInstance as EnvDTE.AddIn ' moved to module level so OnDisconnect can see it Dim CommandObj As Command Public Sub OnBeginShutdown(ByRef custom As System.Array) Implements Extensibility.IDTExtensibility2.OnBeginShutdown End Sub Public Sub OnAddInsUpdate(ByRef custom As System.Array)
 Implements Extensibility.IDTExtensibility2.OnAddInsUpdate End Sub Public Sub OnStartupComplete(ByRef custom As System.Array)
 Implements Extensibility.IDTExtensibility2.OnStartupComplete End Sub Public Sub OnDisconnection(ByVal RemoveMode As _ Extensibility.ext_DisconnectMode, _ ByRef custom As System.Array) _ Implements _ Extensibility.IDTExtensibility2.OnDisconnection Try CommandObj.Delete() ' MsgBox("Disconnect, remove Tool Button", _ ' MsgBoxStyle.Information, "MyAddinTest1") Catch e As System.Exception MsgBox("Error in Disconnect: " & _ e.Message, _ MsgBoxStyle.Critical, _ "MyAddinTest1") End Try End Sub Public Sub OnConnection(ByVal application As Object, _ ByVal connectMode As Extensibility.ext_ConnectMode, _ ByVal addInInst As Object, ByRef custom As System.Array) _ Implements Extensibility.IDTExtensibility2.OnConnection Dim iBitMap As Integer ' set up today's date for use in all methods TodaysDate = Format(Now(), "Long Date") oVB = CType(application, EnvDTE.DTE) addInInstance = CType(addInInst, EnvDTE.AddIn) If connectMode = Extensibility.ext_ConnectMode.ext_cm_AfterStartup Or _ connectMode = Extensibility.ext_ConnectMode.ext_cm_Startup _ Then Dim objAddIn As AddIn = CType(addInInst, AddIn) ' When run, the Add-in wizard prepared the registry for the Add-in. ' At a later time, the Add-in or its commands may become unavailable ' for reasons such as: ' 1) You moved this project to a computer other than the one it was ' originally created on. ' 2) You chose 'Yes' when presented with a message asking if you ' wish to remove the Add-in. ' 3) You add new commands or modify commands already defined. ' You will need to re-register the Add-in by building the MyAddin ' Test1Setup project, ' right-clicking the project in the Solution Explorer, and then ' choosing install. Alternatively, you could execute the ' ReCreateCommands.reg file the ' Add-in Wizard generated in ' the project directory, or run 'devenv /setup' from a command prompt. Try iBitMap = 59 CommandObj = oVB.Commands.AddNamedCommand(objAddIn, _ "MyAddinTest1", "Smart Desktop", _ "Executes the command for MyAddinTest1", _ True, iBitMap, Nothing, 1 + 2) _ '1+2=vsCommandStatusSupported+vsCommandStatusEnabled CommandObj.AddControl(oVB.CommandBars.Item("Tools")) Catch e As System.Exception MsgBox("Error in placing control: " & e.Message) End Try End If End Sub Public Sub Exec(ByVal cmdName As String, _ ByVal executeOption As vsCommandExecOption, _ ByRef varIn As Object, _ ByRef varOut As Object, _ ByRef handled As Boolean) _ Implements IDTCommandTarget.Exec Dim oFrm As New frmTreeView() handled = False If (executeOption = vsCommandExecOption.vsCommandExecOptionDoDefault) _ Then If cmdName = "MyAddinTest1.Connect.MyAddinTest1" Then handled = True ' MsgBox("You rang?") oFrm.Show() Exit Sub End If End If End Sub Public Sub QueryStatus(ByVal cmdName As String, _ ByVal neededText As vsCommandStatusTextWanted, _ ByRef statusOption As vsCommandStatus, _ ByRef commandText As Object) _ Implements IDTCommandTarget.QueryStatus If neededText = EnvDTE.vsCommandStatusTextWanted.
 vsCommandStatusTextWantedNone _ Then If cmdName = "MyAddinTest1.Connect.MyAddinTest1" Then statusOption = CType(vsCommandStatus.vsCommandStatusEnabled + _ vsCommandStatus.vsCommandStatusSupported, _ vsCommandStatus) Else statusOption = vsCommandStatus.vsCommandStatusUnsupported End If End If End Sub Shared Sub BlockComment() Dim iNL As Integer ' number of lines in block Dim sIN As String ' input selection Dim sOUT As String ' commented output Dim i As Integer Dim n As Short ' number of chars before first non blank in first line Dim s As String Try ' Get selected text from active window sIN = GetCodeFromWindow() ' ensure the user selected something If sIN.Length < 1 Then MsgBox("Please select block to be commented.", _ vbExclamation, "BlockComment") Exit Sub End If ' get the number of lines in the text iNL = MLCount(sIN, 0) ' comment the block For i = 1 To iNL s = MemoLine(sIN, 0, i) If i = 1 Then n = CountSpacesBeforeFirstChar(s) sOUT = CType(IIf(n = 0, "", Space(n)), String) & _ "'* Block Commented by " & UserName & " on " & _ TodaysDate & vbCrLf End If sOut =sOut & Space(n) & CommentDelimiter & s & vbCrlf Next i ' now end the block sOUT = sOUT & CType(IIf(n = 0, "", Space(n)), String) & _ "'* End of Block Commented by " & UserName & vbCrLf ' now put the code back PutCodeBack(sOUT) Catch e As System.Exception MsgBox("Error: " & e.Message, vbCritical, "BlockComment") End Try End Sub Shared Sub BlockDelete() ' Insert a deletion comment block around a block ' that is about to be deleted Dim sCC As String Dim sText As String Dim sLine As String Dim i As Long Dim nL As Integer Dim sTmpText As String Dim liCnt As Integer ' get the selected code from the code window Try sText = GetCodeFromWindow() If Trim$(sText) = "" Then MsgBox("No deletion text selected!") Exit Sub End If ' we have the text that is to be deleted ' comment it to delete it sTmpText = "" nL = MLCount(sText, 0) For i = 1 To nL sLine = MemoLine(sText, 0, i) If i = 1 Then liCnt = CountSpacesBeforeFirstChar(sLine) End If sTmpText = sTmpText & IIf(liCnt > 0, Space(liCnt), "") _ & "'* " & sLine & vbCrLf Next i sCC = IIf(liCnt > 0, Space(liCnt), "") & CommentDelimiter & _ " Block Deleted by " & UserName & " on " & _ TodaysDate & vbCrLf sCC = sCC & sTmpText sCC = sCC & IIf(liCnt > 0, Space(liCnt), "") & CommentDelimiter & _ " End of Block Deleted by " & UserName & " on " & _ TodaysDate & vbCrLf PutCodeBack(sCC) Catch e As System.Exception MsgBox("Error in Block Delete: " & e.Message) End Try Exit Sub End Sub Shared Sub BlockChange() Dim sText As String Dim sCC As String Dim liCnt As Integer Dim lsLine As String Try sText = GetCodeFromWindow() If Trim$(sText) = "" Then MsgBox("No change text selected!") Exit Sub End If liCnt = MLCount(sText, 0) If liCnt > 0 Then lsLine = MemoLine(sText, 0, 1) liCnt = CountSpacesBeforeFirstChar(lsLine) Else liCnt = 0 End If sCC = vbCrLf & IIf(liCnt > 0, Space(liCnt), "") & CommentDelimiter & _ " Block Changed by " & UserName & " on " & TodaysDate & vbCrLf sCC = sCC & sText & vbCrLf sCC = sCC & IIf(liCnt > 0, Space(liCnt), "") & CommentDelimiter & _ " End of Block Changed by " & UserName & " on " & _ TodaysDate & vbCrLf & vbCrLf PutCodeBack(sCC) Exit Sub Catch e As System.Exception MsgBox("Error in Block Change: " & e.Message) End Try End Sub Shared Sub BlockUnComment() Dim iNL As Integer ' number of lines in block Dim sIN As String ' input selection Dim sOUT As String ' commented output Dim i As Integer Dim n As Short ' number of chars before first non blank in first line Dim n2 As Short ' nbr chars before first nb char subsequent lines Dim s As String Dim lsCD As String = "'* " Try ' Get selected text from active window sIN = GetCodeFromWindow() ' ensure the user selected something If sIN.Length < 1 Then MsgBox("Please select block to be commented.", _ vbExclamation, "BlockComment") Exit Sub End If ' get the number of lines in the text iNL = MLCount(sIN, 0) ' comment the block For i = 1 To iNL s = MemoLine(sIN, 0, i) ' check the uncommented code, it is leaving it to the left margin ' look for commented lines Select Case True Case Left(Trim(s), 8) = "'* Block" ' comment header, dont write to output Case Left(Trim(s), 15) = "'* End of Block" ' comment footer, dont write to output Case Left(Trim(s), 3) = lsCD sOUT = sOUT & Replace(s, lsCD, "", , 1) & vbCrLf Case Left(Trim(s), 1) = "'" sOUT = sOUT & Replace(s, lsCD, "", , 1) & vbCrLf End Select Next i ' now put the code back PutCodeBack(sOUT) Catch e As System.Exception MsgBox("Error: " & e.Message, vbCritical, "BlockUnComment") End Try End Sub Shared Function GetCodeFromWindow() As String Dim s As String Dim selCodeBlock As TextSelection '= oVB.ActiveDocument.Selection() Try selCodeBlock = CType(oVB.ActiveDocument.Selection(), _ EnvDTE.TextSelection) GetCodeFromWindow = selCodeBlock.Text Catch e As System.Exception MsgBox("Error: " & e.Message, MsgBoxStyle.Critical, _ "GetCodeFromWindow") End Try End Function Shared Sub PutCodeBack(ByVal s As String) Dim selCodeBlock As TextSelection Dim datobj As New System.Windows.Forms.DataObject() Try selCodeBlock = CType(oVB.ActiveDocument.Selection(), _ EnvDTE.TextSelection) datobj.SetData(System.Windows.Forms.DataFormats.Text, s) System.Windows.Forms.Clipboard.SetDataObject(datobj) selCodeBlock.Paste() Catch e As System.Exception MsgBox("Could not put code back in window.", _ MsgBoxStyle.Critical, _ "PutCodeBackInWindow") End Try End Sub Shared Function CountSpacesBeforeFirstChar(ByVal sIN As String) As Short ' Return the number of spaces before the first non blank character Dim iSpCnt As Short = 0 Try For iSpCnt = 0 To CType(sIN.Length - 1, Short) If Mid$(sIN, iSpCnt + 1, 1) <> " " Then Return iSpCnt End If Next iSpCnt Catch CountSpacesBeforeFirstChar = iSpCnt End Try End Function Shared Function MLCount(ByVal cStrng As String, _ ByVal nL As Integer) _ As Integer ' VB Replacement for Clipper MLCount Function ' It does handle word wrap, nL is the max char ' count per line. Dim nStptr As Integer, nLenStr As Integer, nLineCtr As Integer Dim sTemp As String Dim i As Integer ' nStPtr is the pointer to position in cStrng Try nStptr = 1 nLenStr = Len(cStrng) nLineCtr = 0 While True ' If the pointer to the beginning of the next line ' is >= the length of the string, we are outta here! If nStptr >= nLenStr Then Return nLineCtr Exit Function End If ' Get the next line, not to exceed the length of nL ' if nL was greater than 0 If nL > 0 Then sTemp = Mid$(cStrng, nStptr, nL) If InStr(sTemp, vbCrLf) > 0 Then ' there is a CRLF in the string sTemp = Left$(sTemp, InStr(sTemp, vbCrLf) - 1) nStptr = nStptr + Len(sTemp) + 2 Else ' new code to handle lines with no crlf If Len(sTemp) = nL Then ' we have a full line left (at least) i = InStrRev(" ", sTemp) ' truncate the partial word from the end sTemp = Left$(sTemp, i - 1) 'set the pointer to start the next line at 'current start point + len(stemp) nStptr = nStptr + Len(sTemp) Else ' this is the last line, because the string is ' shorter than the nL length Return nLineCtr + 1 Exit Function End If End If Else ' nL was supplied as 0 meaning we just look for CRLf nStptr = InStr(nStptr, cStrng, vbCrLf) + 2 End If ' if the ptr = 2 then there was no crlf in the line If nStptr = 2 Then Return nLineCtr + 1 End If nLineCtr = nLineCtr + 1 If nStptr + 1 > nLenStr Then Return nLineCtr End If End While Exit Function Catch e As System.Exception MsgBox("Error: " & e.Message, vbCritical, "MLCount") End Try End Function Shared Function MemoLine(ByVal cStrng As String, _ ByVal nLL As Integer, ByVal nL As Integer) As String ' VB Replacement for Clipper MemoLine() Function. ' Handles Word Wrap. nLL is the max char/line. ' Note that if the user asks for a line that is beyond the ' end of the string, i.e. more lines than are in the string ' unpredictable results will be returned, assuming we ' return at all. Therefore, MLCount() must be called ' before calling MemoLine() and MemoLine must not be called ' to return a line numbered higher than MLCount() returned. Static nStptr As Integer Dim i As Integer Dim nTmpPtr As Integer Dim sTemp As String Dim nPrevStPtr As Integer Dim lFoundSpace As Integer Static j As Integer Dim iST As Integer Try ' if NL is 1 > than J then ' this is a subsequent call to get the next ' line If nL = 1 Then nStptr = 1 iST = 1 ElseIf (nL - (j - 1) = 1) And (j <> 0) Then iST = nL Else nStptr = 1 iST = 1 End If ' Loop through the string until we find the requested line. For j = iST To nL ' Remembering where the previous line started will allow ' us to know where the requested line began when we have gone ' just past it with the following loop nPrevStPtr = nStptr ' Get the next line, not to exceed the length of nLL ' if nL was greater than 0 If nLL = 0 Then ' nL was supplied as 0 meaning we just look for CRLf nStptr = InStr(nStptr, cStrng, Chr(13) & Chr(10)) + 2 Else sTemp = Mid$(cStrng, nStptr, nLL) If InStr(sTemp, Chr(13) & Chr(10)) > 0 Then ' there is a CRLF in the string sTemp = Left$(sTemp, InStr(sTemp, Chr(13) & Chr(10)) - 1) nStptr = nStptr + Len(sTemp) + 2 Else ' new code to handle lines with no crlf If Len(sTemp) = nLL Then ' we have a full line left with no crlf ' find last space i = InStrRev(" ", sTemp) ' truncate the partial word from the end sTemp = Left$(sTemp, i - 1) ' set the pointer to start the next line at current ' start point + len(stemp) nStptr = nStptr + Len(sTemp) End If End If End If Next j ' nStPtr is now positioned to the end of the requested line ' Now find the end of the current (requested) line. If nLL = 0 Then If nStptr = 2 Then Return Mid$(cStrng, nPrevStPtr) Else Return Mid(cStrng, nPrevStPtr, nStptr - (nPrevStPtr + 2)) End If Else Return Trim$(sTemp) End If Exit Function Catch e As System.Exception MsgBox("Error: " & e.Message, vbCritical, "MemoLine") End Try End Function End Class
MemoLine
Having retrieved the number of lines in the selected block by calling MLCount, you can set up a loop, shown in the BlockComment method, to call Memo Line for next line in the selected block. Listing 3-15 contains the code for MemoLine.
Complete Connect Class
Throughout this chapter, I have been adding new methods to the Connect class. I've added several new methods that are used to perform the new functionalities that have been added. Table 3-1 lists these methods.
| METHOD | DESCRIPTION |
|---|---|
| BlockComment | Encapsulates selected code in Block Comments denoting the programmer name and date commented |
| BlockUncomment | Strips comment blocking from selected code |
| BlockChange | Encapsulates selected code in Block Comments and marks as "Changed" |
| BlockDelete | Encapsulates selected code in Block Comments and marks as "Deleted" |
| GetCodeFromWindow | Retrieves selected code form text window and returns it in a String variable |
| PutCodeBack | Returns processed code to the Text Editor window |
| CountSpacesBeforeFirstChar | Helper function for commenting methods |
| MLCount | Returns a count of lines in a memo string delimited by CrLfs |
| MemoLine | Returns a specified line from a memo string |
Because I have added so many new methods to the Connect class, I list the complete code for the class in Listing 3-15. For purposes of simplicity, I placed all of the new code into the one class. In Chapter 10, I show you how to reorganize the code into several classes according to specific functionalities, such as code manipulation, utilities, and so forth.
|
| < Free Open Study > |
|
EAN: 2147483647
Pages: 172
- Article 356 Liquidtight Flexible Nonmetallic Conduit Type LFNC
- Example No. D4(b) Optional Calculation for Multifamily Dwelling
- Example No. D5(a) Multifamily Dwelling Served at 208Y/120 Volts, Three Phase
- Example No. D10 Feeder Ampacity Determination for Adjustable-Speed Drive Control [See 215.2, 430.24, 620.13, 620.14, 620.61, Tables 430.22(E), and 620.14]
- Annex E. Types of Construction