Should I Go All the Way with .NET?
|
| < Free Open Study > |
|
Running the Migration Wizard on an Add-in
To run the Migration Wizard, open a VB 6.0 project (.vbp) in Visual Studio .NET. The following list describes the various steps of the wizard and tells you what to do in each step.
-
Step 1 is simply an outline of what the wizard will do for you. There is nothing for you to do but click the Next button.
-
Step 2 allows you to pick what type of application to produce, DLL or EXE. If you are converting a DLL or add-in, you will have no choice but to create a DLL. The EXE option will be disabled.
-
In Step 3, you must select a path and directory in which to save the converted application.
-
Step 4 allows you cancel or proceed with the migration; all selections are complete.
-
Step 5 displays a progress bar as well as the objects that are being processed as the wizard progresses through your application.
| Note | Do not be alarmed if your application migration seems to take a long time. One of my add-ins with 10 forms and about 8,000 lines of actual code took 20 minutes on a 650MHz computer. |
Migration Wizard Diagnostics
When the wizard completes the upgrade process, you will see that it has placed diagnostic comments around the lines of code with which it had trouble or could not upgrade. The diagnostics take the form of those shown in Listing 13-1. When the wizard encounters a line of code that cannot be upgraded, a comment will be placed after the line of code that reads "UPGRADE_ISSUE…not upgraded". After the description of the object or statement that could not be upgraded, a link to MSDN describing the problem will be inserted at the end of the diagnostic comment. If there is some doubt as to the validity of what the wizard has done with a particular line of code, it places a diagnostic beginning with "UPGRADE_WARNING…". In the case where the wizard has upgraded a line of code but you should be told about it because of possible side effects, it will place an "UPGRADE_NOTE…" comment. In Listing 13-1, you will see that some of the comments are underlined. These are the links to MSDN.
| Note | The diagnostic is generated all on one line, but I have made two lines of the diagnostics in the following code so they will fit on the book's pages. |
Listing 13-1: Upgraded Code with Diagnostics
Sub ErrHandler(ByRef Func As String, _ Optional ByRef SubFunc As Object = Nothing) ' Display a Trappable Error in a Standard Format. Dim sMsg As String 'UPGRADE_NOTE: IsMissing() was changed to IsNothing().Click for more: 'ms-help://MS.VSCC/commoner/redir/redirect.
htm?keyword="vbup1021"' 'UPGRADE_WARNING: Couldn't resolve default property
of object SubFunc. ' Click for more: 'ms-help://MS.VSCC/commoner/redir/redirect.
htm?keyword="vbup1037"' If IsNothing(SubFunc) Then SubFunc = "" 'UPGRADE_WARNING: Couldn't resolve default property of
object SubFunc. ' Click for more: 'ms-help://MS.VSCC/commoner/redir/redirect.
htm?keyword="vbup1037"' sMsg = "The Following Error: " & Trim(Str(Err.Number)) _ & Chr(10) & _ "Desc: " & ErrorToString() & Chr(10) & Chr(10) & _ "Occured in Proc: " & Trim(Func) & Chr(10) & _ "SubProc: " & SubFunc frmPleaseWait.DefInstance.Display(
"CodeMgr: System Error", sMsg) Exit Sub End Sub
When the newly upgraded add-in is opened in the IDE, the Task List will display a list of errors that it found during the upgrade process. After running a very small add-in through the Migration Wizard, the list of errors shown in Figure 13-2 was displayed in the Task List.
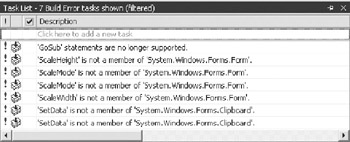
Figure 13-2: Upgrade errors shown in the Task List
| Note | It is highly unlikely that you will run an application of any size through the Migration Wizard without it finding some things that will not upgrade. |
If you double-click any error line in the Task List, the module containing the specified line of code will be loaded into the active window and the cursor will be positioned on the line in question.
Concerning Option Strict
When the Migration Wizard upgrades your application, it will insert the following directive at the top of each module:
Option Strict Off
Option Strict is a new compiler directive in Visual Basic .NET. It is like the VB 6.0 directive Option Explicit, but it serves a different purpose. Option Strict can be turned on or off by changing the last word to On or Off. If you turn it on, as many experts recommend, you are likely to see a lot more compiler errors in your code. All of them will be useful, but many of them can become quite frustrating. One of the things the upgrade process does for you is convert Integer variables to Short. This is because in .NET an Integer is now 32 bits rather than 16 bits as in VB 6.0. The problem is that intrinsic functions such as InStr return a .NET Integer. Consider the following VB 6.0 code snippet:
Dim iPtr As Integer iPtr = InStr("ABCDEFG", "A") When upgraded by the Migration Wizard, the code snippet will look as follows:
Dim iPtr As Short ' changed by the upgrade iPtr = InStr("ABCDEFG", "A") With Option Strict Off, there is no problem. If you change to Option Strict On, the second line of code will immediately be marked in error with a diagnostic that reads "Option Strict disallows implicit conversion from Integer to Short". If the value of iPtr can never exceed 32,767 there is no real error. But, because you have set Option Strict On, the compiler will force you to either change the type of iPtr to Integer or use the CType function to explicitly cast the Integer to Short.
This type of error is probably not a problem for which you need to leave Option Strict On. Option Strict On also prohibits late binding. If you have used late binding in VB 6.0 and you turn Option Strict On, you will have to change the code to make it compile. Sometimes it is difficult, if not impossible, to use early binding in every situation. If you have such a case, Option Strict On will prevent a successful compile and you will not be able to build an executable. Again, Option Strict On is a good thing assuming that you can change the code to early binding. Late binding not only causes a performance hit, but it can also generate runtime exceptions if the Just-in-Time (JIT) compiler cannot resolve the late binding at runtime.
VB 6.0 Add-in Code No Longer Needed
In a VB 6.0 add-in you had to write an entry to the vbaddin.ini file in the Windows or Winnt directory. When an add-in was placed in the .ini file, it caused the Add-in Manager to list the add-in in its dialog box. This code is no longer needed in .NET.
Listing 13-2: AddToIni Method
Sub AddToINI() 'this sub should be executed from the Immediate window 'in order to get this app added to the VBADDIN.INI file 'you must change the name in the 2nd argument to reflect 'the correct name of your project Dim ErrCode As Integer ErrCode = WritePrivateProfileString("Add-Ins32", _ Name & ".Connect", "0", "vbaddin.ini") End Sub
.NET Replacement for VBAddin.ini
Once a VB 6.0 add-in has been through the Migration Wizard and you have cleaned up any errors, including the conversion to the new extensibility model, the add-in must still be registered and entries must be made to the registry to cause the add-in to be listed in the Add-in Manager dialog box. There are two ways to accomplish these two processes. First, you can manually set a start-up project, create a setup project, manually register the add-in, and manually create the registry entries to cause the add-in to be listed in the Add-in Manager dialog box.
When the migration tool processes your VB 6.0 add-in, the output will be the project for the add-in. Although it will be included in a solution (.sln), there will be no setup project created and the add-in project itself will not be ready for execution. If you attempt to execute the project, you will probably receive the error message shown in Figure 13-3.
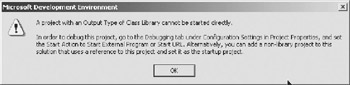
Figure 13-3: The no start-up project error message
An add-in (DLL) project cannot be debugged by itself. You must have a startup project that can be started, which will be the client application. This client application will connect to the add-in (server application). When you use the Add-in Wizard to create a .NET add-in, it does all of this for you behind the scenes. However, the migration tool does none of it. The error message shown in Figure 13-3 tells you how to get a start-up project configured. To perform this process, right-click the add-in project in the Solution Explorer window. Select the Properties option and the Project Properties dialog box will display, as shown in Figure 13-4. Click the Configuration Properties folder. Click the Start External Program radio button. Browse to the copy of devenv.exe on your computer. Click the OK button to close the dialog box. What you are doing is telling your add-in project to start another instance of the Visual Studio IDE as your start-up project. Next, you must register your add-in manually.
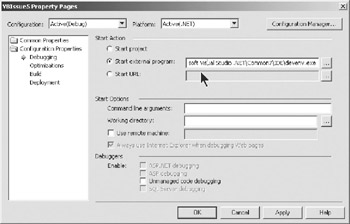
Figure 13-4: Setting a start-up project in the Project Properties dialog box
Registering the Add-in
This is a task that you would not have to worry about if you were creating the add-in via the Add-in Wizard. Because you are upgrading the add-in via the migration tool, you must now get the add-in registered. To do this, you must use Regasm.exe. This is a command line utility that comes with Visual Studio .NET. You use it to manually register DLLs created in .NET that are written in either Visual Basic or C#. C++ DLLs are still registered with Regsvr32.exe. The command window displayed in Figure 13-5 shows a typical execution of Regasm.exe and its output notification of a successful registration.
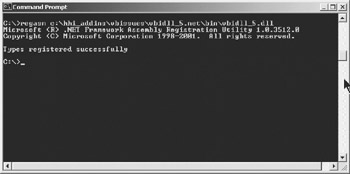
Figure 13-5: Using Regasm.exe to register an add-in
| Tip | If you still want to attempt to make an upgraded VB 6.0 add-in work using IDTExtensibility, be aware that Regasm.exe does not create the registry string entry named CodeBase. This is the entry that tells the path and file name of the add-in DLL. A missing CodeBase string entry for the add- in will result in an "Unknown Error" display.You can pull your hair out over that one.You can look up a CodeBase entry in the registry and enter one manually in the area where your add-in was registered. This anomaly appears to be related only to upgraded VB 6.0 add-ins and not .NET add-ins that were created on another machine. |
Creating Registry Entries for the Add-in
One last task that must be accomplished is the creation of the registry entries for the Add-in Manager. You could type them in manually using Regedit, but I recommend that you use a .REG file like the one shown in Listing 13-3. Place the lines shown below into a file with a .REG extension. Replace the ProgID with the one from the Connect class of your add-in. The ProgID is shown in boldfaced font in Listing 13-3.
Listing 13-3: Registry File for Add-in Manager Registry Entries
REGEDIT4 [HKEY_LOCAL_MACHINE\SOFTWARE\Microsoft\VisualStudio\7.0\Addins] [HKEY_LOCAL_MACHINE\SOFTWARE\Microsoft\VisualStudio\7.0\Addins\ Connect_NET.Connect] "FriendlyName"="VBIssue" "Description"="Log changes to project files." "LoadBehavior"=dword:00000003 "CommandLineSafe"=dword:00000000
 | Note | "Connect_NET.Connect" was generated by the upgrade tool and can be found as the ProgID on the class declaration line of the Connect class. In a wizard-generated Connect class, the ProgID would be ProgIDAttribute and would contain a GUID value instead of "Connect_NET.Connect". |
Once you have created the registration file, you simply double-click the file in the Windows Explorer and your add-in will be registered with the Add-in Manager.
Building a Setup Project
A second way of registering your migrated add-in is to add a setup project to your solution, build it, and install it. This process will not only register your add-in, but it will also create the registry entries that will cause the add-in to be listed in the Add-in Manager dialog box.
| Note | If you are attempting to run an add-in in the IDE and you do not have a setup project, you can follow the procedure outlined in this section to create one. This procedure is applicable regardless of whether you are dealing with an upgraded VB 6.0 add-in or a .NET add-in that was not created by the Add-in Wizard on your computer. The latter will be the case if you download an automation sample from the Microsoft Web site.You will get the add-in project, but it probably will not have a setup project associated with it. |
To create a setup project, go to the start page and click the New Project button. When the New Project dialog box opens, click the Setup and Deployment Projects folder. Next, click the Setup Project icon and enter the name of the project and the path where you want the project stored. Click the OK button to create the setup project.
Once the setup project is created, it will probably be empty. To build the setup project, right-click the setup project and click the Build option on the popup menu. Once the project has been built, you can right-click the setup project and click the Install option on the pop-up menu. This will cause the Install Wizard to run and lead you through the installation process. After the installation has completed, the add-in will be registered and it will be listed in the Add-in Manager dialog box.
|
| < Free Open Study > |
|
EAN: 2147483647
Pages: 172