WORKING WITH PDF COLOR
| PDFs have very specific options for setting up colors and color management. These options are found in the Output panel of the Export Adobe PDF dialog (see Figure 31.12). Figure 31.12. Use the Output panel of the export Adobe PDF dialog to specify exactly how color should be managed in the PDF.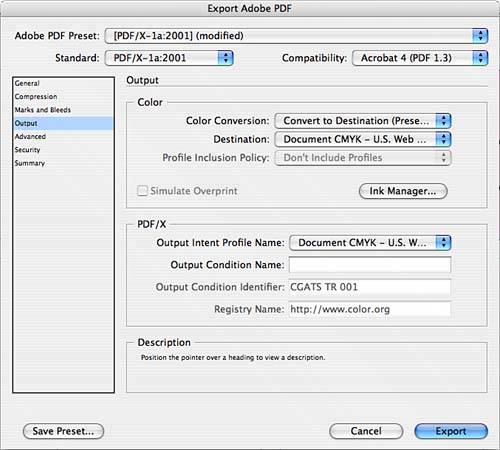 Depending on various selections you can make in this dialog and others, your options are going to vary. This discussion serves as an overview only, to show how the options interact. For most PDFs, you have the option to choose No Color Conversion, Convert to Destination, or Convert to Destination (Preserve Numbers). For the last two choices, you can select the destination color space that objects with embedded profiles will be converted tomake sure that your printer or output agency makes you aware of the best choice to make here. If you choose to preserve numbers, any object without an embedded profile will keep the color settings applied to it. You can choose whether to include Destination Profiles in the next pop-up menu; this determines whether a color profile is included in the document. Again, based on other color choices you make, your options here differ:
The Simulate Overprint option shows how separations are printed by simulating overprint for process color objects on a composite document. The Ink Manager button controls the conversion of spot color to process equivalents. This setting is not saved with the PDF preset. If you have specified to export to a PDF/X format, you can choose the output profile in the next section. If color management is on, the output intent device is the same profile as selected previously, in the Destination area. If not, the selections match the destination color space. Enter your own information in the Output Condition Name field. The Output Condition Identifier enables you to type the name of the Output Condition if one is not entered automatically from the ICC profile. Similarly, the Registry Name may be filled in, or you can use the field to type the URL of the output condition. |
EAN: 2147483647
Pages: 426
- Using SQL Data Definition Language (DDL) to Create Data Tables and Other Database Objects
- Using SQL Data Manipulation Language (DML) to Insert and Manipulate Data Within SQL Tables
- Creating Indexes for Fast Data Retrieval
- Understanding Transaction Isolation Levels and Concurrent Processing
- Repairing and Maintaining MS-SQL Server Database Files