CROPPING IMAGES
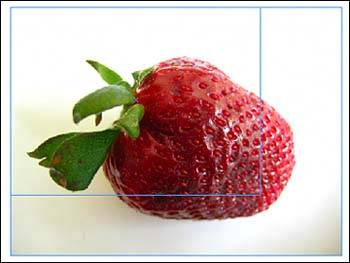
| Many times when you place an image, you don't want the entire image to be displayed. Every shape in InDesign can serve as a frame, and when you place an image, the image is placed inside a frame, regardless of whether you've drawn a frame on the page or not. To crop an image, or make the frame smaller, click on the frame with the Selection tool. You will see the object's bounding box, the frame that shows its dimensions. Eight handles appear around the bounding box. Click a handle and drag to resize the frame, hiding part of the image (see Figure 28.7). You can also use the Position tool to drag a handle after a frame has been selected. Figure 28.7. Use the Selection tool to resize the frame of an image and crop, or hide, part of the subject matter.
If you have a specific point from which you want to resize, like the center, take advantage of the Scale tool and its crosshairs to scale your frame. Select the frame with the Selection tool, then switch to the Scale tool. Crosshairs will appear. Position the crosshairs at the point from which you want to scale the frame. Now, use the Scale tool to drag a handle (or just drag from any point on the page) and resize. Corner handles resize from all four corners; side handles resize either vertically or horizontally, depending on which side handle you use. If you have a specific size in mind for your frame, select the frame and then use the Control palette or Transform palette to enter the width and height for the frame, or enter a percentage in the Scale X and Scale Y fields. Click to join the chain link if you want either set of fields to enlarge or reduce proportionally. After your frame has been resized, you may need to reposition the image within the frame to show only the area you want to see. To do this, use the Position tool or the Direct Selection tool. When you click on the frame contents with one of these tools, you will see the edges of the image within the frame, again with eight handles. This frame is a different color, however, to indicate that you've selected the image itself.
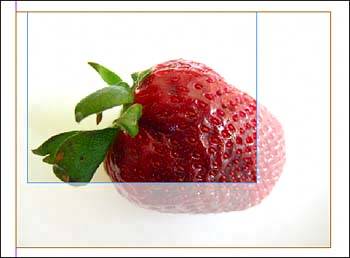
You can crop graphics in other programscropping the background out of a large digital image in Photoshop, for examplebefore you place them in InDesign. If you have a lot of graphics in your document, it might be a good idea to crop the image before placing it in InDesign, because getting rid of excess information in the image makes the graphic file smaller. Smaller graphic files mean smaller document files, which are easier and faster to print and export. When you hold the Direct Selection tool or the Position tool over the image, it turns into a hand. Click, hold, and drag to reposition the image within the frame. And take it easy! If you immediately start moving the hand after you click, you have to guess where your content is in relation to the frame. If you hold for a second with the hand, you see the rest of your graphic ghosted outside the frame (see Figure 28.8). This can help you as you reposition to see exactly what you're hiding and what will show through the frame. Figure 28.8. If you wait a second before trying to reposition an object with the Direct Selection or Position tool, you will see a ghosted version of the hidden parts of the image to help with cropping.
|
EAN: 2147483647
Pages: 426