UNDERSTANDING THE PHOTOSHOP CS2 INTERFACE
| Open Photoshop and you will find more tools staring back at you than you'll want to count (see Figure 2.3). Fortunately you don't need to know how they all work, at least at first. Aside from the Tools palette and other floating palettes in the interface, it's pretty much like any other program. You have a menu bar and some icons along the top. All of the other palettes, which include the vertical Toolbox on the left and the smaller rectangular stacked palettes on the right, can be moved around in any arrangement that suits you. If you do not need a palette while you are working, just close it out by clicking the close button (the X) at the top of the palette. Figure 2.3. The Photoshop interface.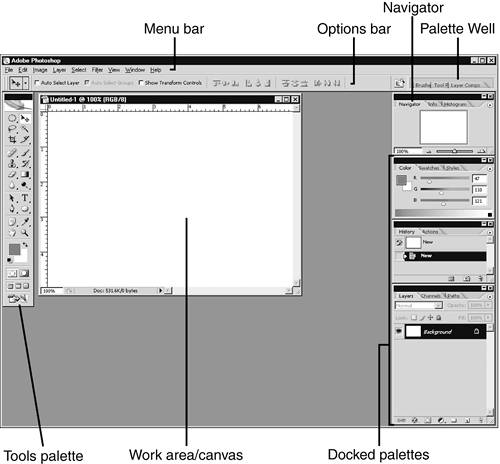 When learning a new program, it's best to jump in with both feet, so let's create a new Photoshop document. Choose File, New to open the New dialog, which has a lot of options. From the Preset pop-up menu, choose Default Photoshop Size. The options underneath will change for the size. Spend a little time looking at all these options here. Understanding the purpose of your final graphic helps you make the right choices. A graphic for a printed poster has different sizes and dimensions than a button row you might design for a website. If you are not quite sure what size to specify, err on the larger size because it's very easy to crop your canvas later. The CanvasWhen you create a new document, the area where you make or work on your image is called the canvas (see Figure 2.4). Figure 2.4. A new document in Photoshop has a canvas of a specified size on which you work. A canvas size has nothing to do with the size of the window in which it is displayed. You may be viewing your canvas at any zoom level inside the window. Resizing the window of the canvas does not change the canvas size.
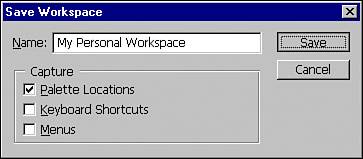
Options BarChoose Window, Options to show or hide the Options bar. Generally it's preferred to show the Options bar at all times rather than hide it because it gives you quick access to tool options and the Palette Well. The Options bar is contextual, so its options depend on the tool you have selected in the Toolbox. If you select the Paintbrush tool, the Options bar shows options for Brush size, opacity, and flow. Selecting the Type tool gives you type options such as font family, size, and justification. Think of the Options bar as an extension of the Toolbox. The Palette Well in the Options bar is a smaller storage area for some of your palettes. You can dock a palette into the palette well by clicking the palette tab and dragging it into the well. Palettes that are docked in the Palette Well have all of their features hidden until you click their tab to reveal them. This works well for palettes you need access to, but not very often. The palettes that are docked in the Well by default are the Brushes, Tool Presets, and Layer Comps palette (see Figure 2.5). Figure 2.5. The Options bar showing options for the Brush tool and the Palette Well.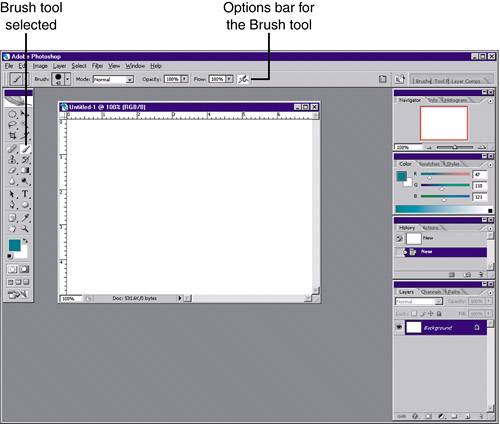 PalettesPalettes are everywhere. Sometimes you're working in Photoshop and it seems you are spending more time moving palettes around than actually creating something. When the view of your workspace gets too palette-cluttered, close a few out. If you need to open a palette again, remember that all the palettes are found under the Window menu. Think of palettes as your little windows and you won't forget that fact. Also take a look at how some palettes are in groups of tabs. This arrangement helps keep things clean, but you can still move palettes out from their group and use them individually. You can also regroup them in new ways that benefit your working style. Palettes help you further control the options for your tools, color, and other document arrangements. Look more closely at palettes and you see they have their own little interface. A lot of palettes look the same, but their extra buttons or controls are different. Take a look at the Layers palette, which has more to it than you first think (see Figure 2.6). Your stack of layers show up in the middle of the palette. Around the outside is the palette's title bar, which includes close and minimize buttons. Not every palette has a palette menu. Most have them to contain extra options for the palette and even have duplicated options of those found under the Photoshop menu. You may hear this palette menu referred to as a flyout menu or the arrow you click to display the palette menu referred to as a caret. Figure 2.6. The Layers palette with its palette menu opened.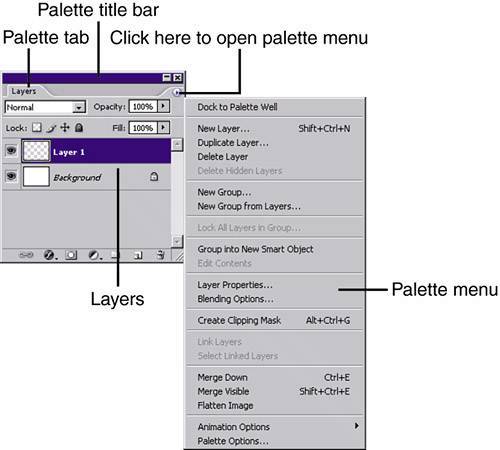 Each palette has the tab near the top that identifies it. The Layers palette has a tab called Layers. By clicking on these tabs and holding and dragging, you can move palettes out of their group and separate them. You can drag palettes into their own groups. When you drag a palette by its tab into another palette, the outside of the second palette is highlighted, enabling you to know that the palette you're dragging will dock with the highlighted palette. You can also dock palettes underneath each other by dragging into the bottom of a palette until you see a highlighted bar. At the right end of the Options bar is a little rectangle called the Palette Well where you can also dock a few palettes to make them accessible but mostly hidden. The Palette Well is unique to Photoshop and ImageReady (see Figure 2.7). Figure 2.7. Drag palettes inside the Palette Well and they stay hidden until you click the palette's tab. Here the Brushes palette is accessed from the Palette Well.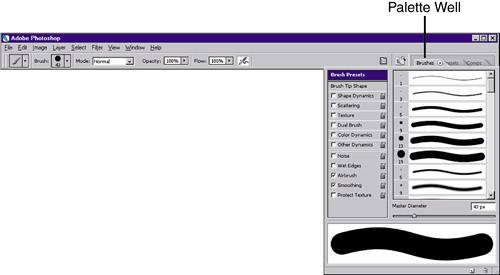 Workspace HintsIf you are getting overrun with palettes while you are working, you can press the Tab key to hide all the palettes at the same time. Press Tab again to bring them all back. If you need just the Tools palette, press Shift+Tab, and all palettes will disappear except for the Tools palette. What if you would like to keep your special arrangement of palettes? After you arrange your palettes, choose Window, Workspace, Save Workspace to make Photoshop remember the arrangement of the workspace; you give the workspace a name so that you can load it again later (see Figure 2.8). In the Save Workspace dialog that opens, enable the Keyboard Shortcuts check box to save your keyboard shortcuts and menus along with the workspace so that they are all easily accessible. Figure 2.8. Save your workspace with a custom name and you can easily access your desired arrangement of palettes.
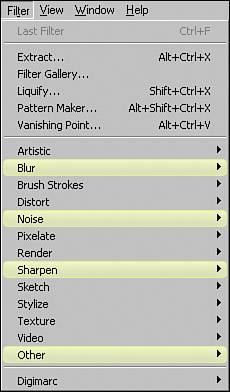
You can save your workspace and instantly set up your workspace the way you like at any time. Revert back to a saved workspace by choosing Window, Workspace and selecting the workspace you named. Highlighted Menu ModesAdobe has been the first I've seen to do this totally awesome menu trick with a program. Choose Window, Workspace, What's New in CS2. Then notice the color that is applied to some of your menus. As you drill down through menus you will see that Photoshop highlights the menu options corresponding to the new features of CS2. You have a lot of other choices for this menu-highlighting feature as well. Photoshop can highlight menu options corresponding to certain types of image editing you might be doing (see Figure 2.9). For example, you can choose to highlight menus related to Image Analysis, Painting and Retouching, Web Design, Typography and more. Kudos to Adobe for this neat little feature. Figure 2.9. Choose from several menu-highlighting options, or customize your own. Here, the options in the Filter menu are highlighted based on Image Analysis related functions.
|

EAN: 2147483647
Pages: 426
- Challenging the Unpredictable: Changeable Order Management Systems
- Enterprise Application Integration: New Solutions for a Solved Problem or a Challenging Research Field?
- Distributed Data Warehouse for Geo-spatial Services
- Relevance and Micro-Relevance for the Professional as Determinants of IT-Diffusion and IT-Use in Healthcare
- Development of Interactive Web Sites to Enhance Police/Community Relations