UNDERSTANDING SYMBOLS
| Symbols are reusable artwork stored only once in Illustrator, in the Symbols palette or a symbol library. They can make sweeping changes as simple as editing a single object. Creating and Working with SymbolsAfter an object is converted to a symbol, unlimited instances of the symbol may be inserted into the document without the increased file size and system RAM overhead associated with multiple copies of an object (see Figure 18.20). Moreover, symbol instances retain their links to the original symbol artworkchanging the content of one changes them all. Figure 18.20. A package design using symbols. Each object, including the background raster image, vector logo, 3D revolved can, and all other elements on each panel are instances of symbols. Thus each object is stored in the file only once, reducing a 43MB document to 6MB. Create a symbol by drawing artworkpaths, shapes, text, meshes, compound paths, embedded images, and almost anything elseand dragging it into the Symbols palette (choose Window, Symbols to display the palette). Hold the Shift key while dragging into the Symbols palette to create a new symbol while simultaneously converting the original artwork to an instance of, or reference to, that symbol. Try this:
Create instances by dragging the symbol from the Symbols palette into the current document. Dragging a symbol from one document's Symbol palette or artboard into another document automatically adds the symbol to the second document's local Symbols palette. Symbol instances may be individually transformed and manipulated without breaking their links to the original symbolone instance may be rotated, for example, and another reflected and resized up to 300% of its original size. Most effects may also be applied to symbol instances to create 3D objects, drop shadows, glows, path offsets, and other effects. Transparency and blending mode changes may also be applied, though access to the actual content and appearance attributes of objects within the instance is not possible without breaking the link to the symbol, thus converting the instance into a standalone object.
Though useful for any situation in which the same artwork appears more than once in a document, symbols are especially valuable for creating buttons for web or PDF documents, as artwork to map to 3D objects, for creating animations for Shockwave Flash documents, and for mobile content in Scalable Vector Graphics (SVG), the next generation of resolution-independent artwork for online and mobile publishing. Try this:
When access to the content of a single instance is necessary, the link to the original symbol must be broken. This converts the symbol instance back into a standalone object; any changes made to either the symbol or the broken instance do not affect the other. With the instance selected on the artboard, choose Break Link to Symbol from the Symbols palette menu or press the Break Link to Symbol button at the foot of the Symbols palette. The symbol converts to a normal object group, which may be edited as such or ungrouped into its constituent elements. To redefine or edit a symbol, simultaneously altering all instances of that symbol, place a single instance of the symbol and break the link to the symbol. Make the necessary changes, select the modified symbol, and choose Redefine Symbol from the Symbols palette menu. Try this:
Create symbol libraries from the content of the Symbols palette. After all desired symbols have been added to the Symbols palette, remove those undesired ones (the default symbols, for instance) and select Save Symbol Library As from the Symbols palette menu. The resulting file is an Illustrator document containing nothing but the symbol library, which may be shared with any other Illustrator CS2 user, on either the Windows or Macintosh platform.
The Adobe Studio Exchange website (http://studio.adobe.com) features numerous downloadable and free symbol libraries created by Adobe and other Illustrator users. Upload and share yours! Copy symbols by dragging them from the Symbols palette onto the New Symbol button at the bottom of the palette or by selecting Duplicate Symbol from the Symbols palette menu. Rearrange symbols by dragging them from their original location in the Symbols palette to any other location. At the bottom of the Symbols palette are five buttons:
Included with Illustrator are 25 prebuilt symbol libraries, including the libraries loaded into the Symbols palette upon the creation of new RGB or CMYK color mode documents. Access these preinstalled libraries from the Window, Symbol Libraries submenu, or from the Open Symbol Library submenu on the Symbols palette menu. Each new library loaded appears onscreen in its own palette (multiple libraries form a tabbed palette group). To make any symbol library load automatically with Illustrator, thus making it accessible to all new documents, choose Persistent from that library's palette menu. Using the Symbol SprayerIn addition to placing a single instance of symbols by dragging out of the Symbols palette or using the Place Symbol Instance button, the Symbol Sprayer tool sprays many instances onto the artboard at one time in a random fashion (see Figure 18.21). The result is a single object called a symbol set, which acts much like a group in that it may be transformed and modified as a single object or edited with the Symbolism tools (see the section "Symbolism Tools," later in this chapter). Figure 18.21. Randomly grouped symbols in a symbol set after using the Symbol Sprayer tool.
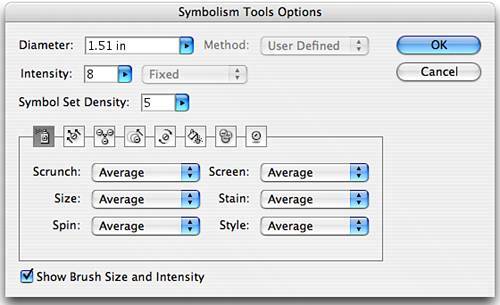
To create a symbol set, select the Symbol Sprayer tool on the Tools palette and click, drag, or click and hold to begin spraying symbols. Instances in a symbol set interact with one another as if they had volume. Clicking and holding with the Symbol Sprayer tool progressively pushes symbol instances outward from the center of the nozzle. Though they also overlap one another and grow into a dense stacking order, they also push each other out of the way. Selecting a different symbol on the Symbols palette and continuing to spray into the same symbol set adds instances of the new symbol into the existing symbol set, causing the instances already there to react to the volume of new instances as well. Hold the Alt key (Windows users) or the Option key (Mac users) while spraying to delete instances. To create an additional symbol set instead of adding to an existing one, lock the symbol set in the Layers palette or by choosing Object, Lock from the menu bar before spraying. Double-clicking the Symbol Sprayer opens the Symbolism Tools Options dialog (see Figure 18.22), where the following options are set:
Figure 18.22. The Symbol Sprayer tab of the Symbolism Tools Options dialog.
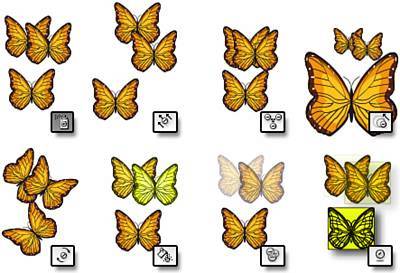
The other options on the Symbol Sprayer tab are relative to the settings of the various Symbolism tools (see the next section), which may be applied while spraying by changing any of the values in the pop-up menus to User Defined. By default, each is set to Average, which has the same effect as the Average setting of the Method pop-up menu at the top of the dialog. Symbolism ToolsIn addition to the Symbol Sprayer tool, which creates symbol instances in a symbol set, seven other Symbolism tools control various effects and transformations of the instances within sets by clicking with the tool and dragging across the set. The tools are (see Figure 18.23)
Figure 18.23. The Symbolism tools in action. The original symbol set is in the upper left.
If the symbol set contains instances from multiple symbols, the Symbolism tools affect only the symbol or symbols highlighted in the Symbols palette. This enables isolation of effects to specific symbols' instances. To affect other instances in the set, select their symbol(s) in the Symbols palette. Double-click any one of the Symbolism tools to change its options in the Symbolism Tools Options dialog. Pay particular attention to the Diameter setting because the Symbolism tools affect all instances beneath their nozzlethe effect is more profound at the centerwhich could lead to unexpected results. |

EAN: 2147483647
Pages: 426